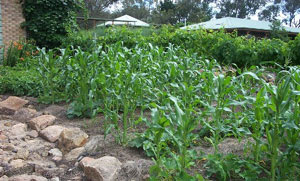
No Dig Veggie Gardens
On a recent trip to my local shopping centre (one of those monolithic structures so big it has its own postcode) I was shocked to discover that the fashions of the 80’s were back!
Despite the hefty price tag and 'designer' labels on many items, I still couldn’t comprehend it. I mean, the gear we wore in the eighties wasn’t that great then... I can’t imagine what has prompted its resurgence! Either I’ve been avoiding fashion for too long (and just about anyone who knows me would agree with that), or it is true what they say – fashion and trends do go in cycles.
This got me thinking about garden trends and design styles, and the recent flurry of interest I have had in the construction of no dig gardens. Daily, my inbox is full of requests for information on no dig gardens – what are they, how do they work, why are they so good, and, most importantly, how to construct them. And, just like that dreaded eighties fashion, no dig gardens have come back into vogue.
But, despite what many people may think, they are not a new concept. No dig gardens have in fact been documented since the 1800’s, but the 'pioneer' of the no-dig gardening concept is Masanobu Fukuoka of Japan, through his excellent 1953 book entitled The One-Straw Revolution. Mr Fukuoka, we salute you!
What is No Dig Gardening?
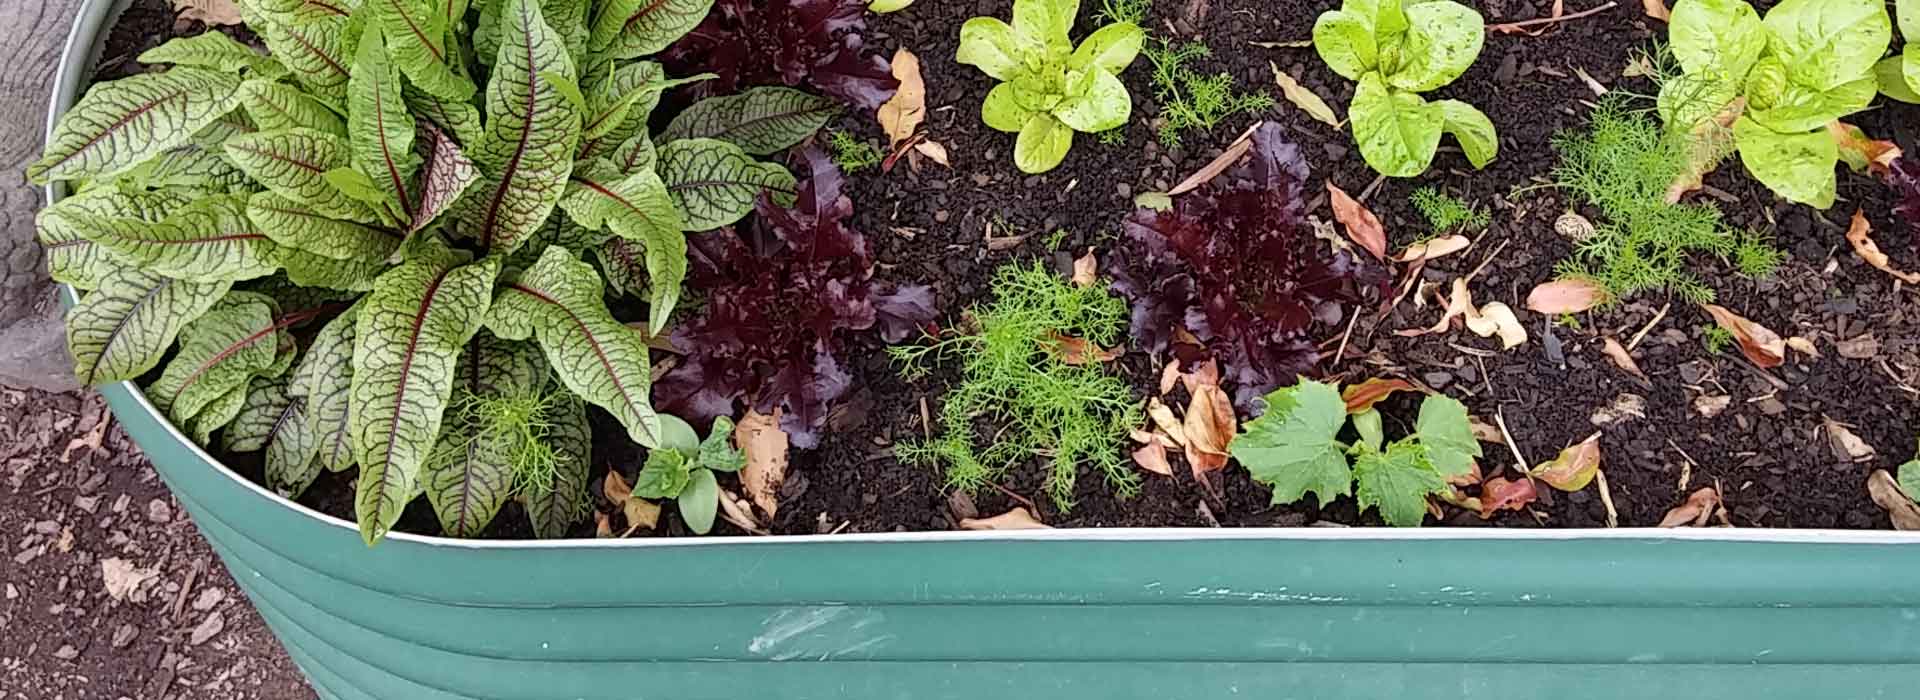
As the name suggests, no-dig gardening is all about going up, rather than down, essentially a patch 'above ground'. Although it can be known by a number of different names, no-dig gardens are definitely NOT no-work gardens! Yes, there may be less work in setting up a no-dig patch (as opposed to the traditional 'dig down' style of garden) but it’s important to remember that all gardens, particularly edible ones, require on-going maintenance, monitoring and work. Think above-ground pool vs. in-ground pool... they all need work to keep them looking good, but it is somewhat easier to install an above ground pool.
Why we love them
There are so many things to love about no-dig vegetable gardens, so let’s start from the ground up! No-dig veggie gardens are fantastic in Australia, as a great deal of our soil is nutrient deficient, hard to work and somewhat inhospitable to our favourite herbs and vegetables. As these raised beds do not require the soil beneath them to be dug over before installation, the risk of damage to the structure of the soil is minimised (especially important on clay soils).
Construction of these types of gardens has the two-fold advantage of both protecting and improving the existing soil. You see, as the organic matter we use to fill our no dig beds (more on this later) breaks down over time, the health of the soil beneath improves, as does the structure, nutrient content, microbial and worm activity (all excellent things if you are soil!).
Why else do we love them? For those of us who are somewhat less mobile (years of nursery work and landscaping do wreak havoc on your back), no-dig gardens are an excellent way of bringing the garden up to you, rather than you going to the garden! For anyone with a 'diggy, dirt-loving dog', no-dig means you can raise the height of the bed sufficiently to prevent your pooch getting silly in the soil. The same principle applies to those rascally rabbits, and many other ground dwelling, garden-squashing backyard beasties (that includes soccer balls and wayward children!).
No-dig vegetable patches can also be a bit of a movable feast, which is perfect for renters, or those of us who move house a lot! Instead of leaving your patch behind, many no-dig systems can simply be moved with you. But the reason I love no-dig patches so much is that their size and shape is limited only by your imagination!
How to build on an existing lawn or onto soil...
1. Choose a nice, sunny spot for your veggie bed. The less wind the better, as most of our incredible edibles are not big fans of 'blowin’ in the wind' (although they do like a bit of Bob Dylan).
2. Mark out and form walls of no-dig garden. The walls should be at least 30cm high, but may be a lot higher. You can use anything including old rocks or sleepers or bricks, blocks, pavers etc. The hot tip here is to make sure your edging is sustainable – check out our 'Hot Tips' section below.
3. Line the base with at least 6mm thickness of newspaper or cardboard (not waxed) to suppress weeds; and wet thoroughly. Make sure this overlaps, otherwise those wily weeds will work their way upward! If the soil below is heavy clay, dust the surface with gypsum prior to laying the newspaper. This will help improve the drainage of the in-situ soil by improving the structure.
4. The idea is to then stack alternating layers of fine and coarse compostable materials. Start with a 6cm layer of organic compost, then a 6cm layer of pea straw, then a layer of aged cow manure, and then another 6cm of pea straw. Repeat the layers finishing with a thick compost layer.
5. Planting can be done into the top compost layer. Dig a wee hole to fit the seedlings in and plant, watering in well. Yup, they will look a bit sad and sooky initially, but your little babies will establish really well into this strong, nutrient-packed base!
6. Mulch well around your seedlings with pea straw (remembering to keep the mulch away from the stem of the plants) to a depth of about 6cm.
7. Due to the high level of compostable, organic material, you will notice that the level of the growing media in your no-dig bed will drop considerably over time. The tip here is to top this up with fresh stuff as you change your plants over each season, keeping in mind the 'lasagna layering' outlined in point 4.
You can also build a no-dig garden in a large container, simply do the same as above, but omit step 2.
If you want to whack a no dig Garden on a sealed surface...
1. Mark out the size of the beds and construct the sides. If using bricks, sleepers or other rectangular shaped materials, make sure you leave some gaps for drainage. The walls should be at least 50cm high.
2. Place a 7 – 10cm layer of coarse screenings or scoria at the base for drainage.
3. Layer the materials as listed above.
4. Plant the bed.
5. Top up layers as they rot down.

Hot Tips For Your No Dig
When choosing sleepers, choose the most sustainable timber available. This will significantly increase the long term viability and sustainability of your Yummy Yard.
- Avoid rainforest timber (there is always a sustainable replacement) and instead use plantation grown timber.
- Choose radially sawn timber, as this technique produces more timber per log.
- If an option, consider recycled products. There are loads of places now selling recycled and reclaimed timber.
- Local products require less transport, and therefore they have less impact on greenhouse gas emissions and other negative environmental impacts.
- Please be aware that CCA (copper chrome arsenate) Treated timber (often marketed as Perma-Pine) is NOT recommended for garden bed construction, due to the arsenic content of the wood and possibility of copper and arsenic leaching into soil.
- CCA Treated timber has been shown, in a number of Australian and international studies, to present a risk to consumers through the leaching of heavy metal compounds through contact with water and humic acid (found in healthy soil).
- Since March 2006, CCA Treated timber is not permitted to be used in the construction of new garden furniture, picnic tables, exterior seating, children’s play equipment, patios, domestic decking and handrails. Although the construction of garden beds is not mentioned, SGA would recommend selecting an alternative product.
Christmas Beetles
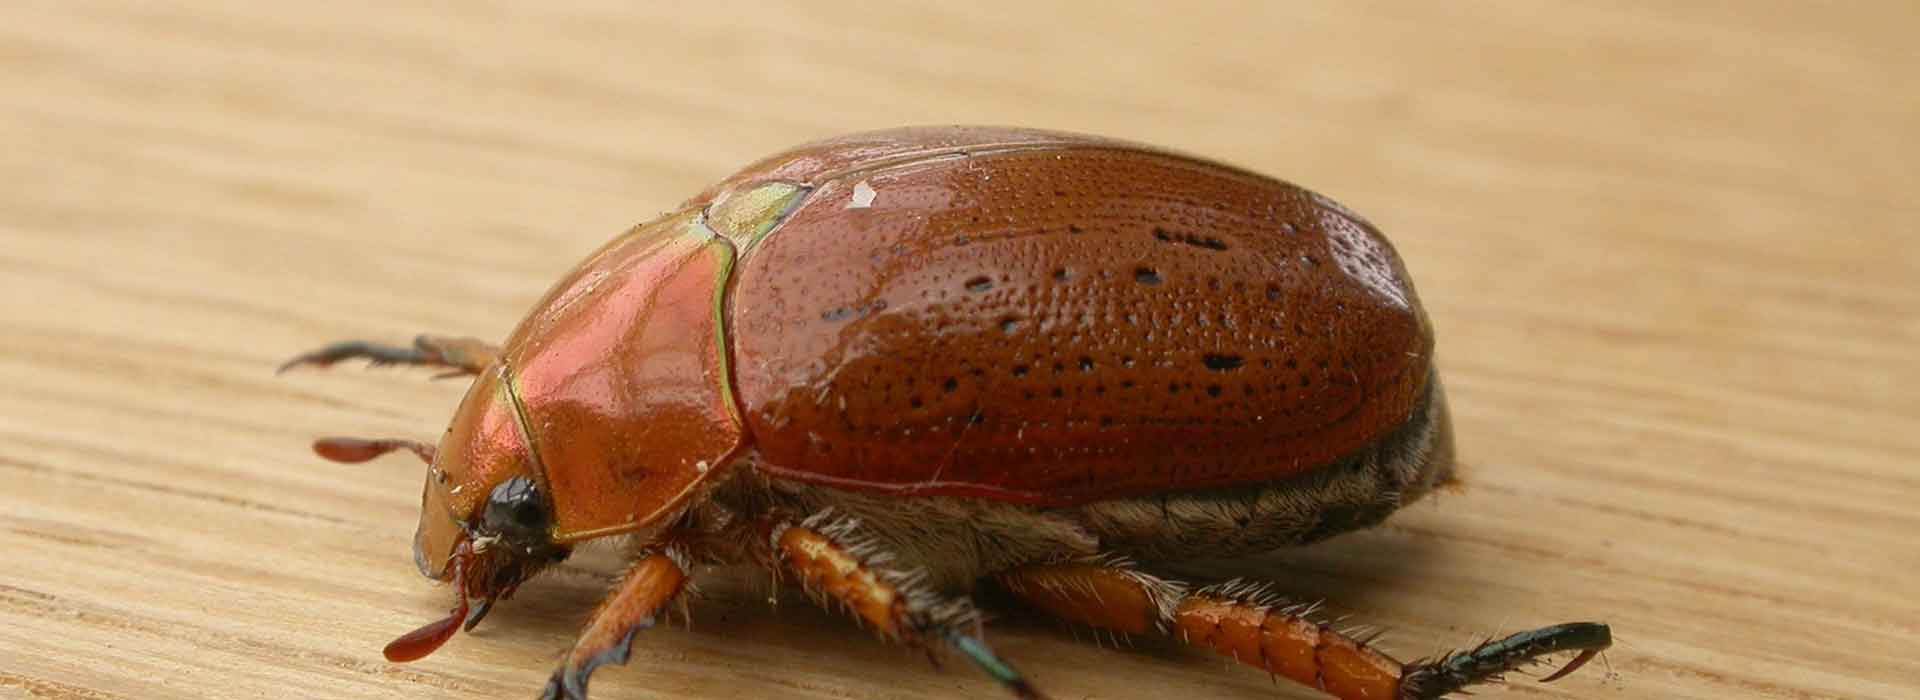
Most of us would be familiar with the brightly coloured, glossy and sometimes iridescent Christmas beetles. We often see them dazed and confused, crawling around on the ground or in the house in the morning after a big night out (they are attracted to bright lights!).
As their name suggests, the adult beetle is most active during the Christmas season and warmer months of December and January. Adult Christmas beetles aren't much of a pest in most home gardens, although they do feed on eucalypt leaves and can cause severe defoliation in large numbers.
Christmas beetles are about 20 millimetres in length and belong to the Scarab beetle Family (Scarabaeidae) in the Order Celeoptera. The image shown here is courtesy of CSIRO. Scarab beetles are the second largest family of beetles in Australia. (Weevils are the largest Family). There are around 35 species of Christmas beetle with the most common being Anoplognathus chloropyrus and Anoplognathus montanus. They are occur across most of Australia, except for deserts, with the highest density in eastern regions.
However, from around 2013, a decline in numbers has been noticed with a citizen science project being launched ini November 2022 by scientists at the University of Sydney to report on sightings. Since their natural habitat is grassy plains and woodland, increased clearing of forests and urban expansion may be involved in their disappearance.
Life Cycle
The life cycle of a Christmas beetle is from one to two years. The larvae of Christmas beetles, often called curl grubs, live and develop in the soil for about a year, eating decaying organic matter and plant roots of mainly native grasses and other vegetation. In agricultural land larvae can feed on the roots of crops and pasture. In urban areas larvae often feed on the roots of turf. This feeding can cause plants to turn yellow and wither.
Toward the end of winter the larvae move closer to the soil surface and pupate. The adults emerge several weeks later and dig their way out of the soil. They then fly to the nearest food plant to feed. And of course their other main duty at this stage is to mate. They then lay eggs in the soil close to their food source.
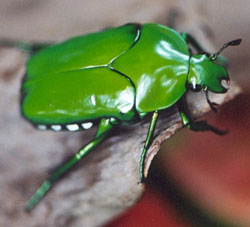
There are many other Anoplognathus species, in fact there are 35 species of Christmas beetle across Australia, and many are brightly coloured, such as the bright green tropical Christmas beetle shown here (courtesy of www.wildwatch.com.au). Eight species alone occur in Sydney. All are attracted to bright lights at night.
Are They a Pest?
Thought a pest in early days, control is seldom needed now with the decline in numbers.
Geoff Monteith, curator of the insect collection at the Queensland Museum said that Christmas beetles have a bad reputation for causing dieback of trees, which they don't entirely deserve.
In the home garden, Christmas beetles are seldom a problem. In fact, they are usually controlled naturally by native animals such as possums, currawongs, magpies and predatory wasps.
Christmas beetles are an ideal insect to introduce to children as they are quite placid (especially after a big night out).
References
www.abc.net.au
D. Jones & R. Elliot, Pests Diseases and Ailments of Australian Plants, Lothian Publishing.
Australian Geographic 2016. November 16, Where have all the Christmas beetles gone?

Sweet Corn
Is there anything sweeter than home grown corn? Corn on the cob, done on the barbie is a stunner, and adds some real height and interest to your Yummy Yard. Kids love corn, and I have seen some really creative gardeners make a "Maize Maze" and "Corn Corners" in their backyards, adding some magic kids spots to the patch.
Shop bought corn often leaves a lot to be desired. Corny jokes aside, growing your own sweet corn and saving the seed is a super sustainable species saver. So lets plant corn (Jack)!
Planting Schedule
Warm Areas: September - October, but in tropical areas almost any time except December
Temperate Areas: September - October, although you may still succeed up to January
Cool to Cold Areas: End of October - November
Position, Position, Position!
Now, it really is all about position, position, position with these sweeties! They need full sun, no exceptions, and must have protection from strong winds (no-one likes a floppy corn!). Sweet corn are a friendly mob, and will do best when planted in a block style formation. This encourages better cross-pollination, which means more corn for you! The more corn you can fit in the better, and remember to allow about 40 - 50cm between plants.
Don't fret about losing all your space, sweet corn are quite happy to be under planted once they grow up a bit. Try climbing beans or cucumbers... they are excellent companions, suppress weeds and you will seriously increase your productivity in your Yummy Yard.
Talking Dirty
The first thing that needs to be done when thinking about planting sweet corn is soil improvement! Loads of organic matter (you know, the good stuff like compost and aged manure), or try planting sweet corn after a green manure crop. Sweet corn will tolerate most deep, lush soils, but they hate clay! Oh, and, as with all Yummy Yards, mulch well with pea straw or similar after planting.
Feed Me!
Feeding sweet corn that has been planted into good, rich soil is not a huge issue. A wee drink of manure tea after establishment, and then an additional wee drink when you see the flowers should do the trick!
Sweet corn is dead easy to look after, but there are a couple of things you can do to ramp up productivity. One of my tried and trues with sweet corn is to pile up compost around the base of the stem. Called "hilling", making mounds of compost about 15 - 20cm high will increase the amount and flavour of your sweet corn, and will keep the big buggers upright!
What about the Water?
Sweet corn, like me on the weekends, loves a good drink, and this can be an issue where water is scarce (like the whole of our wide brown land!!!). High amounts of organic matter and mulch in the patch will reduce the need for the precious wet stuff, but the key is not to let them dry out. Why not dedicate Monday, Wednesday and Fridays shower warm up water to the corn (only when required of course)? They'll thank you for it, and you'll get super buff carrying that bucket. As always, greywater is a no go!
Are We There Yet?
I get asked all the time by folks that grow corn, how they can tell when it's ready. Two to three weeks after flowering, sweet corn is generally ready to be harvested. You'll know when it's flowering because the bloke flowers look like wheat. Sweet corn is good to go when the little tassely bits at the top of the cob are brown and shriveled, the husks are no longer glossy and the corn kernels ooze a milky sap when you jab it with your fingernail. Oh, and you have a pretty small window of time in which to harvest corn, so when you reckon they are good to go, get harvesting and then get eating!
Pests and the Rest
Corn does have a couple of pests, dependent on where you live. Bushrats have always been my personal bugbear, but nothing a bit of vine netting didn't put an end to. The biggest issue with sweet corn is the aptly named "earworm", who, not surprisingly, nests in the ears of corn. A nice diverse patch, healthy soil and good watering regime should prevent attack, especially if you whack some carrots and daisy type plants into your patch. Bad infestations could be dealt with using derris dust or Bacillus thuringiensis (despite the scary name, this is a readily available low environmental impact worm destroyer!), but I reckon removing the worms and feeding them to the chooks is a top idea!
Hot Tip
Corn, once harvested, goes downhill pretty quickly and rapidly losses flavour. The best way to enjoy sweet corn is really fresh. But, if required, blanching corn and then freezing it is a top thing to do. My other hot tip - don't put salt in the cooking water (yes Mum, I'm talking to you!). It converts the sweet corn sugars (yum) into starch (not so yum), so wait 'til you're about to eat it to salt it!
Eat Me
Sweet Corn loves to be baked in the oven or barbequed. Keep them in their husky tuxedos or wrap them in foil.
Try smothering them in these flavoured butters before and after cooking:
Coriander Pesto ( see the Coriander page)
Soy and Shallot ( 100g butter, 1 tsp soy sauce, 1 finely sliced shallot)
Chili and Ginger ( 100g butter, 1 chili, 2cm knob of ginger, 1 tsp ground coriander)
Lemon and garlic ( 100g butter, 1 tbsp lemon juice, handful parsley, 1 garlic clove)
Why not bake or BBQ a cob of corn, slice off the kernels and add it a salad with cous cous, quinoa or rice?
March In Your Patch
March is the month named after Mars, the Roman God of War. So March in your patch is an excellent time to wage war on it. Be it ripping out the weeds, mulching up a storm, or popping in a plethora of plants, March is the ultimate time to launch a full scale (but well planned) attack on you patch! So, all you weekend warriors … March into action!
Warm Areas
Frost free or occasional light frosts (North from about Coffs Harbour and all the way across to the west to Geraldton)
- Okay, it’s still pretty warm out there, but you could certainly consider popping in the following incredible edibles, especially towards the tail end of the month. Consider cabbage, Asian greens, rocket, silverbeet,
 cauliflower, beans, peas, spring onions, leeks, radish or cucumber.
 - Whack some lettuce in but consider popping them under a shade cloth tent if the days are still quite warm.
- Hop into the herb patch with coriander (try a slow bolting variety if it’s still very warm), sweet basil, lemon grass and oregano.
- Feeling fruity? Go Carmen Miranda with some strawberries, watermelon, citrus, rockmelon, pineapple and passionfruit!
- Plants feel the need for a feed at this time of year. A seaweed tea, or any low environmental impact liquid fertiliser, is perfect for giving them a kick start as they establish. Apply to the soil early in the morning and in the concentrations mentioned on the packet.
- ‘Ave a go with an avocado!
- Begin to prepare your potato beds now….you’ll be glad you did come April!
- Pretty up the patch with these flowering fancies- marigolds, sunflowers and pansies, cornflowers, violas, snapdragons, stock, verbena and lavender (non-invasive varieties of course!). Popping these in around your veggies will give some colour and interest to the patch, and act as beneficial insect attractors!
- Consider a green manure crop to add some life and love to an overworked patch. At this time of year, try millet, oats, lupins or field peas. This will improve your soil incredibly, and, as a bit of forward planning, you’ll find it well worth the effort!
- Water smarter at this time of year. Water first thing in the morning, and instead of quickie irrigation, a nice, deep drink a couple of times a week is far more beneficial!
- Top up mulch on your veggie patches, herb gardens and ornamental beds, especially important for weed suppression at this time of year. A hot tip is to mulch after watering the patch, to a depth of about 7cm. Keep mulch clear of plant stems….especially young seedlings. Choose a sustainable, low environmental impact mulch, one that will enrich your soil as it breaks down.
- Weeding is an important job to do at this time of year. Cut down the competition between your tasty treats and these space invaders, and tidy up your patch. It may sound tedious, but it’s incredibly rewarding!
Cool to Cold Areas
Low temperatures for extended periods of time (all of Tasmania, most of Victoria, the southern highlands of NSW, the ACT and a tiny southern bit of SA)
- Yup… it’s a touch warm, but there is still a whole heap of things you can pop in the patch at this time of year. Tasty herbs in the ‘burbs that are ready to roll include coriander and basil. You could give mint and lemon balm a go as well, but be careful to contain them, otherwise they can take over!
- Whack these tasty wonders into your Yummy Yard this month: Chinese cabbage, spinach, tatsoi, rocket, silverbeet, broccoli, leeks and lettuces!
- Add some colour and movement to the patch, and pop in some of these little pretties- dianthus, cornflower, pansy, viola, echinacea, stock, verbena and lupins. Having these around your veggies will give some interest to the patch, and act as beneficial insect attractors!
- Top up mulch on your veggie patches, herb gardens and ornamental beds, especially important for weed suppression at this time of year. A hot tip is to mulch after watering the patch, to a depth of about 7cm. Keep mulch clear of plant stems… especially young seedlings. Choose a low environmental impact mulch, one that will enrich your soil as it breaks down.
- Green manure crops, including oats, wheat, faba beans and field peas are good to go now… improve that dormant veggie patch, and get ready for next seasons heavy feeding plants!
- Plants feel the need for a feed at this time of year. A seaweed tea, or any low environmental impact liquid fertiliser, is perfect for the seedlings you’ve just popped in. Apply to the soil early in the morning, and in the concentrations mentioned on the packet.
- Weeding is an awesome job to do at this time of year. Cut down the competition between your tasty treats and these space invaders, and tidy up your patch. It may sound tedious, but it’s incredibly rewarding!
- Water smarter at this time of year. Water first thing in the morning, and instead of quickie irrigation, a nice, deep drink a couple of times a week is far more beneficial!
Temperate Zones
Occasional winter frosts (pretty much the rest of Australia, most of the inland, some areas of Victoria, most of SA and the southern area of WA)
- It is still a little warm in this part of the world, but there are a heap of things you could pop in to the patch this March. Why not try cabbage, Asian greens, lettuce, rocket, tatsoi, silverbeet, spring onions, spinach, carrots,
- It’s time to get happy with herbs, so try some parsley, basil, coriander (try a slow bolting variety if it’s still pretty warm), rosemary, marjoram and thyme. You could give mint and lemon balm a go as well, but be careful to contain them as they can take over!
- Why not try some lovely flowering stuff in your patch as well, like: cornflower, calendula, dianthus, pansies, viola, snapdragons, stock, nasturtium, verbena and marigolds. These guys are great at attracting pollinators and beneficial insects to your patch, and I reckon they look tops as well.
- Consider a green manure crop to add some life and love to an overworked patch. At this time of year try faba bean, field pea, oats and wheat. This will improve your soil incredibly, and, for a bit of forward planning, you’ll find it well worth the effort!
- Top up mulch on your veggie patches, herb gardens and ornamental beds, especially important for weed suppression at this time of year. A hot tip is to mulch after watering the patch, to a depth of about 7cm. Keep mulch clear of plant stems….especially young seedlings. Choose a low environmental impact mulch, one that will enrich your soil as it breaks down.
- Plants feel the need for a feed at this time of year. A seaweed tea or low environmental impact liquid fertiliser is perfect, especially for the seedlings shoved in this month. Apply to the soil early in the morning, and in the concentrations mentioned on the packet.
- Weeding is an awesome job to do at this time of year. Cut down the competition between your tasty treats and these space invaders, and tidy up your patch. It may sound tedious, but it’s incredibly rewarding!
- Water smarter at this time of year. Water first thing in the morning, and instead of quickie irrigation, a nice, deep drink a couple of times a week is far more beneficial!
- Of course, this is just a rough guide, and many of you will find your situation varies from the above listing, due to microclimates created in your garden, location in relation to your nearest major city, extremes of weather (Mother Nature does like to keep us on our toes) and garden type.
But the one thing that remains the same for all zones and regions is this: start out the year as you mean to go on, and give your patch some much needed love! So, grab a cool beverage, slip, slop slap, and spend some time under your favourite tree, admiring your patch!
Information sources:
Bagnall, Lyn, Easy organic gardening and moon planting, published by Scribe Publications, VIC.
McFarlane, Annette, Organic Vegetable Gardening, published by ABC Books, Sydney, NSW.

June in Your Patch
Ok, it’s official, winter is upon us. And while it may seem easier to curl up on the couch with a cup of tea and a good book, it is the perfect time to get amongst it in the patch! There is a sense of hibernation for a lot of us but wherever you are in this nation it’s time to don the boots and get to it.
Warm Areas
Frost free or occasional light frosts (North from about Coffs Harbour and all the way across to the west to Geraldton)
-
Time to plant some winter crops – think about some leeks, rocket, beetroot, celery, lettuce (oak leaf), broccoli, cabbage, carrots, cauliflower, onions, kale, kohl rabi, spinach and silverbeet.
-
Pop in some coriander and chamomile… perfect for warming winter curries and cups of tea!
-
Stick in some spuds, home grown is easy, and incredibly rewarding. Don’t forget about sweet potatoes, they are great fun to grow as well!
-
There are a load of fruity favourites ready to go in, including kiwifruits and figs! Remember that kiwi fruits need to cross pollinate, so ensure you pick up one of each sex so that they can cross pollinate.
-
Nuts such as pistachio or pecan can also be planted. Beautiful trees in their own right, these nuts are number one in the garden!
-
A seaweed tea, or any low environmental impact liquid fertiliser is perfect for giving plants a kick start as they establish. Apply to the soil early in the morning and in the concentrations mentioned on the packet. Don’t forget to give the fruit trees a bit of a feed as well (particularly paw paw).
-
Much needed at this time of year is colour. Marigolds, lupins, pansies, violas, phlox, verbena and lavender (non-invasive varieties of course!). Popping these in around your veggies will give some colour and interest to the patch, and act as beneficial insect attractors!
-
Consider a green manure crop to add some life and love to an overworked patch. At this time of year, try millet, oats, lupins or field peas. This will improve your soil incredibly, and, as a bit of forward planning, you’ll find it well worth the effort!
-
Water smarter at this time of year. Water first thing in the morning, and instead of quickie irrigation, a nice, deep drink a couple of times a week is far more beneficial! Always check soil moisture before watering at this time of year….don’t waste your precious drinking water if Mother Nature has already done all the hard work for you!
-
Top up mulch on your veggie patches, herb gardens and ornamental beds, especially important for weed suppression at this time of year. A hot tip is to mulch after watering, to a depth of about 7cm. Keep mulch clear of plant stems, especially young seedlings. Choose sustainable, low environmental impact mulch, one that will enrich your soil as it breaks down. Also look for one that has done the lest amount of travel to get to you.
- Weeding is still needed at this time of year. Most plant growth has slowed down though so it will not have to happen as often. But it also means that it is also a time of year to try and remove as many competitors as possible before the weather starts warming up again.
Cool to Cold Areas
Low temperatures for extended periods of time (all of Tasmania, most of Victoria, the southern highlands of NSW, the ACT and a tiny southern bit of SA)
-
You should start seeing bare rooted fruit and deciduous trees starting to appear in your local nursery. This is the cheapest and easiest way to purchase. The stress is less for the tree as it is dormant. Pick trees with a nice shape, and don’t forget to prune them back before you plant them out (best thing to do is ask the local nursery to do it for you). Remember to make sure you have the correct pollinators to ensure a good crop. Some stone fruit trees will not fruit until they have been in the ground for a few years. So be patient.
-
 Give Brassica’s a place in your patch, pop in the following: broccoli, cabbage, cauliflower and Brussels sprouts. Plant some sage with these guys as a great, caterpillar and moth-repelling companion!
 -
For plants that will settle in over winter, so that when spring comes along, they will go gang busters are: peas, beans, radish, Swedes, turnips and spinach. Oh, and some spring onions would go a treat this month as well.
-
Set aside a bit of space and pop in an artichoke! These are gorgeous additions to the patch, look amazing, and taste pretty good too!
-
Plant some rhubarb crowns. Set aside some space in the patch.
-
Add some colour and movement to the patch, and pop in some of these little pretties- dianthus, cornflower, pansy, viola, verbena and lupins. Having these around your veggies will give some interest to the patch, and act as beneficial insect attractors!
-
Top up mulch on your veggie patches, herb gardens and ornamental beds, especially important for weed suppression at this time of year. A hot tip is to mulch after watering the patch, to a depth of about 7cm. Keep mulch clear of plant stems, especially young seedlings. Choose low environmental impact mulch, one that will enrich your soil as it breaks down. Also look for one that has done the lest amount of travel to get to you.
-
Green manure crops, including oats, wheat, faba beans and field peas are good to go now. Improve that nutrient deficient veggie patch, and get ready for next seasons heavy feeding plants!
-
A seaweed tea, or any low environmental impact liquid fertiliser are perfect for the seedlings you’ve just popped in. Apply to the soil early in the morning, and in the concentrations mentioned on the packet.
-
Weeding is still needed at this time of year. Most plant growth has slowed down, so it will not have to happen as often. But it also means that it is also a time of year to try and remove as many competitors as possible before the weather starts warming up again.
-
Water smarter at this time of year. Water first thing in the morning, and instead of quickie irrigation, a nice, deep drink a couple of times a week is far more beneficial! Always check soil moisture before watering, don’t waste your precious drinking water if Mother Nature has already done all the hard work for you!
- Cold days mean a bit of shed time… why not build yourself a nice blackboard for the shed, to keep track of what has been planted in your patch where and when? This makes crop rotation a load easier, and allows you to keep track of feeding times and dates, what worked, what didn’t and what’s happening in the veggie garden.
Temperate Zones
Occasional winter frosts (pretty much the rest of Australia, most of the inland, some areas of Victoria, most of SA and the southern area of WA)
-
 Great time to plant in the temperate zones, so pop in some Brussels sprouts, cabbage, cauliflower and broccoli. Peas and beans can also go in, as well as radish, turnips, Swedes and spinach.
 -
It’s time to get happy with herbs, so try some chamomile and lemon grass. You could give mint and lemon balm a go as well, but be careful to contain them as they can take over.
-
Why not try some lovely flowering stuff in your patch as well, like: cornflower, calendula, dianthus, pansies, viola, snapdragons, stock, ageratum and marigolds. These guys are great at attracting pollinators and beneficial insects to your patch, and I reckon they look tops as well.
-
You should start seeing bare rooted fruit and deciduous trees starting to appear in your local nursery. This is the cheapest and easiest way to purchase. The stress is less for the tree as it is dormant. Pick trees with a nice shape, and don’t forget to prune them back before you plant them out (best thing to do is ask the local nursery to do it for you). Remember to make sure you have the correct pollinators to ensure a good crop. Some stone fruit trees will not fruit until they have been in the ground for a few years. So be patient.
-
Consider a green manure crop to add some nutrients back into your patch, especially before planting heavy feeders in spring. At this time of year try faba bean, field pea, oats and wheat. This will improve your soil incredibly, and, for a bit of forward planning, you’ll find it well worth the effort!
-
Top up mulch on your veggie patches, herb gardens and ornamental beds, especially important for weed suppression at this time of year. A hot tip is to mulch after watering the patch, to a depth of about 7cm. Keep mulch clear of plant stems, especially young seedlings. Choose low environmental impact mulch, one that will enrich your soil as it breaks down.
-
Plants feel the need for a feed at this time of year. A seaweed tea or low environmental impact liquid fertiliser is perfect, especially for the seedlings planted this month. Apply to the soil early in the morning, and in the concentrations mentioned on the packet.
-
Weeding is still needed at this time of year. Most plant growth has slowed down, so it will not have to happen as often. But it also means that it is also a time of year to try and remove as many competitors as possible before the weather starts warming up again.
- Water smarter at this time of year. Water first thing in the morning, and instead of quickie irrigation, a nice, deep drink a couple of times a week is far more beneficial! Always check soil moisture before watering, don’t waste your precious drinking water if Mother Nature has already done all the hard work for you!
Of course, this is just a rough guide, and many of you will find your situation varies from the above listing, due to microclimates created in your garden, location in relation to your nearest major city, extremes of weather (Mother Nature does like to keep us on our toes) and garden type.
Information sources:
Bagnall, Lyn, Easy organic gardening and moon planting, published by Scribe Publications, VIC.
McFarlane, Annette, Organic Vegetable Gardening, published by ABC Books, Sydney, NSW.

September In Your Patch
September is fantastic for gardeners! So much to plant in most regions of the country. In southern parts, the chill is almost gone from the mornings, and the afternoons are getting longer. Blossoms are bursting and you can smell spring in the air wherever you go. If you have been hibernating through winter now is the time to get out and into it. Read on for some fabulous September gardening advice for your area.
Improve Your Soil
Prepare your Yummy Yard for spring planting by improving your soil. Lightly dig over the soil popping in plenty of organic matter including top-notch compost and well rotted manure. Don't forget to mulch the beds with a straw mulch. This bed will be awesome come planting time... and you will have the greatest Yummy Yard in the street!
Try some colour
Why not try some lovely colour in your patch as well like nasturtium, snapdragons, phlox, petunias, marigolds (French) and celosia. They are great at attracting pollinators and beneficial insects to your patch, and they look fantastic as well. Now is the time to plant some sunflower seeds. Find a sunny spot where you would like to see some happy sunflowers later in the year and plant the seeds to double the depth of the seed. Cover lightly with dirt and wait... they'll be popping their heads up in no time!
Citrus Gall Wasp
Check your citrus trees for gall wasp and remove affected sections by pruning well below the gall. Don't compost this or put it in the green waste bin. It's a good idea to cut through the gall to expose the larvae to air - which they hate - before putting it in a bag and popping in the rubbish bin. Or you could soak the galls in water for a week or two - or burn them (if your local Council permits).
Other things you can do are to hang sticky yellow traps on the tree in mid-August as they attract and trap the emerging adults, but make sure you take the traps down by November as they also kill beneficial insects.
Do not use a fertiliser that is high in nitrogen, as this promotes soft growth which provides ideal conditions for the wasp. Use a balanced fertiliser or compost.
A biological form of control - introducing wasps that prey on citrus gall wasp - is used in orchards and home gardens. Megastigmus brevivalvus and Megastigmus trisulcus are natural enemies of citrus gall wasp. They lay their eggs inside the eggs of the citrus gall wasp and when their eggs hatch they destroy the host.
Megastigus brevivalvus is sold to home gardeners in some states, but it is only available for a two-week window around October/November. If you are able to get some of the parasitic wasps, they must be released soon after the citrus gall wasps have emerged.
This is your absolute last chance to do something about gall wasp before they hatch out and take over the world, so don't put action off!
Mulch Now!
Top up mulch on your veggie patches, herb gardens and ornamental beds. Choose a sustainable, low environmental impact mulch, one that will enrich your soil as it breaks down.
Look after your tools
On really cold days, why not head out to the shed and sharpen, clean, oil and maintain your garden tools. Sounds tedious, but it's really rewarding, and will save you cash and plant illness in the long run.
Indoor Plants
Now is a great time to re-pot your Indoor Plants. Give them a bit of a feed with a seaweed tonic afterwards to keep them happy.
Below you will find more information that is specific to different regions and climates in Australia.
Warm Areas
Frost free or occasional light frosts (North from about Coffs Harbour and all the way across to the west to Geraldton)
- Spring into it! There is so much ready to go, so why not plant some rocket, silverbeet, spring onions, Chinese cabbage, mizuna, lettuce, tatsoi, zucchini, pumpkin, leeks, capsicum, cucumber, eggplant, tomatoes and watermelon.
- In the herb patch, pop in some parsley, sweet basil, chamomile, dill, coriander, marjoram, oregano, catnip and thyme. Also try mint, but keep it in a pot, as it has a tendency to take over.
- Feeling fruity? It's time to plant passionfruit, paw paw, avocados, banana, citrus and macadamias. If your tastes are a little more exotic, try putting in a guava... they're tough plants and the fruit is sensational!
- Consider a green manure crop to add some life and love to an overworked patch. At this time of year, try millet, lablab, amaranth or mung bean. This will improve your soil incredibly and you'll find it well worth the effort! Green manure crops like faba beans, barley, lupin, wheat or field peas are also good to go now.

Cool to Cold Areas
Low temperatures for extended periods of time (all of Tasmania, most of Victoria, the southern highlands of NSW, the ACT and a tiny southern bit of SA)
- There's a bit happening in the veggie patch so you could try leeks, onions, parsley, parsnips, cauliflower, peas, radish, silverbeet, lettuce, swedes and turnips. Don't you just love the start of spring?
- Don't get over excited... it's too early for tomatoes just yet!
- In the herb patch pop in some chamomile, dill, coriander, echinacea, catnip and thyme. Also try lemon balm but keep it in a pot, as it has a tendency to take over! Plant these after the frost risk has passed.
- Green manure crops like faba beans, barley, lupin, wheat or field peas are good to go now... improve that dormant veggie patch!
Temperate Zones
Occasional winter frosts (pretty much the rest of Australia, most of the inland, some areas of Victoria, most of SA and the southern area of WA)
- Leap into springtime gardening, especially in your veggie patch! Try celery, silverbeet, lettuces, leeks, spring onions, climbing beans, cucumber, sweet corn, tomato, carrot, Jeruslaum artichokes and radishes. Wait until the frosts have finished.
- Get into herbs in the 'burbs with parsley, chives, catnip, sage, oregano, rosemary, thyme and marjoram.
- Feeling fruity? It's time to plant blueberries, passionfruit, paw paw, avocados, banana, citrus trees, olives (non-weedy varieties). If your tastes are a little more exotic, try putting in a guava... they're tough plants and the fruit is sensational!
- Green manure crops like chick pea and barley are good to go now... improve that dormant veggie patch!
Of course, this is just a rough guide, and many of you will find your situation varies from the above due to microclimates created in your garden, location in relation to your nearest major city, extremes of weather and garden type.
Happy springtime gardening, see you next month!
Information source:
Bagnall, Lyn, Easy organic gardening and moon planting, published by Scribe Publications, VIC.
Photos:
Peach Blossom - Tracey Martin
Garde in Girl - Elaine Shallue
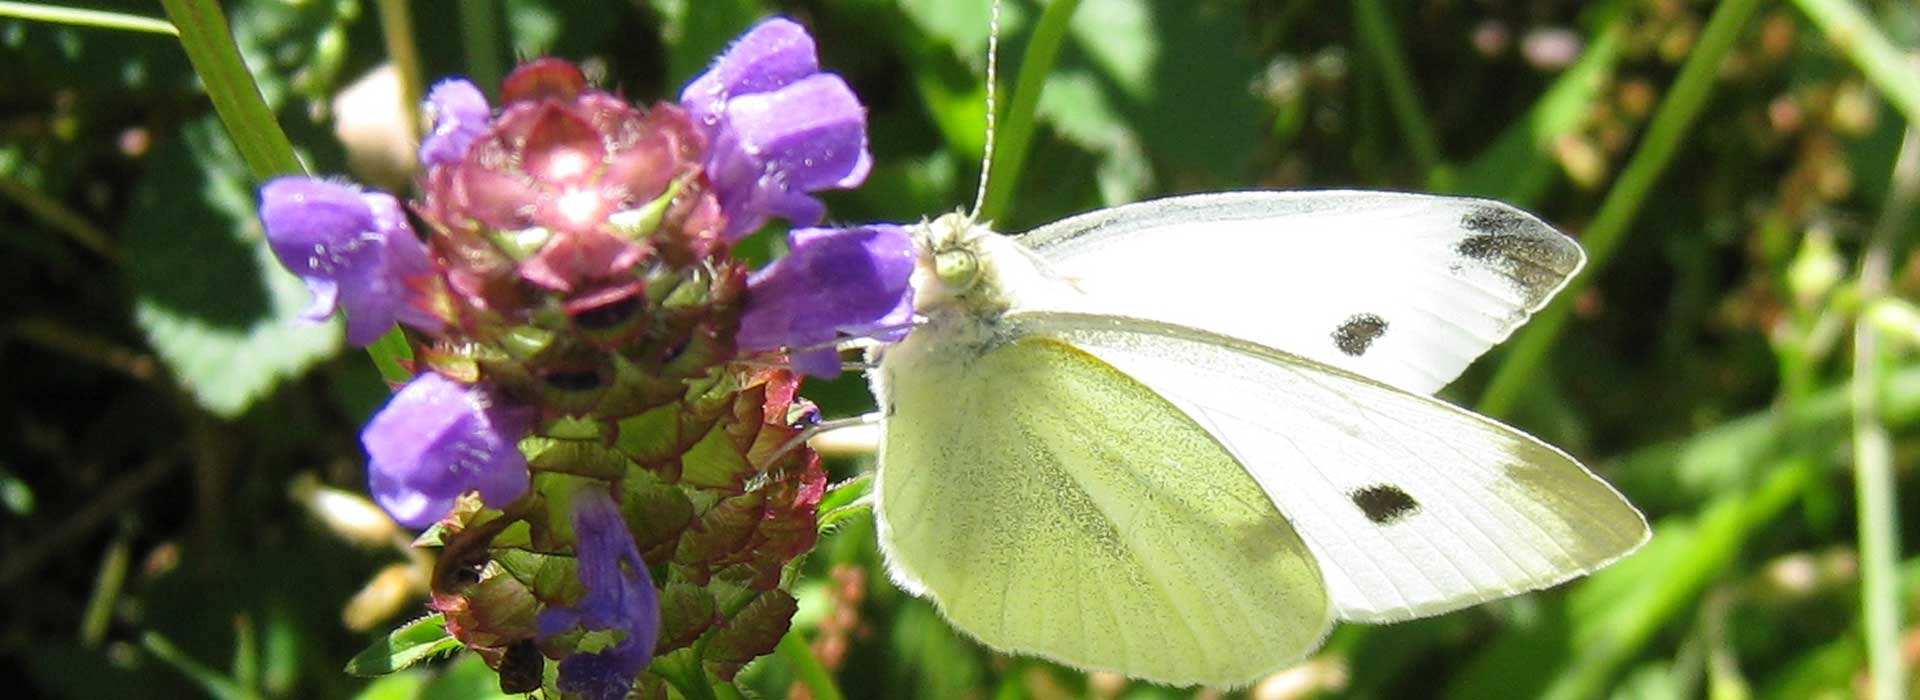
Cabbage White Butterfly
Hi, my name is: Cabbage White Butterfly, lovely to meet you...
Describe yourself: I am quite a striking white butterfly, Pieris rapae, with two lovely grey/black spots on my wings. Don't confuse me with Pieris brassicae which is a little smaller and has a slightly different black pattern on its wings or with other unrelated moths with similar appearance. I'm probably the most common butterfly in your home garden. In my youthful (but destructive) days, I am a silky, blue-green colour... very attractive, if I say so myself!
Hobbies: I love laying eggs all over your plants and watching my beautiful larvae destroy your garden!
Likes: Cabbages, broccoli, brussels sprouts, chinese cabbages, cauliflower, celery, beetroot, rocket and watercress.
Dislikes: Really smelly herbs, like dill, sage and coriander. I can't stand other Cabbage White Butterflies on my turf! My larvae hate birds, being handpicked off plants, Assassin Bugs, Green Mantids, Paper Wasps, Lacewings and Ladybirds. I hate insecticidal soaps (like home made chilli soap), or store bought stuff. I can't stand Bacillius thuringiensis bacteria (Dipel) ... this stuff makes me sick!
You'll know you've met me when: My larvae munch through the leaves of your favourite cabbage (and related) plants. They leave massive holes in the outer leaves, and heaps of delightful green poo around the place!
If you want to dump me, you could try to:
- Spray your plants' leaves with water and knock me and my mates right off our perch!
- Pay your neighbours' kids to come round and wipe me off with a stick!
- Collect me in a bucket and feed me to the chooks!
- Encourage or release some of my well known enemies like Assassin Bugs, Lady Birds and Lacewings.
- Release some Bacillius thuringiensis bacteria to kill me and all members of my family. (It hurts no others!) You can buy this pre-packaged in your local nursery
- Cover your edible crops with fine mesh or similar. Then my beautiful mum can't land and lay her eggs.
- Scatter eggshells around the garden... I get confused and lay my eggs on them!
- Cut up some old with plastic bags, and tie small "bow ties" to the top of thin bamboo stakes. A few of these around the garden look just like Cabbage White Butterflies, and will scare us off!
- Plant smelly herbs to confuse me such as sage, dill and coriander.
- Plant land cress Barbarea verna (it has a lot of common names like "early yellow rocket" 1 and sometimes confused with Barbarea vulgaris) somewhere else in the garden. This plant attracts the butterflies to lay their eggs. When the caterpillars hatch, they can die from being parasitised by some insects, particularly a wasp, Cotesia rubecola which was introduced into Australia in 1960 and New Zealand in 1993 to control cabbage whites 2,3. Or when you see caterpillars on the plants you could pull them out, bag and bin them.
References
- https://en.wikipedia.org/wiki/Barbarea_verna
- Cameron PJ. Walker GP. Field Evaluation of Cotesia rubecula (Hymenoptera: Braconidae), an Introduced Parasitoid of Pieris rapae (Lepidoptera: Pieridae) in New Zealand. 2002. Environmental Entomology, Volume 31 (2): 367–374, https://doi.org/10.1603/0046-225X-31.2.367
- Dempster, JP. 1967. The Control of Pieris rapae with DDT. I. The Natural Mortality of the Young Stages of Pieris. Journal of Applied Ecology 4 (2): 485–500. doi:2307/2401350
Banner image: By John Tann from Sydney, Australia - Cabbage white butterfly, CC BY 2.0, https://commons.wikimedia.org/w/index.php?curid=38233633

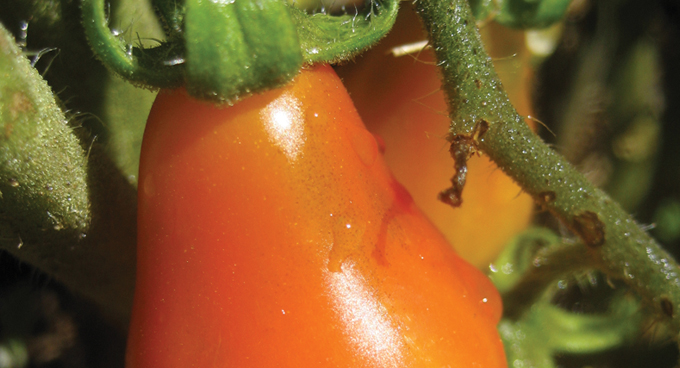
Tomatoes
Is there anything more satisfying than growing, harvesting and tucking into a home grown tomato (Lycopersicon esculentum)? For those of you who reckon there are 100 things MORE satisfying, I reckon you shouldn't knock it until you've tried it. Tomatoes are immensely enjoyable to grow and eat, and are a dead-set must have in every Yummy Yard. So, get reddy to plant some saucy little tomatoes!
Planting Schedule
Warm: All year (in frost free zones)
Temperate: August - November
Cool: September - November
Position, Position, Position!
If you're looking for a top spot for these big, red beauties, the more sun the better. In really hot spots (G'day to all my mates in sunny Queensland) I would recommend making a wee "tomato tent" from shadecloth offcuts. This stops tomatoes getting sunburnt. A bit like "slip, slop, slap" for fruit!
Everywhere else in Australia, full sun is the go! Try for about seven hours of sun a day, for loads of fruit and healthy foliage.
When you whack in your babies, plant them deep into the soil, right up to the lowest proper leaves, as these guys will root from the stalk. This will make the plant tough, buff and ready to grow!
Talking Dirty
Unlike some other Yummy Yard favourites, (I'm looking at you sweet corn and pumpkin), tomatoes can be grown in a good-sized pot as well as a garden bed. In fact, there are some tasty little hybrids bred especially for pots and even hanging baskets!
Tomatoes love compost, and a bit of pelletised chook poo won't do them any harm either. The best way to ensure top toms is to prepare the bed at least one month before planting time. Whack in some top quality compost, pelletised poo, a nice straw mulch and then count down the days! The tip here is to ensure the soil drains freely and isn't too heavy (meaning not dense and clayey).
Now, tomatoes can be a wee bit fussy with regards to their soil pH, so I would suggest either buying a kit, or taking some soil down to the local SGA nursery for testing. Ideally, soil pH for tomatoes should be between 6.5 - 6.7, and this prevents all manner of hideous stuff from happening, in particular a dirty little disorder called Blossom End Rot. Prevention, as with most things, is better than a cure here, so my tip is whacking some dolomite lime into the tomato bed well before planting (about two months is perfect). Blossom End Rot is essentially a calcium deficiency, and dolomite lime will provide a nice whack of calcium ovber a long period. Don't leave this to the last minute, as it can take a while to become available to the plant. Ideally, if your soil has not been limed in the last two years (and honestly, whose has), it is recommended that 1 handful of dolomite lime be applied per tomato plant. I reckon mix this through with your compost, and walk away for a couple of months! Too easy!
Feed Me!
Feeding tomatoes is pretty unnecessary at first, especially if you have prepared your soil well. Avoid manufactured fertilisers for these guys, in my opinion it's a waste of money, environmentally irresponsible and they really don't need it. If you are dead keen to feed, give 'em more compost! My secret is good soil preparation, coupled with the occasional drink of liquid chook poo... soak some pellets in a big old bucket of water for a few days, giving it a stir occasionally, and you're away. I do this every two to three weeks during the flowering and fruiting period!
Stake ya' claim!
Stake your claim with tomatoes! All toms, even the tiny little ones and the pot-bred varieties will benefit from staking. Like me, they have a tendency to want to be horizontal all the time. I love training mine on a bit of lattice or trellis, mainly because I like the look of it. Normal staking involves knocking in a fair size tomato stake or two (ask at your SGA nursery and they'll tell you what it is), and tying the stem to the stake with some sort of material that has a bit of give in it. I use old stockings, (not that I have any, but my neighbour has loads on her clothes line) and be careful not to tie them too tight... you don't want to strangle your toms!
What about the Water?
Never ever let the soil dry out with tomatoes, especially during the flowering and fruiting stages! This causes all manner of bad things to happen, mainly hideous diseases, fruit and flower drop, and plants really susceptible to attack by pests and the rest! That said, don't over water... wet boggy soils are just as bad as dry soils! Use the trusty soil moisture indicator (your pointer finger) to assess the situation! Oh, and as for the other Yummy Yardies... no Greywater on or near your tomato plants!
Are We There Yet?
Well, here's a rough guide... the big fellas take between 10 -14 weeks to mature, while the little cherry tomatoes (and friends) take about 11-13 weeks. The best time to pick tomatoes is... well... undecided! I tend to pick mine when they are slightly ripe, that is, they have changed colour, but are still quite firm, and a little green. This works especially well in warmer climes (hi Brisbane!!) as, if they are left on the plant too long, they tend to over ripen and split, due to the heat!
In cooler climates you have a bit more freedom, and can leave them on the vine a bit longer. Again, watch that they don't get too soft, or you'll run the risk of them being fairly unpleasant to eat. Also, if you are leaving them on the vine to ripen, watch out for stealthy tomato-stealers! Rats, possums, roos, rabbits, birds and all manner of critters love ripening tomatoes, so it's best if you get to them before they do!
Now, my nanna, an ace tomato grower, used to pick her toms when they were fairly green, and whack them on the kitchen window sill to ripen. I got a lot of gardening tips from my grandma, but this ain't one of the better ones. In my experience, tomatoes placed on a window sill can, if it's a really hot spot, warm up too much and blister, which makes for a very tasteless (and very unattractive) tomato harvest. Check out the hot tips below for better ways to ripen tomatoes... still love you heaps, Nanna!
Pests and the Rest
Unfortunately, tomatoes can be host to a plethora of garden nasties, but there are a couple of preventative measures you can take to "stop the rot" so to speak! Diverse Yummy Yards, full of tasty treats and pretty plants, will attract a range of good bugs to your patch. These guys will make short work of loads of pest outbreaks. The other hot tips are a consistent watering regime, and crop rotation. Don't plant this year's toms in a patch where tomatoes, chillies, eggplants or potatoes have been in the last two years... this lessens the possibility of disease. Also, companion planting and tomatoes go hand in hand.
Now, if all this fails and you do have an issue, never fear, Sustainable Gardening Australia is here! Below is a list of common issues, their causes and a couple of solutions for taming tomatoes!
Flowers fall off before the fruit forms - Could be caused by loads of things, including too much or not enough water, not enough light, over fertilising (I tried to warn you), possums or thrips. Check flowers for thrips
Leaves wilting
Did you water your plants? This generally happens when humans are overcome by laziness, or holidayitis! Especially common during summer school holidays.
Yellowish patches on fruit and burnt bits on leaves - "We're melting, we're melting"! If your toms could talk this is what they would say! It's too hot... read the "Position, Position Position" section above for some tips!
Mottled yellow patches on leaves and fruit - Sorry Mum, but this happens to my tomatoes a fair bit! It's called tobacco mosaic virus, and it's spread by smokers not washing their dirty little hands before touching their tomatoes! Make sure your crop is maintained, hygienic and rotated seasonally. And for goodness sake you puffers - wash your hands!!!
White powdery patches on upper surfaces of leaves - Ahh, our old mate powdery mildew. Often caused by water hanging around on the leaves of plants. Try to water the soil, rather than the foliage. Remove affected leaves and put them in the bin, not the compost.
Holes in your leaves - Pretty sure it's caterpillars
Really ugly wet looking patches on the tomato - It's probably Blossom End Rot.
Hot Tips
Now, thanks to my Nan, we have some great ways to speed up the ripening of toms... and it's so simple! Grab 10 or so green tomatoes, and pop them in a paper bag with a banana (not too ripe... that would spoil it). Ripening bananas release ethylene, which seriously speeds up the ripening of tomatoes! How easy is that?
Finally, the best way of storing your home grown tomatoes is on your kitchen bench, away from direct sunlight. Don't ever, ever put them in the fridge, as it destroys their structure and flavour... something I didn't know until last week, but it makes a pile of sense!
Eat me!
Tomatoes are the love apple, so it’s best to K.I.S.S. them and enjoy the homegrown taste of fresh juicy tomatoes “vine ripened.”
So...
Make the salad from the Basil Yummy Yards fact sheet.
Do a bruschetta. Chop tomato, onion and red onion or shallot. Tear up some basil leaves. Season with salt and pepper and stir through your best quality olive oil. Toast some bread and smear a cut garlic clove on it. Pile the bruschetta mix on top. Ahh, the taste of summer.
Throw some breadcrumbs, freshly picked herbs, olive oil and garlic into a frying pan. Allow to heat through for a minute. Add halved tomatoes, cut side down. Move each tomato in a circular manner to ensure it is coated with the breadcrumbs mix. Allow to cook for about 5 minutes. Gently turn the tomatoes over and cook through for a few more minutes. Serve with toast for breakfast or alongside chicken or steak for dinner.
Make the Ratatouille from the Capsicums and Chilies fact sheet.
Chop them and toss through the cous cous Recipe from the Cucumbers page.
Mock Chicken
Try this 'Mock Chicken' recipe. It will take you back to the days when tomatoes tasted like tomatoes!
2 home grown tomatoes chopped
1 onion chopped
1 egg beaten
Salt and pepper
1 cup cheddar cheese, grated
Handful fresh homegrown herbs
Finely dice onion and tomato
Fry onion till soft, then add tomato and cook until starting to fall apart.
Beat the egg and add. Cook till egg firms. Turn off the heat.
Add chopped herbs and cheese and salt and pepper to taste
Eat straight away on toast for breakfast or chill before filling a roll with the mixture for lunch. Also great served with crackers.
Pictures
Tomato pics: Mary Trigger (SGA)

Lettuce
Lettuce (Lactuca sativa) – a reliable summer favourite, salad filler and sandwich staple! But it can be grown year round, with very little tender loving care after making sure that there is adequate feed. With a large variety of types and therefore flavours, lettuce isn’t just reduced to your Cos or iceberg! Available as seedlings, but also germinates readily from seed. Sprinkle in some seed at any time of year and this quick growing vegetable will be ready in weeks.Read more

Broccoli and Cauliflower
Essentially, broccoli and cauliflower are sisters... albeit sisters with different coloured heads, but sisters all the same. As such their growing conditions and nutritional requirements are pretty similar. Although not the easiest veggies to grow, they are incredibly rewarding and look great!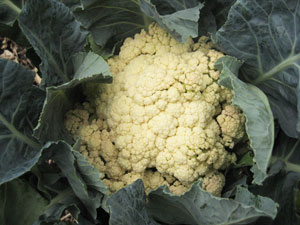
Planting Schedule
Warm Areas: April - July
Temperate Areas: April - August
Cool to Cold Areas: April - August
Position, Position, Position!
As these two are cool season vegetables, it's all about position and timing. Choose a sunny position for both, protected from strong winds. When sowing seedlings, leave about 40cm between each plant.
Talking Dirty
Both these veggies can be a bit fussy about their soil, so take a bit of time to prepare the bed, about one month prior to planting. Ensure a well-drained soil, chock full of well-rotted compost and organic matter with a pH of 6.5-7. Correct soil pH should prevent a myriad of nutrient related issues, as will a light application of chook poo based fertiliser pellets when preparing the bed.
Feed Me!
Feed both weekly with a seaweed or compost tea, especially in the month leading up to harvest. As heads appear (the bits we want to eat!), a drink of worm wee or liquid fish fertiliser will improve size and shape of the heads.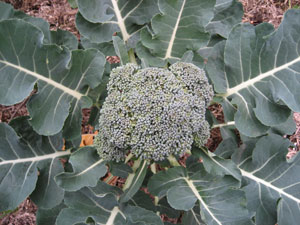
What about the Water?
Both broccoli and cauliflower will become stressed if not watered deeply and consistently. It is important to ensure water reaches the roots, so, if area is mulched, consider subsurface irrigation or pull mulch away when watering.
Pests and the Rest
The caterpillar of the cabbage white butterfly is the bane of broccoli and cauliflower growers everywhere. For hints to get rid of them see https://www.sgaonline.org.au/cabbage-white-butterfly/ .They can also suffer aphids, caterpillars and water stress.
Are We There Yet?
These two sisters will take anywhere from 12 weeks upwards before they are ready to harvest. Look for firm, tight, well-formed heads that have not begun to flower. Cut off heads with a sharp knife as required.
Hot Tip
Dunking lightly cooked broccoli into cold water will halt the cooking process and keep the florets bright green and crisp!
Good friends
Dill, sage, mint, nasturtium, rosemary, beetroot, beans, lettuce and cucumber.
Bad friends
Garlic, rue, tomatoes and strawberries.

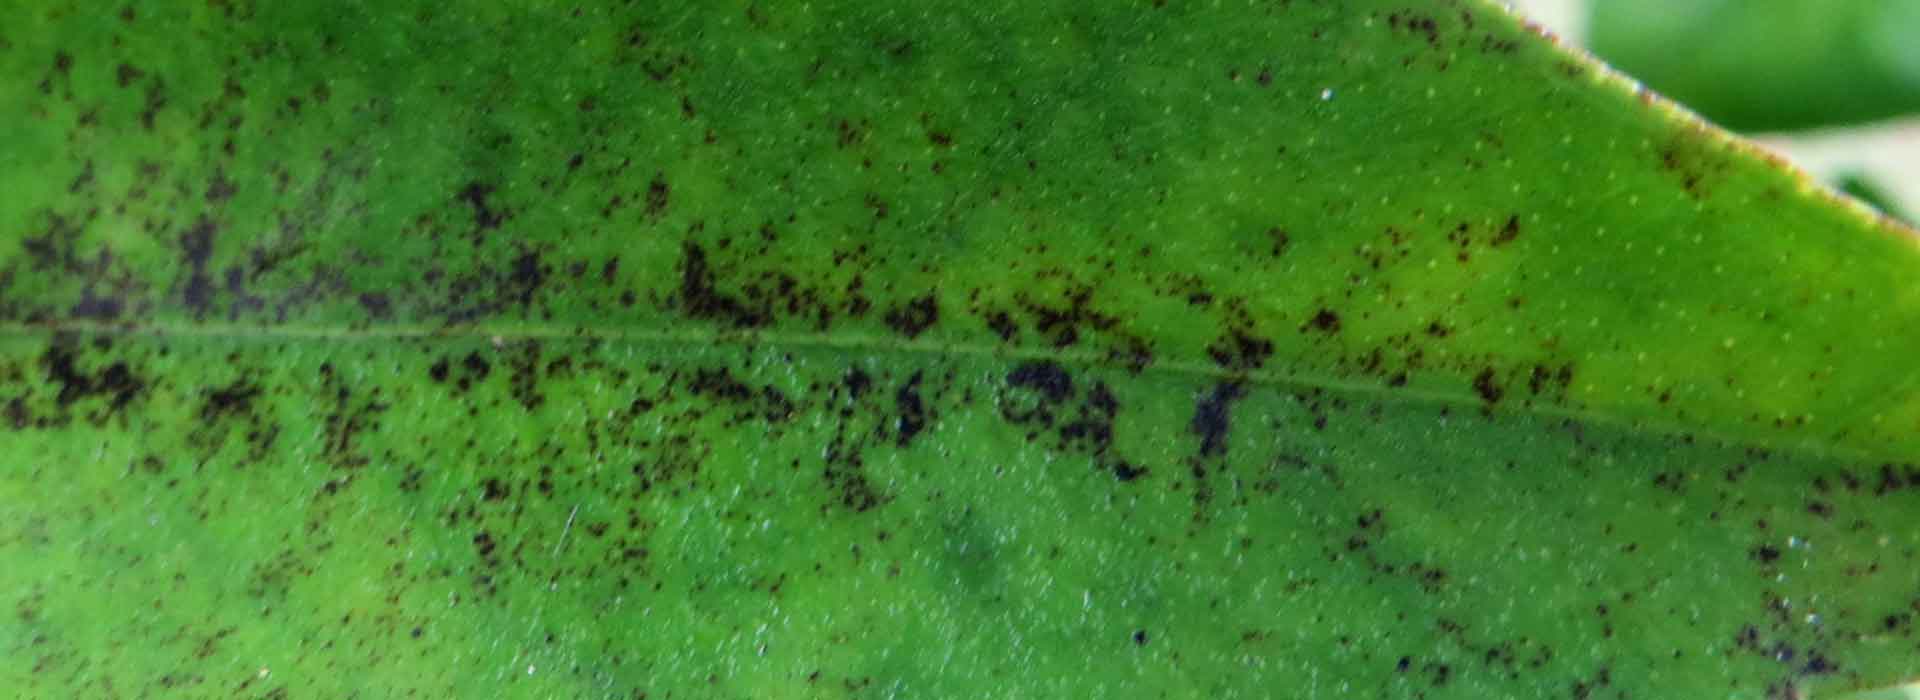
Early Blight of Tomatoes
Hi, my name is: Early Blight of Tomatoes, nice to meet you
 Describe yourself: I'm a saucy little fungal disease with a real thing for the leaves of tomato plants! People say I'm common, but I reckon I'm an angel, a brown spot with a gorgeous yellow halo.
Hobbies: I adore the older leaves of tomato plants, but don't mind a stem, or entering the fruit through growth cracks or the fruit stalk. I'm movin' on up baby... I start on your older leaves and work my way to the top of the plant, causing defoliation as I go. If I have to have a young plant, I would definitely go for the base of the stem... I'm partial to a bit of collar rot!
Likes: Oh, I love to get busy when the weather is over 15⁰C and there is lots of moisture around... it really gets my spores flying and my lesions growing! Love humidity, when you over fertilise your tomatoes (oh yeah baby, I love that), shade and water lying around on leaves. I love really crowded gardens where there is no air movement.
Dislikes: Sun, well mulched garden beds, when you clean up fallen leaves, hate well prepared soil with heaps of organic matter, home made spray remedies (like milk sprays and bi-carb mixes), store bought good sprays. I really don't like gardeners who monitor their plants all year round!
You'll know you've met me when: Your tomatoes lack serious vigour, older leaves are seriously ugly with spots, and some fruit shows damage (at the stalk end). Check young plants for collar rot.
Breaking up ain't hard to do... if you
 Mix fat-free milk with water in a 1:1 ratio and apply it using a spray bottle. Spray the solution directly onto the clean leaves of your tomatoes. Milk-and-water solution coats the leaves and leads to the growth of an invisible fungus that frightens off black spot!
- To four litres of water, add 3 level teaspoons of bicarbonate of soda and a couple of good splashes of fish emulsion. Give it a good mix and spray it on weekly. Don't apply when it's hot. The Fish emulsion is very useful because it helps to make it stick. It also contains beneficial bacteria that have antifungal properties. And that's not all - the oils in fish emulsion will help to suffocate pests like mites/aphids/scale. You must use it weekly for it to be most effective.
- Seaweed sprayed onto the leaves changes the pH of the leaf surface making it less attractive to the fungal spores. It also strengthens the cell walls making it more difficult for the invading fungi.
- Low Environmental Impact fungicides are available, but success is limited and control can be difficult.
- Destroy all infected plants and dropped leaves by bagging and disposing in rubbish, or burning. Do not compost.
- Rotate your crops!!! Don't plant the same crops, or susceptible crops in the same area each season.
Photographs:
Banner Image: Dwight Sipler from Stow, MA, USA - Early blight on tomato leavesUploaded by Jacopo Werther, CC BY 2.0, https://commons.wikimedia.org/w/index.php?curid=25221133
Pic 1: www.avrdc.org Des: Fruit symptoms of Early Blight of Tomato
Pic 2: www.plantpath.iastate.edu Des: Foliage symptoms of Early Blight of Tomato
Pic 3: www.apsnet.org Des: Stem lesion caused by Early Blight of Tomato

Heritage Veggies
What are heirloom and heritage plants? Alright, I’ll admit it, I’m a bit of a history ignoramus (my pub trivia team will testify to that). In fact, were it not for Billy Joel’s song 'We Didn’t Start The Fire', I may have no knowledge of historical events at all! But, without knowing it, my garden and I have become an important element in preserving heritage and living history through the growing (and eating) of heirloom and heritage vegetables. Neil Finn reckons 'History Never Repeats', but in my garden, every season sees a little bit of history repeating.
Heirlooms, Hybrids and Hardcore Horticulture
 Put simply, these are 'old school' veggies and flowering plants that have been handed down from one generation of gardeners and farmers to the next. There is a bit of debate as to what constitutes a true heirloom, with loads of people suggesting that 1951 be the 'cut-off' date, as, after this time, hybridized seeds and plants became more widely used in commercial agriculture. Others suggest (and I quite like this definition) that an heirloom plant is any that has been selected, bred and passed down because they were recognised for their superior qualities such as great flavour, pest and disease resistance, and suitability to local conditions.
Whichever definition you roll with, one thing remains consistent – for a plant to be classified as an heirloom, it must be open-pollinated. Open-pollinated plants are those that have been pollinated by 'nature', either by wind, insects, birds or other natural circumstances, and thus seeds produced, while regarded as 'true to form', are open to variation and genetic differences. This varies significantly from hybridised plants, where parent plants are bred (generally by human intervention) to encourage specific traits, like a particular colour or growth habit. Hybridized plants generally produce seed that is not viable (meaning it won’t shoot) or, if the seed is viable, the next generation of plants may lack vigour and prove to be a poor imitation of their parent plants.

Want an example? Take our good friend the carrot, a staple in many gardens and kitchens. It is reported (by the World Carrot Museum no less) that carrots were originally purple, skinny and presented a slightly orange centre, and that the orange carrot we have come to know and love was developed in Holland in the 1500’s. Patriotic Dutch growers developed the orange carrot (probably from a mutant purple one) by selective breeding, at which time it was adopted as the royal vegetable in honour of the House of Orange. The breeding and hybridisation of these carrots continued over centuries, to produce bigger, tastier and more vibrant orange carrots. The modern hybridised carrot we grab from the grocers is nothing like the original carrots, but, thanks to some savvy seed saving over the centuries, we are still able to grow a fair variety of heritage carrots (including the awesome purple ones!).
The Hoo-Ha About Heirlooms
Novelty factor aside, there are loads of ripping reasons to consider sticking in a couple of heirloom flowers and veggies into your patch (although weird coloured veggies is high on my list!). For starters, because heirloom veggies are open pollinated, gardeners can collect and save the seeds produced from their plants until next year, assured that they will grow 'true to type'. Saving seed of heirloom veggies from one season to the next also encourages desirable traits to develop over time, including disease and drought resistance and better flavour. Speaking of flavour, heirloom veggies taste loads better than commercially grown, shipped to the supermarket stuff. Trust me, your tastebuds will thank you for it! The planet will thank you also, because growing heirloom veggies from seed is an awesome way to reduce your environmental footprint, and you can choose to use less pesticides, fertilisers and other artificial inputs than generally used in commercially grown crops.
But, the best reason to grow heirloom veggies may be this: they are dead easy, even for beginner green thumbs! Heirloom veggies don’t rely on excessive inputs, don’t need too much 'molly-coddling' and generally give you amazing 'bang for your buck', providing greater yields over a longer period of time. How good is that? All this for the price of a packet of seeds!
Whether it’s for health, financial or environmental reasons, turning even part of your backyard into a productive patch is incredibly rewarding, great for the planet and darned tasty! To 'grow your own' fruit and vegetables is one of the most environmentally friendly things you can do and whacking even a few heritage and heirloom varieties in the patch makes a good thing even better.
So, this spring, why not seek out some open-pollinated, heritage seeds for your Yummy Yard, and impress your friends and families with a tasty, good looking bit of history that’s great for the planet! Trust me, nothing fires up dinner party conversation like a purple carrot (and a couple of bottles of good organic beer!). Enjoy!
Open pollinated, non-hybridised heritage seeds and even seedlings are becoming far easier to track down, and many good garden centres stock a great range. A couple of other places to try would be these great companies, doing their darnedest to preserve vegie genetic diversity and great tasting edible crops:
Diggers Club - www.diggers.com.au
Eden Seeds - www.edenseeds.com.au/
The Lost Seed - www.thelostseed.com.au/
Green Harvest Open Pollinated Seeds - www.greenharvest.com.au/
Greenpatch Organic Seeds - www.greenpatchseeds.com.au/
Australian Seed Savers - www.seedsavers.net
Sooty Mould
Hi, my name is: Sooty Mould
Describe yourself: I’m definitely one of the most appropriately named pests and diseases going around...I look exactly like black soot or charcoal. Technically, I’m a fungus that feeds on the sweet honeydew left by some sort of sap-sucker (like aphids, scale or mealy bugs), and will follow an infestation of this kind.
Hobbies: I LOVE making your precious plants really unsightly, covering leaves and even stems in a grey to black soot. I don’t actually harm your plants, and in fact I’m a pretty good indicator that there is some other sort of pest issue that needs to be controlled.
Likes: Just about any sort of plant is appealing, but remember, I can’t exist without the delicious exudates of a sap-sucking critters.
Dislikes: Gardeners who keep pest problems under control and practice good garden hygiene.
You’ll know you’ve met me when: The foliage of your plants looks as though it has been dusted with charcoal. Sooty mould can feel sticky to touch, and will wipe off fairly easily.
Breaking up ain’t hard to do…..if you:
• Remove or treat the honeydew producing insects and the sooty mould will disappear.
• Sooty mould can be removed by wiping the affected foliage with a damp cloth. This is only temporary and re-infestation will occur if the other pest issues are not treated.
• Collect fallen leaves affected by sooty mould and place in bin – DO NOT compost!
• Controlling ant populations, who tend the honeydew producing insect, will minimise the opportunity for them and the sooty mould to take residence on your plants. Repel ants by planting ant-repellent plants such as tansy nearby. Check the base of the plants for large ants’ nests; and, if found, mulch with tansy, and increase regular watering to discourage ants and sooty mould.
Banner photo: from image by Erika Magarifuji in Scot Nelson album.

Aphids
Hi, my name is: Aphid. If you would like to know more about how to control aphids, read this interview with me:
 Describe yourself: I'm a real softy, small in size (around 2 - 3mm), with a shiny, transparent green or yellow body! I occasionally dress up in a white, woolly coat. I'm rarely seen on my own as I hang out in a pretty big group! A particular version of me, the cabbage aphid, is more grey and particularly loves brassicas in winter.
Hobbies: Multiplying!!! Sucking sap; exuding honeydew; hanging out with ants which are attracted to the honeydew, encouraging sooty mould and passing viruses from plant to plant. You'll often find yellow patches from these viruses on infected leaves.
Likes: Yellow flowers, warm moist environments, succulent new growth of just about every kind of plant (I really love roses, heaps of veggies, annuals and citrus trees).
Dislikes: Chives, coriander, garlic, onions, petunias and radishes. Soaps - like home made chilli soap, neem oil (Azadarachtin). Don't get along with Ladybirds or Lacewings, Braconid Wasps, Hover Flies or Praying Mantis! Oh, and I hate sticky traps! These predatory insects seem to be attracted by companion plants like Alyssum, Yarrow and Dill.
 You'll know you've met me when: all your plants' new growth is seriously malformed; there are heaps of ants on the stems or plant parts are sticky from my honeydew. Oh, and yucky black sooty mold soon appears!
Breaking up ain't hard to do... if you:
- Squash me and my mates by hand. It's icky but effective! Or pay your neighbours' kids to do the deed- they love squashing us! In my death throes I emit a chemical signal that makes the other aphids take off quick smart!
- Stop my ant friends from coming around by growing tansy or other ant repellent plants! Ants tend to our every need and protect us from garden bullies. Without their protection we are very vulnerable to being eaten!
- Irritate me by putting a flattened square of aluminium foil around the base of plants to bounce light on the undersides of leaves.
- Spray me with a home made garlic or chilli soap. Or make an insecticidal soap (2ml liquid Castille soap per 100 ml water) and target the underside of leaves. Some claim that including mint tea in the water can also be helpful.
- Suck me off with a vacuum cleaner.
- Spray your plants' leaves with a strong jet of water (either with a hose or kitchen spray bottle) and knock me and my mates right off our perch!
- Provide a bright yellow plastic dish, half filled with water, near my preferred plants. I can't resist yellow things, but I can't swim either! You can work out the rest!
 Photographs:
Pic 1: E Shallue, SGA
Pic 2: E Shallue, SGA
Pic 3: Bob O'Neil Purdue University

Growing Beans
Phaseolus spp.
"Beans, beans are good for your heart, the more you eat... etc.". Conveniently I have forgotten the rest of that ditty but it's true that beans are good for your heart, bones and all over "well-ness". Growing beans is really good for your Yummy Yard because they are easy to grow and produce stacks of beans. They are a climber so are excellent where space is an issue!
Planting Schedule
Warm Areas: All Year
Temperate Areas: September to January
Cool to Cold Areas: September to January
Position, Position, Position
Full sun is the order of the day for beans but provide a bit of temporary shade cover in super-hot, dry, windy weather. As most beans are climbers (unless you go for the dwarf or "bush beans"), you need to think about that before you whack them in. They need support as they get up to about 2m high. A wire trellis, fence lines, frames or similar can be used to prop them up. Why not make a tee-pee, or an A-frame walkway to grow your beans along? They look awesome, the kids will love them and they'll add some real height and interest to your Yummy Yard.
Talking Dirty
Like my ideal partner, soil for beans should be rich, deep, pH neutral and organic. Compost is perfect (not as a partner - as a soil improver) for soil preparation. You could also use an organic, complete pelletised fertilizer at planting time. Mulching your bed is really important but ensure the mulch doesn't touch the stems of the beans, as this can lead to bad things happening! Soil needs to be well-drained but note that beans don't really like sandy soils very much. So improve your sandy soil with nicely aged compost.

Feed Me
Feeding beans is totally unnecessary except for a wee bit of blood and bone sprinkled around at planting time. Make sure seedligs don't come in direct contact with the Blood and Bone. Beans have a wonderful relationship with bacteria in the soil that enables them to 'fix' their own nitrogen from the atmosphere. Feeding beans with a nitrogen rich fertilizer can harm these bacteria and also reduce bean production... all in all a pointless exercise. Feed with a seaweed tea at flowering time to promote higher yields of tasty beans!
What about the Water?
The biggest water issue with beans is not so much under-watering but over-watering. That's right, people are killing their bean stalks with love! Overwatering is a significant issue if planting beans from seed or when seedlings are very young. Leaves can become really yellow if drainage is poor and the plants are getting too much water so keep an eye on this. When planting seed, whack them in a damp (not soaking) soil, then leave them for a few days! Too easy! Soaking seeds of beans in water before planting is totally unnecessary and is a deadset waste of time and water.
Are We There Yet?
Depending on the varieties of beans you have planted, expect to be chowing down on bundles of beans between 12 - 14 weeks (10 weeks if you've gone the dwarf varieties). Pick bean pods when they are young, tender and at their tastiest. Do this before the seeds have swollen to make the pod lumpy and they'll taste better. It's best to harvest manageable numbers of beans regularly as this will promote more flowering and more tasty bean pods. I collect beans every three days... this seems to work out pretty well!
Pests and the Rest
Look, beans are dead simple to grow but it doesn't mean that they are without their issues. We've seen that they don't like too much water, dislike too much fertilizer and hate being touched by mulch. There are a couple of other things to keep an eye on, like fuzzy stuff on the leaves. This is probably powdery mildew and this can be caused by humidity, water on the foliage or poor air circulation. An easy solution is when you plant your beans to give them some "personal space". We all need room to breathe, beans included. Try to avoid watering the leaves as another good preventative measure.
Halo blight is another funky fungal issue and first appears as leaf spots with holes. Leaves will eventually progress to becoming light green with dark green veins and it will eventually kill infected plants. The best thing to do here is to remove and destroy all infected plants (but not into the compost). Plant your replacement bean seeds in a different spot.
Hot Tip
Let's talk green manures! Green manure is essentially a crop grown in a patch (or on a farm) that acts to improve the nutrient content and organic matter in the soil. Beans, peas, clovers, lupins and alfalfa are all legumes - plants that have a relationship with nitrifying soil bacteria. So growing any of them will assist in "fixing" atmospheric nitrogen and returning it to the soil. With legumous green manures, the idea is to plant seeds of these plants (they can be bought premixed) and let them grow until they begin to flower. I then whack them with the whipper snipper, and allow the slashed plants to lie on the surface of the soil or just tilled in. Do not plant in your green manure bed for at least 6 weeks after slashing. Green manures are a top, sustainable way of improving your soil.