On a recent trip to my local shopping centre (one of those monolithic structures so big it has its own postcode) I was shocked to discover that the fashions of the 80’s were back!
Despite the hefty price tag and ‘designer’ labels on many items, I still couldn’t comprehend it. I mean, the gear we wore in the eighties wasn’t that great then… I can’t imagine what has prompted its resurgence! Either I’ve been avoiding fashion for too long (and just about anyone who knows me would agree with that), or it is true what they say – fashion and trends do go in cycles.
This got me thinking about garden trends and design styles, and the recent flurry of interest I have had in the construction of no dig gardens. Daily, my inbox is full of requests for information on no dig gardens – what are they, how do they work, why are they so good, and, most importantly, how to construct them. And, just like that dreaded eighties fashion, no dig gardens have come back into vogue.
But, despite what many people may think, they are not a new concept. No dig gardens have in fact been documented since the 1800’s, but the ‘pioneer’ of the no-dig gardening concept is Masanobu Fukuoka of Japan, through his excellent 1953 book entitled The One-Straw Revolution. Mr Fukuoka, we salute you!
What is No Dig Gardening?
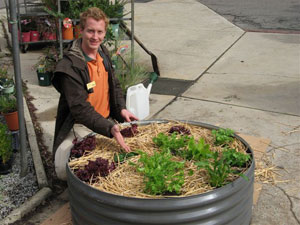
As the name suggests, no-dig gardening is all about going up, rather than down, essentially a patch ‘above ground’. Although it can be known by a number of different names, no-dig gardens are definitely NOT no-work gardens! Yes, there may be less work in setting up a no-dig patch (as opposed to the traditional ‘dig down’ style of garden) but it’s important to remember that all gardens, particularly edible ones, require on-going maintenance, monitoring and work. Think above-ground pool vs. in-ground pool… they all need work to keep them looking good, but it is somewhat easier to install an above ground pool.
Why we love them
There are so many things to love about no-dig vegetable gardens, so let’s start from the ground up! No-dig veggie gardens are fantastic in Australia, as a great deal of our soil is nutrient deficient, hard to work and somewhat inhospitable to our favourite herbs and vegetables. As these raised beds do not require the soil beneath them to be dug over before installation, the risk of damage to the structure of the soil is minimised (especially important on clay soils).
Construction of these types of gardens has the two-fold advantage of both protecting and improving the existing soil. You see, as the organic matter we use to fill our no dig beds (more on this later) breaks down over time, the health of the soil beneath improves, as does the structure, nutrient content, microbial and worm activity (all excellent things if you are soil!).
Why else do we love them? For those of us who are somewhat less mobile (years of nursery work and landscaping do wreak havoc on your back), no-dig gardens are an excellent way of bringing the garden up to you, rather than you going to the garden! For anyone with a ‘diggy, dirt-loving dog’, no-dig means you can raise the height of the bed sufficiently to prevent your pooch getting silly in the soil. The same principle applies to those rascally rabbits, and many other ground dwelling, garden-squashing backyard beasties (that includes soccer balls and wayward children!).
No-dig vegetable patches can also be a bit of a movable feast, which is perfect for renters, or those of us who move house a lot! Instead of leaving your patch behind, many no-dig systems can simply be moved with you. But the reason I love no-dig patches so much is that their size and shape is limited only by your imagination!

How to build on an existing lawn or onto soil…
1. Choose a nice, sunny spot for your veggie bed. The less wind the better, as most of our incredible edibles are not big fans of ‘blowin’ in the wind’ (although they do like a bit of Bob Dylan).
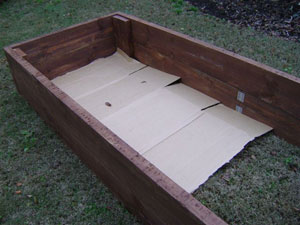
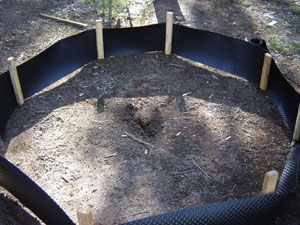
2. Mark out and form walls of no-dig garden. The walls should be at least 30cm high, but may be a lot higher. You can use anything including old rocks or sleepers or bricks, blocks, pavers etc. The hot tip here is to make sure your edging is sustainable – check out our ‘Hot Tips’ section below.
3. Line the base with at least 6mm thickness of newspaper or cardboard (not waxed) to suppress weeds; and wet thoroughly. Make sure this overlaps, otherwise those wily weeds will work their way upward! If the soil below is heavy clay, dust the surface with gypsum prior to laying the newspaper. This will help improve the drainage of the in-situ soil by improving the structure.
4. The idea is to then stack alternating layers of fine and coarse compostable materials. Start with a 6cm layer of organic compost, then a 6cm layer of pea straw, then a layer of aged cow manure, and then another 6cm of pea straw. Repeat the layers finishing with a thick compost layer.
5. Planting can be done into the top compost layer. Dig a wee hole to fit the seedlings in and plant, watering in well. Yup, they will look a bit sad and sooky initially, but your little babies will establish really well into this strong, nutrient-packed base!
6. Mulch well around your seedlings with pea straw (remembering to keep the mulch away from the stem of the plants) to a depth of about 6cm.
7. Due to the high level of compostable, organic material, you will notice that the level of the growing media in your no-dig bed will drop considerably over time. The tip here is to top this up with fresh stuff as you change your plants over each season, keeping in mind the ‘lasagna layering’ outlined in point 4.
You can also build a no-dig garden in a large container, simply do the same as above, but omit step 2.
If you want to whack a no dig Garden on a sealed surface…
1. Mark out the size of the beds and construct the sides. If using bricks, sleepers or other rectangular shaped materials, make sure you leave some gaps for drainage. The walls should be at least 50cm high.
2. Place a 7 – 10cm layer of coarse screenings or scoria at the base for drainage.
3. Layer the materials as listed above.
4. Plant the bed.
5. Top up layers as they rot down.

Hot Tips For Your No Dig
When choosing sleepers, choose the most sustainable timber available. This will significantly increase the long term viability and sustainability of your Yummy Yard.
- Avoid rainforest timber (there is always a sustainable replacement) and instead use plantation grown timber.
- Choose radially sawn timber, as this technique produces more timber per log.
- If an option, consider recycled products. There are loads of places now selling recycled and reclaimed timber.
- Local products require less transport, and therefore they have less impact on greenhouse gas emissions and other negative environmental impacts.
- Please be aware that CCA (copper chrome arsenate) Treated timber (often marketed as Perma-Pine) is NOT recommended for garden bed construction, due to the arsenic content of the wood and possibility of copper and arsenic leaching into soil.
- CCA Treated timber has been shown, in a number of Australian and international studies, to present a risk to consumers through the leaching of heavy metal compounds through contact with water and humic acid (found in healthy soil).
- Since March 2006, CCA Treated timber is not permitted to be used in the construction of new garden furniture, picnic tables, exterior seating, children’s play equipment, patios, domestic decking and handrails. Although the construction of garden beds is not mentioned, SGA would recommend selecting an alternative product.
Related Articles:
Citizen Science: A Pathway to Gardening Success and Biodiversity Conservation
In recent years, the realm of science has experienced a remarkable transformation, one that invites people from all walks of life to participate…
A Sustainable Gardener’s Guide to Thrifty Gardening
Creating an eco-friendly and cost-effective garden involves more than just nurturing plants; it's about adopting a sustainable approach that…


