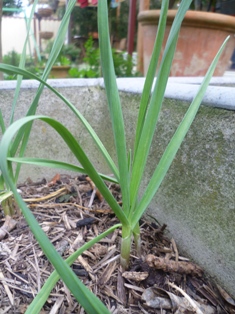
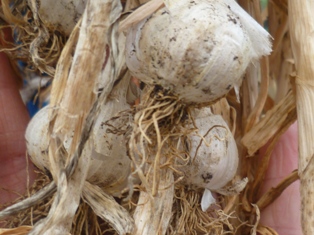
Allium sativum
In the same family as the onion, chives and the leek, garlic has been used for millennia for culinary and medicinal purposes, though a garlic mouthwash is not recommended for obvious reasons! Originally from Central Asia, it has a history of being used all over the world.
There are a large number of countries that are responsible for growing garlic commercially, though growing it yourself from local sources reduces the food miles that your bulb travels and also ensures you are more likely to enjoy the flavour. Due to customs regulations, imported Garlic is sprayed with chemicals to reduce the risk of pathogens being introduced into Australia plus a fumigation to stop it sprouting. So before you have even bought your garlic, there is a very intensive process that has occurred.
There are a number of garlic varieties available for growing. The best way to make sure that you have a good garlic bulb is to purchase from your local nursery or reputable online seed and plant sellers. Growing your own garlic means that you can grow to your likes, pungent or not, slightly sweet, or soft for jarring or storing to be used over the course of a year.
Cultural notes
There are 2 types of garlic, hard and soft necked (the soft necked are the ones that you are able to plait for storage). The soft neck varieties are more suited to warm temperate regions and do not usually set a flower, whereas hard necked varieties are more suited for cool to cold areas, way south of the Equator and will flower.
Companion plants
You can plant among where your tomatoes will grow in the warmer months (just remember where you planted). Garlic releases secretions of sulphur that is said to improve the scent of roses. As the bulbs will be in the ground for many a month, you can grow some shorter lived plants amongst them to use up maximum space. Try lettuce as these can be grown and harvested without much damage being done to the bulb below. Avoid planting garlic near legumes (peas and beans).
Planting times
- Warm areas: June- July
- Temperate: April- July
- Cool- Cold areas: March- June (So get cracking!!)
Position/ Spacing/ Requirements
Garlic will grow happily in full sun to part shade.
Prepare soil by adding organic matter and manure a few weeks prior to planting. Also ensure that soil is loose and free draining. As garlic is grown from autumn to summer, it spends most of its time in quite damp soil. Ensure good drainage so that the bulbs do not rot in the soil before they have a chance to send up shoots.
Separate your bulb of garlic, so that you have individual cloves. Loosen the soil and place each bulb pointy end up, up to 3 cm deep (finger tip to about the first knuckle). You can plant them in rows 10-15cm apart. Depending on available space and what else you want to grow, you may want to lessen the distance in between. Water in with a seaweed tea and mulch well using a locally sourced straw as soon has shoots have appeared.
Make sure that the soil stays moist for the first few weeks after planting (in some parts of this land that won’t be too hard). After that they should be alright to look after themselves, unless you are having an extended dry spell. Worm and seaweed teas can be applied once a month or so.
Pests
Garlic suffers from very few pests or diseases. It is occasionally attacked by aphids, a little ironic when one sustainable way to deal with aphids is a home made garlic spray! Check the aphid fact sheet here https://www.sgaonline.org.au/?p=6788
Harvesting
For harvesting it is best to wait until after the flower (hard neck) or stems/leaves (soft neck) has started to brown and die. You can harvest earlier, but the individual cloves may not have formed. It will just be one bigger one. Waiting allows that paper-slike wrapping to form, which creates the individual segments.
If you want to also use the chive like stems of the soft neck varieties, harvest when they are green. They have a pungent flavour and are best cooked.
Grab a trowel and gently lift up from underneath and at the same time pull on the stem. They should come out relatively easily. Be gentle though, as you’ve waited until the stems have died off some they can be a bit brittle.
Storage
Once you’ve harvested your garlic, try and rub off as much of the soil as you can without removing the papery outer coating. You can then place them somewhere to dry out. This can take a couple of weeks, though it is fine to use some of your bulbs strait away.
Ensure that there is adequate air flow and little moisture around the bulbs that are to dry. Try a rack with the bulbs evenly placed or a mesh bag hanging up somewhere. You can even plait them if you are a bit dextrous, this will be easier soon after harvesting as the stems will still have a bit of flexibility and won’t be so rigid.
Your bulbs will store for a long time if stored correctly. Hopefully you’ve planted enough to keep you going until your next lot are ready to be harvested. If not, try to purchase from a local source rather than an imported type.
Uses
- Cooking (obviously)
- Garlic Spray- to be used as a deterrent against sucking insects, aphids etc.
- Some people also feed garlic to their pets, it’s said to be good for chickens and dogs. Best to do some research for yourself to find out the correct dosage and other tips.
Types of Garlic
Now, we could inform you of all the types of garlic, from white to purple, from big to small etc. But with Australia being diverse and requiring various quarantine laws even between states, it would be a very long list. Try to source locally or from a certified grower that will supply stock that meets Quarantine requirements.
Below is a list of suppliers who can help (though, we make no promise on whether stock is available).
http://www.diggers.com.au/– Victorian, though will supply stock to other states and meets quarantine requirements.
http://greenharvest.com.au– East Coast Australia, not Tassy.
Garlic Farm Sales-Victoria will supply to home growers in WA – 03 9739 5810
You can also read more about harvesting and storing garlic HERE
Photos:
Jo Bate
Related Articles:
Garden Journaling – Slow down to tune in.
As we move through the year and our gardens evolve, there's something magical about documenting the journey. Garden journaling is an art that enables…
The Importance of building soil health for a biodeverse, productive garden
Creating a thriving garden that not only sustains itself but also contributes to the broader ecosystem requires more than just sunlight and water.…


