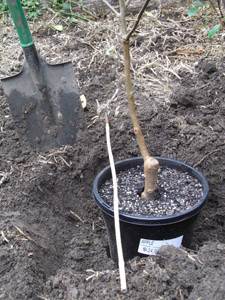
 Everything you need to know about bare root fruit trees
As the weather gets colder, it’s ever so tempting to stay inside, and curl up by the fire with a glass of wine and your media of choice. However, winter is a top time in the garden, especially if you are planning on planting some fruit trees to feed you for years to come. And while this can seem daunting (and somewhat unappealing in chilly weather), edible trees are a must have in every productive patch, and winter is the time to get down and dirty with deciduous fruit trees. The following guide contains everything you need to know about picking, pruning, planting and pampering beaut fruit trees! It’s time to whack on the winter woolies, and get amongst it!
Finding Fruit to Fit
Now, before you make the carbon neutral trip down to the local garden centre and select a swag full of fruit trees, you need to have a look at your patch. There are a few things to look out for, many of which will significantly influence which fruiting beauties you select. In your patch, have a look at how much space you have for a fruit tree, bearing in mind that many varieties require a friend or two to pollinate (don’t we all?) which will require more room. The bulk of fruit trees require full sun for optimum performance, and many can get to a fair height, so remember to look up as well as down. Are you wanting to espalier the tree (that is, train it to grow “flat” along a wall or fence), grow it in a pot, or use it as a feature?
Remember that while the deciduous trees are leafless over winter, this will alter come spring, meaning sun underneath may disappear in the warmer months. This is particularly important if you are considering whacking in a Yummy Yard in close proximity to the tree. Yeah, it’s a lot to consider, but there really is a fruit tree for every space… you just have to be realistic about room (trust me, it’ll save tears later on!). Oh, and it is essential to match your fruit tree selections with your climate – there are some plants that just aren’t supposed to grown in some spots!
Picking the Perfect Plant
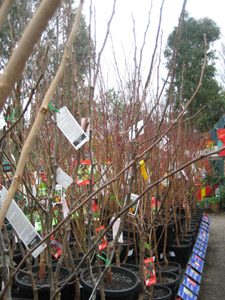
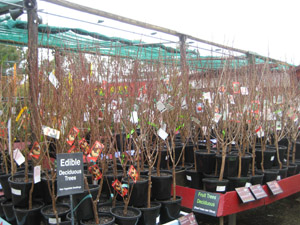
Now that you have assessed the patch and planned your purchases, it’s time to head to the garden centre and pick out your plants. Despite what you may have heard, bigger is not always better, and canny customers will generally select small to medium size bare root fruit trees, rather than the biggest on the bench. Shape is also an issue, and if you are wanting to purchase a peach, persimmon, nectarine, plum, pear, apple, almond or apricot, look for plants that lend themselves to a nice “vase” shape. This vase shape is perfect for allowing good air circulation, which may not be an issue when the trees have no leaves, but will prove most beneficial when the foliage returns. If you are selecting a tree for espaliering, it’s time to click here to head to the espalier page… otherwise read on.
These days, many bare rooted trees are whacked into pots, to make displaying and transport easier (they used to be sold with no pots, generally covered in sawdust and wrapped in newspaper). Just because they are in a pot doesn’t mean they can stay there, so don’t purchase a plant until you are ready to put it into the ground (or a bigger pot with top notch organic potting mix). Make sure you buy current seasons stock… that is, one where the roots look healthy, and the plant isn’t pot bound. Pick a plant that looks vigorous, has a nice shape, no visible damage to branches and trunk, and appears free of blemishes.
Remember that many fruit trees need pollinators (friends that help them fruit) so ask your nursery person for suitable varieties for the trees you have chosen. Nowadays, there are many varieties of trees available that are self-pollinating (no, it won’t make them go blind) and a huge selection of multi-grafted fruit trees. Multi-grafted trees are those that have either two or three (and occasionally more) different varieties of the same fruit on one tree, and can seriously save you space in the garden.
Pruning for Productivity and Prettiness
Ok, let’s get serious now. Fruit trees require pruning to maintain the health and vigour of the tree, as well as to encourage fruit production, which is why we plant them in the first place! Regular pruning opens up the canopy allowing greater air circulation and more light, meaning a healthier, problem free tree in the future. An added bonus of pruning means the size of the tree is restricted, and the fruit is easier to pick each season.
As long as pruning cuts are made in the correct position and cleanly, the plant will heal. Using special paint to seal the cuts is generally not necessary, if the cuts are made correctly with clean pruning equipment. Always use pruning equipment appropriate to the size of the branches you will cut, selecting between secateurs, loppers and pruning saws. When tying up stems, use soft flexible ties and allow for some movement of the stem. Remember to regularly check and remove ties, as these can cause terrible injury and amputation to plants if they are left unchecked.
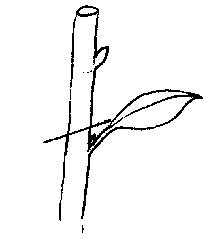
Positioning the prune: When making pruning cuts on smaller stems and branches, the position of the cut is just above a node (see diagram 1). A node is where a bud, leaf or stem emerges from a branch. The internode is the space along the branch between the nodes. If the cut is made too far into the internode, then the branch usually dies back to the node. This area of die back is a potential entry point for disease, and can spell trouble in the years ahead.
Despite what you may have heard, the angle of the cut is not as important as getting the position right. Ideally, the cut should angle slightly away from the bud so that water is directed away from the bud, minimising the risk of infection. Also, you should try not to cut on a sharp angle as this makes a large wound and may damage the bud.
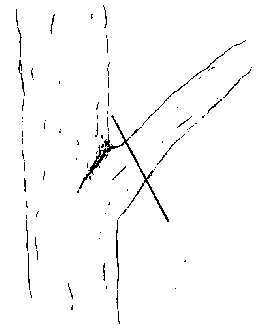
When pruning main branches, the cut should be positioned so that the branch – bark ridge (the ridge of bark on the top where the branch is attached to the trunk) and the collar (swollen area underneath the attachment point of the branch to the trunk) are not damaged. Even if you cannot see it, the collar is still there and should not be damaged. The pruning cut should be made just outside this area (see diagram 2).
Why bother? In addition to encouraging fruit production, fruit trees require regular pruning to remove dead or diseased branches, remove branches that cross over, keep the centre of the plant open, shape them up, and to thin out the fruit. Pruning is an ongoing activity, and one that must be conducted at least annually to ensure awesome trees and full-on fruit. For most deciduous fruit trees, the best time to give them a haircut is during their winter dormancy, unless you are growing apricots, who like their annual chop in early autumn, while there are still leaves on the plant.
Planting the Plant
Planting bare root fruit trees is all about tenderness and technique, so don’t just throw it into a hole and walk away. That said, don’t leave the trees sitting in their pots for an extended period of time either – bare root fruit trees should only be purchased if you are planning on planting them almost immediately. Once the plant has been pruned, remove it from it’s pot, and soak the roots in a bucket of water for about two hours (add a small amount of seaweed fertiliser or compost tea to this if you feel so inclined). While the tree is soaking, it’s time to dig a hole.
Head out to the prepared patch, and dig a whole twice as wide as the pot, but no deeper. The idea is here that we do not want to plant the tree any deeper than the existing soil line in the pot, to minimize the risk of disease, issues and collar rot (think plant tinea… not good!). The inside of the hole should have nice, rough edges, to ensure the effective movement of water, air and allowing our precious little plant roots to spread. Once prepared, fill this hole with water, and allow to drain away naturally – this minimizes transplant shock, and will give your tree the best start in life.
Once this water has drained away, it’s time to pop the plant in place. Gently tease out the roots of the plant to minimize the risk of root girdling (when roots wrap around each other and the trunk of the tree, and effectively squeeze the life out of them!). Back fill the hole, lightly firm the soil, and water in. Whack some mulch down next, taking care to keep the mulch well away from the stem of the plant. And that’s it! You’ve planted a bare root fruit tree!
Pampering and Preventing Pesky Problems
Even without their leaves, your deciduous fruit trees need a little loving! Winter washing is a great way to prevent funky fungal issues, like Peach Leaf Curl, affecting your fruit trees, particularly stone fruits (including peaches, nectarines, apricots and almonds). Winter washing involves spraying your trees with a low environmental impact copper oxychloride or lime sulphur spray, several times over the winter dormancy period, until bud burst. What this does is prevent fungal spores from taking hold, and will go a long way to preventing issues come spring time.
As the weather warms up, you may see your young fruit trees burst into flower and start to put on fruit. While this is indeed a very exciting time (your first home grown fruit… woohoo!), you must remember that in the first and second seasons, it is best to remove fruit from the tree as it forms. This allows our newly planted fruit trees to spend their valuable energy and nutrients on getting established, rather than producing fruit. While this can be difficult, you will benefit in seasons to come from a well established, healthy plant that provides a luscious load of full flavoured fruit!
Bare root fruit is beaut, and a couple of trees are a great way to ramp up the productivity in your patch! Quite honestly, there is nothing as rewarding as picking, eating and sharing your home-grown harvest. Get on a winner this winter; go for some bare root fruit!
Related Articles:
Garden Journaling – Slow down to tune in.
As we move through the year and our gardens evolve, there's something magical about documenting the journey. Garden journaling is an art that enables…
The Importance of building soil health for a biodeverse, productive garden
Creating a thriving garden that not only sustains itself but also contributes to the broader ecosystem requires more than just sunlight and water.…


