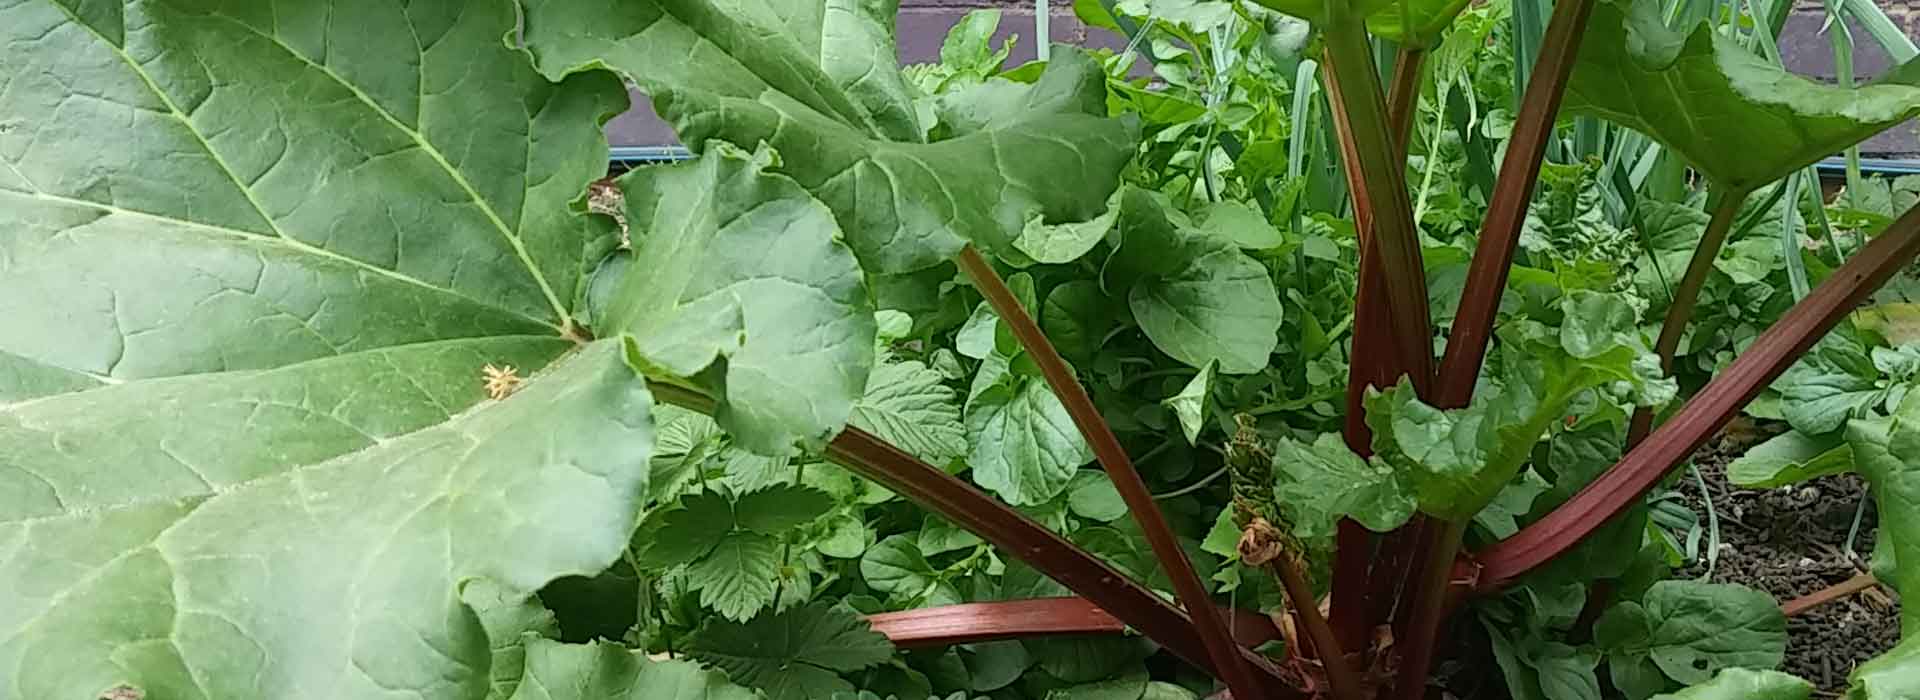
Rhubarb
This delicious herbaceous perennial lives for a number of years, so although it can die down during winter months it does bounce right back up again in spring, making it a great (almost) continual harvest.
Only the stems of rhubarb are eaten. In fact the leaves contain toxic levels of oxalic acid. Oxalic acid is present in many vegetables in varying amounts, but it has also been linked to kidney stones.
Rhubarb plants can be divided by cutting through the crown (centre of the plant), ensuring that 'eyes' are present on each division. Crowns can also be bought from garden centres and planted during winter throughout Australia.
It does best in cooler climates but also does reasonably well in Queensland's sub-tropical environments. Temperatures below -3 degrees C will damage above ground plants, but this is only temporary as new stems are likely to grow back if the crown survives.
Growing
Rhubarb can be grown in a wide range of soil types but they need to be well drained. Deep loam rich with organic matter is the ideal soil environment, with a pH between 5.5 and 6.5. It does like a lot of nutrients too, so organic matter with animal manure is preferable.
When crowns start growing, additional liquid fertiliser feeds of seaweed extract or carp will kick them along.
And rhubarb isn't exactly a low water use crop, but a plant or two isn't going to be an issue to keep watered - surely?
Stalks are picked from the outside as required. Pluck downwards and sideways to pull the stalk away from the crown.
Pests and Diseases
Snails may cause occasional damage but otherwise rhubarb is quite trouble free. In sub-tropical areas it can be susceptible to fungus diseases.
Insect Spray
Rhubarb leaves make a great insecticide! Boil rhubarb leaves in water (about 1:10 ratio), then add a small amount of soap (not detergent) and strain. Spray as required.
Information sources:
Yates Garden Guide, 42nd Edition, 2006, published by Harper Collins Publishers.
Department of Primary Industries and Fisheries, Queensland
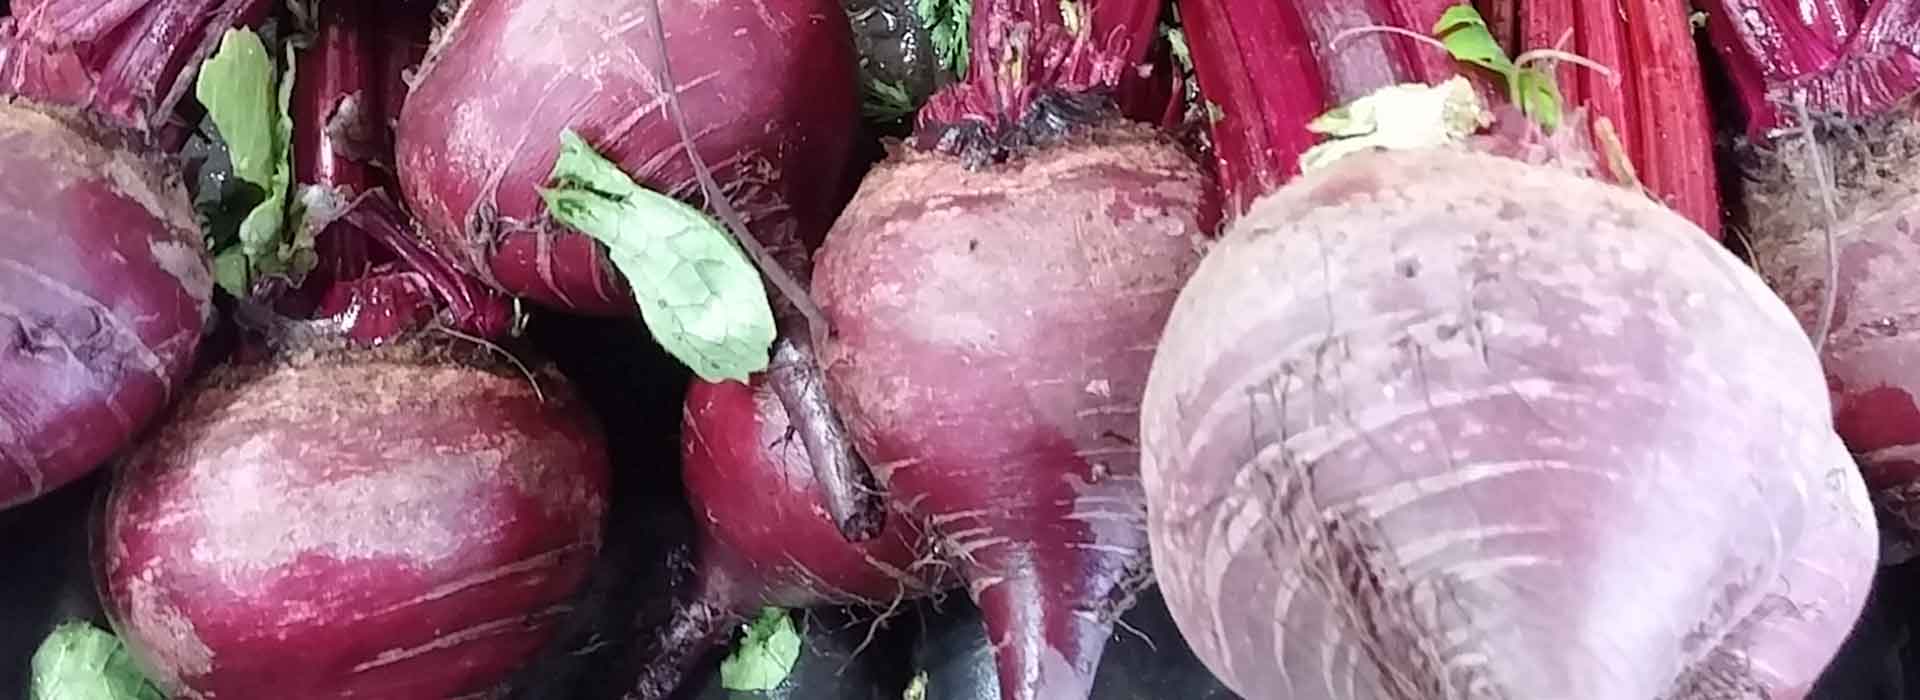
Beetroot
Betta vulgaris
Beetroot is so simple to grow in your Yummy Yard, and homegrown beets tastes ten times better than the stuff from the can that they put on your "hamburger with the lot". Read on to find out why "they can't be beeten".
Planting Schedule
Warm Areas: All Year (not when too wet)
Temperate Areas: July to March
Cool to Cold Areas: September to February
Position, Position, Position
Position-wise, beetroots aren't overly fussy. They'll tolerate full sun to part shade and even do fairly well in dappled light under a deep rooted tree. Oh, and don't forget that beets do beetifully in containers, especially the polystyrene fruit boxes you get from your green grocers... now that's sustainable!
Talking Dirty
Like most root vegies (yup, I'm talking about carrots and parsnip) beetroots need a rich, well-drained soil, chock full of organic matter like compost and manures. Drainage is the key so, if you're faced with a heavy, clay soil, improve its structure with lashings of delicious compost! And maybe consider putting in some raised beds!
Feeling Seedy
Just like carrots, beetroots tend to do best if planted from seed rather than seedlings. The seed itself is a weird looking "cluster" of a few true seeds in a corky coating. Unlike carrots though, these seeds will benefit from a soak in water overnight... you'll get better results, trust me!
To plant the seeds, make a 2cm deep trench, and pop them in about 2cm apart. Cover the seeds lightly with seed raising mix or a fluffy compost. Keep the area damp (not soaking wet) and in about two weeks your baby beets will appear. You will probably find you need to "Jenny Craig" them ie thin them out. Do this by spreading and removing beets so that there are around 6 - 8cm between each beet plant. This will give them the personal space they need to grow!
Feed Me
The faster beetroot grows the tastier and more tender it will be. The key to this is feeding. At planting time, I'd be whacking in some organic chook-poo based pellets to give your beets a kick along. I'd follow this up periodically with a drink of seaweed-based fertilisers as these contain everything needed for good healthy roots.
As with all root vegies, fertilisers high in nitrogen are unnecessary and totally counter-productive. Nitrogen puts on top leaf growth but does nothing for the roots beneath.
What about the Water?
Water deeply and keep the soil around emerging seedlings damp. Regular watering will help keep the beets from going woody but don't flood them.
Are We There Yet?
Beetroot, as root vegies go, is one of the most obliging in terms of letting you know when it's ready to harvest. This is because you can see beetroot crown above the soil surface. This makes it dead easy to assess the size of your beets and harvest when appropriate. How good is that? As a rough guide beets grown from seed are ready to roll from about ten weeks onward, depending on the size of the beets required. Make sure you harvest them before they get too big - I generally remove mine before they are 6-7cm across, otherwise they can be really tough and taste rubbish!
Pests and the Rest
Beetroots are amazingly pest free especially in a diverse, well-monitored patch. The only thing that will really knock them for six is too much water at an early age. Really wet soil leads to what's known as "damping off", a highly technical term that explains why seedlings fail. Essentially it's a fungal disease that thrives in cold, wet soil, and picks on the weak and vulnerable eg seeds and seedlings. As they say, timing is everything, so plant beets when soil is warming and the wet season has well and truly passed.
Hot Tip
I have a couple of dead simple hot tips for your bounty of beets. Firstly, when harvesting, leave a bit of stalk (about 3cm) attached to the beetroot. This makes them much easier to handle, especially when storing and cooking and means you won't hurt their delicate skin and make them bleed. Second tip is that the leaves can be eaten! They make an awesome, colourful addition to really boring leafy salads! Go on, make your mates green with envy!
Eat Me
Fresh, homegrown beetroot just begs to be baked!
Wrap beetroot in foil and place in the oven. After about and hour, remove the beetroots and allow to sit for a while to cool. Use the foil to scrape off the skin so that your fingers don’t get stained!
Slice and place on sandwiches or in a salad with beans, potatoes, beetroot leaves, olives and your favourite vinigarette.
Here’s a good way to preserve those beetroots if you have harvested too many.
Pickled Beetroots
To make two 500 ml jars:
2 Cups vinegar ( mix and match using whatever you have in your pantry)
½ Cup water
¼ Cup brown sugar
6 cloves
1 tsp black peppercorns
Place all ingredients in a saucepan.
Bring to the boil. Reduce heat and simmer for 10 minutes.
Strain the liquid and pour over the baked beetroot which you have placed in your sterilised jars.
Hint: When your beetroot has been removed from oven, place your washed and rinsed sterilising jars in there to dry out while you prepare the pickling liquid.
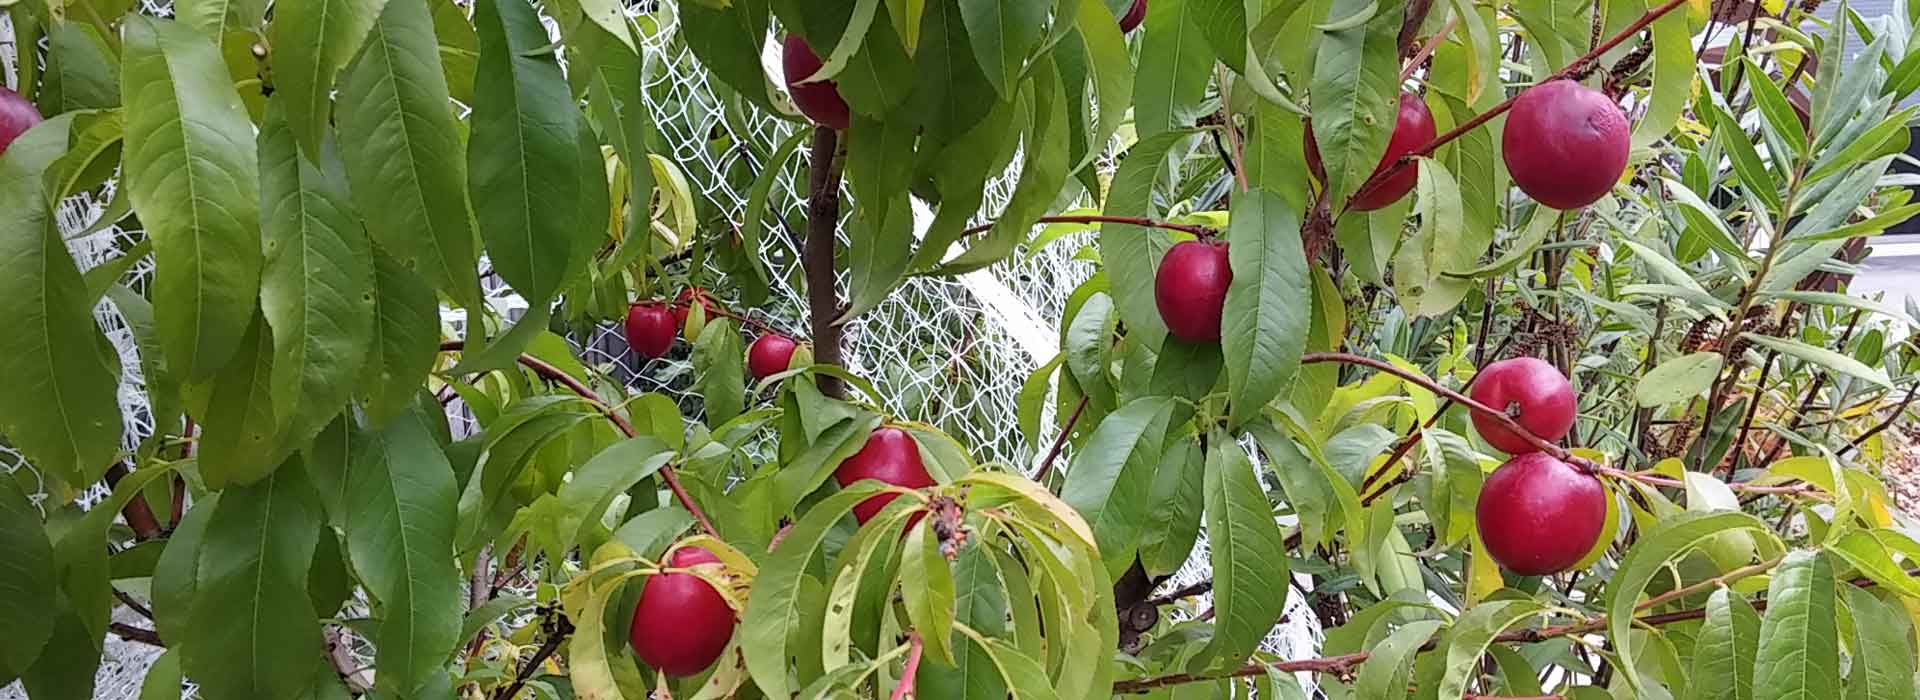
Peaches and Nectarines
Nothing compares to the taste of a home grown, freshly picked peach or nectarine. Bursting with flavour and heavy with juice, once you have tasted peaches from your patch you’ll never go back to those rubbery, gooey things from a can again. As well as being super tasty, peaches and nectarines are also really darned good for us, having a fair whack of Vitamins A and C, as well as potassium, magnesium and beta-carotine.
Oh, and just so we are all on the same page, nectarines are essentially a smooth-skinned peach…that’s why we have whacked them all together on the one factsheet.
Peaches and nectarines grow really well in the cooler areas of Australia, as they need a nice mild climate, and a cold winter. If you live in an area that is prone to late frosts, consider protecting your peaches and nectarines with shadecloth or similar, as these late/spring frosts can severely damage the flowers (and negatively impact yield).
Find a nice sunny position in your patch for these super stone-fruit, ensuring the soil is full of organic matter and free draining. This can be a bit of a challenge on some of Australia’s heavy clay soils, so incorporate some gypsum and compost prior to planting, and consider planting your peaches on a mound to improve drainage.
Food wise, give your peaches and nectarines a bit of seaweed feed a couple of times a year (spring or autumn). This will not only help them grow big and strong, but it can also act to deter the dreaded “Peach Leaf Curl” fungus, the bane of peach growers everywhere. The secret to fighting this funky fungal disease is “winter washing”, which involves spraying your trees with a low environmental impact lime sulphur spray, several times over the winter dormancy period, until bud burst. What this does is prevent fungal spores from taking hold, and will go a long way to preventing issues come spring time. Ripper!
Peaches and nectarines are best left on the tree until ripe, as their flavour is far more intense, however, fruit picked while firm is fantastic for cooking and will still ripen away from the tree.
These superb stonefruit are ideal for smaller gardens, as they are generally self fertile, meaning they don’t require another tree for cross pollination. But, if you are really pushed for space, consider a dwarf nectarine or peach, a multi-grafted tree, or a multi-grafted dwarf (half peach, half nectarine)! Some of the fabulous varieties stocked at many SGA Certified Garden Centres include:
Nectarine - Arctic Rose: Freestone, New generation of white fleshed nectarine. Picked and eaten when still quite firm they are a taste sensation. Matures throughout February. Spray at bud swell with copper to control curly leaf. Prune previous season's growth as required. White flesh. Picked firm, they are very sweet with little or no fruit acid. A delicious, new, very sweet flavour with little or no fruit acid. Bright red colour over a creamy-green background. Used mainly for fresh fruit but has potential for drying, bottling and cooking. Freestone. Fruits February. Best eaten fresh. Self fertile.
Early Rivers An easy to grow fruit tree, that can be maintained in a large pot. Two years to first fruit, and four years to high yield. Spray at bud swell with copper to control curly leaf. Prune previous season's growth. Mid-season bearer. An older variety that bears well and has tender and juicy, rich crimson blushed coloured fruit over yellow skin. Delicious yellow flesh fruit. Excellent for eating fresh, stewing, preserving or drying. Self-fertile.
Nectarine – Flavortop: Yellow flesh, freestone. Vigorous and productive. Large firm fruit with melting texture and great flavour. Matures late January to Mid February. Fresh fruit, drying, bottling and cooking. Self fertile
Nectarine – Goldmine: Freestone, white flesh. Excellent flavour, sweet and juicy. A reliable cropper. Fruits February. Fresh fruit, drying and cooking. Fruit does not keep well. Self fertile
Nectarine - May Grand: Freestone, yellow flesh. Excellent flavour, firm flesh. Late December to Mid January. Fresh fruit, drying and cooking. Self fertile. Medium-sized fruit with good flavour. Late January to February. Best eaten fresh. Self fertile
Nectarine - Queen Giant: Freestone, white flesh. Crisp and juicy with very good flavour. Mid to late January Fresh fruit and drying. Self fertile
Nectarine 3 Way Multi-Graft Goldmine / May Grand / Fantasia A combo of white and yellow flesh fruit. Fantasia: excellent yellow flesh freestone, large fruit. Late December to Mid February. Fresh fruit, drying and cooking. Self fertile
Dwarf Nectarine – Nectazee: Freestone, yellow flesh. Compact tree for small gardens.
Peach – Daisy: White flesh, freestone. Firm and juicy with good flavour. Mid January to February. A quality peach best used for fresh fruit. Self fertile.
Peach - Double Jewel: Yellow flesh, freestone. Juicy fruit with good flavour. Good cropper. January. For fresh eating, drying, juice and stewing. Self fertile.
Peach – Elberta: Yellow flesh, freestone. Soft flesh fruit. Heavy and reliable cropper. February. Fresh fruit, juice, stewing and drying. Self fertile or use J.H.Hale.
Peach - Golden Queen: Yellow flesh, clingstone. Firm and juicy. Heavy cropper requires thinning. Mid to late March Fresh fruit, juice and especially for preserving. Self fertile.
Peach – Peacharine: Cross of peach and nectarine. Smooth skin and peach like flavour. Yellow flesh, freestone. Late January to mid February. Fresh fruit, juice, stewing and drying. Self fertile.
Peach – Redhaven: Yellow flesh, freestone. Very good flavour, medium texture and moderately juicy. Matures mid-late season. Used for fresh fruit, stewing and drying.
Peach - Tasty Zee: White flesh, freestone. Very sweet, juicy and firm. Matures late season, early to mid February. Used for fresh fruit and drying.
Peach – Anzac: White flesh, freestone. Soft and juicy when ripe. A very good bearer although quality may vary. Early maturing, late December to January. Used for fresh fruit and juice.
Peach 2 Way Multi-Graft Tasty Zee/ Doublejewel: A combo of white and yellow flesh fruit. Fresh fruit, drying and cooking. Self fertile.
Peach 3 Way Multi-Graft Redhaven/Tasty Zee/ Doublejewel: A combo of white and yellow flesh fruit. Fresh fruit, drying and cooking. Self fertile.
Dwarf Peach – Pixzee: Yellow flesh, freestone. Excellent flavour. Dwarf tree for small gardens. Fruit is normal size. Fresh fruit but has potential for drying, bottling and cooking. Self fertile
Peach/Nectarine Multi-Graft Dwarf: Your two favourite fruits on one dwarf tree! This magic little miniature is a multi-graft with Pixzee (Dwarf Peach) and Nectazee (Dwarf Nectarine). A self fertile combo, would do well in a big pot. Thin fruit to improve fruit set and minimize plant health issues.
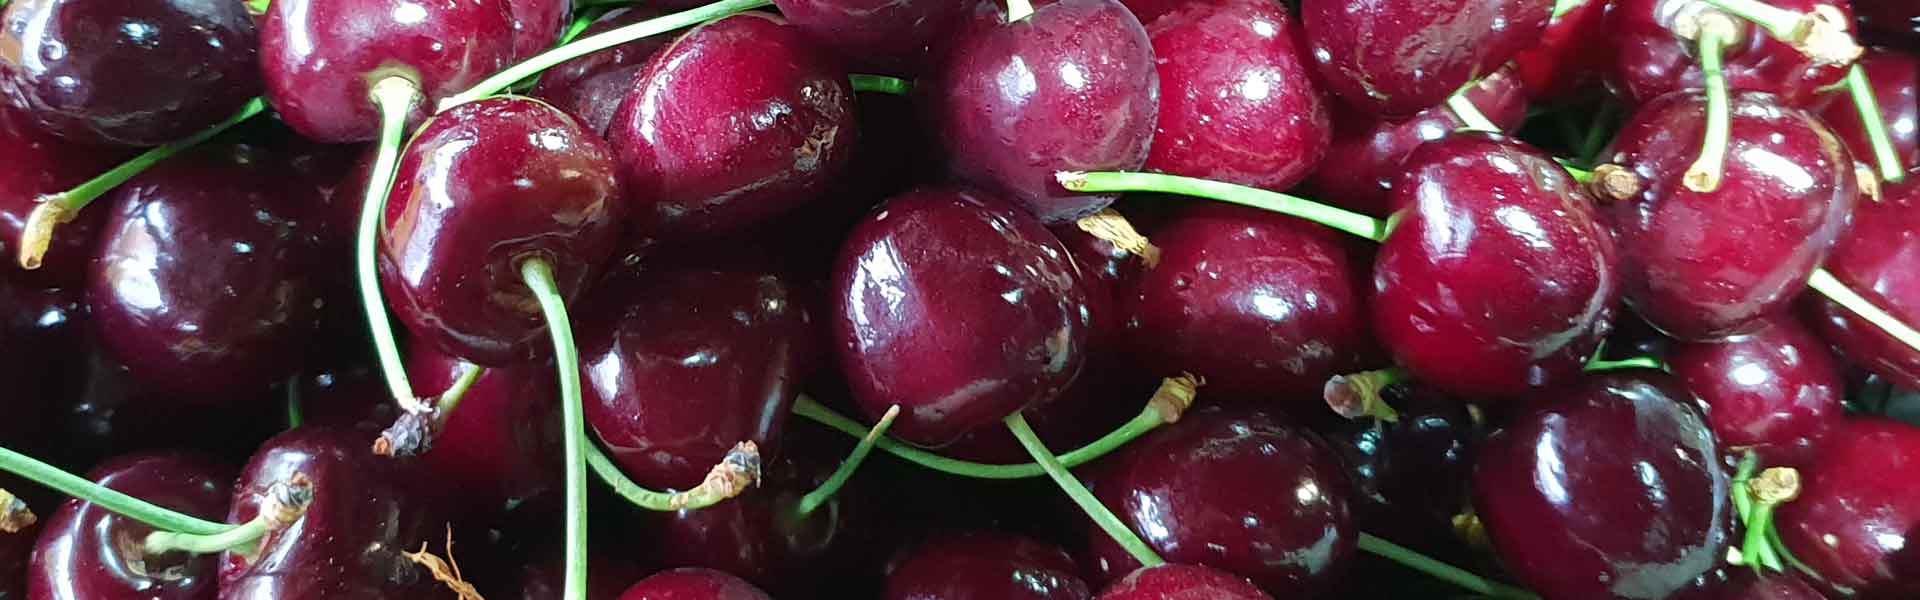
Cherries
It might just be me, but cherries remind me of a good old Aussie Christmas – prawns, cold meat and salad, backyard cricket and the ever present bowl of deep red, super sweet cherries. Mum would grab a couple of kilos of cherries from the supermarket and my brother and I would be through the lot in a couple of hours…bliss on a hot, sticky summer’s day!
Growing up in Queensland, having my very own cherry tree in the backyard was an impossible dream, as they adore a cooler, less humid climate and a lovely cold winter. This makes them a pretty good choice for the home patch across much of the southern states, Tasmania and highlands, especially those areas that experience bracingly cold winters.
If your area experiences a short burst of cold weather through winter, fear not. Whacking a good layer of mulch over the soil before winter hits will prevent the soil from warming too quickly, meaning happier and more productive cherries.
Soil is a big factor in the success of these sweet stone-fruit, and a deep, well-draining soil full of delicious organic matter (like compost and aged manure) is an absolute must-have. A neutral pH is just fine, and a position in full sun will suit both the sweet and sour varieties of cherries perfectly.
One thing to bear in mind is that cherries can get to a fair size, and many of them require cross pollinating, meaning you will have to pop in more than one tree, or grab a “multi-graft”. Big old cherry trees can get to a whopping 10 - 15m over time, so, if space is going to be an issue, why not consider a dwarf hybrid?
Cherries can have a few issues with pests and diseases, namely the dreaded Pear & Cherry Slug. This hideous larvae of the Black Saw-fly can make a real mess of cherry trees, so to prevent slug problems, feed your cherries a couple of times a year with seaweed tea to keep up the vigour of the tree. If you do encounter this ugly little pest, try sprinkling some wood ash around the base of the tree, and onto affected foliage. This generally works to discourage the little blighters. Check out our factsheet on pear & cherry slug here.
Now for the fun stuff – picking a cherry variety. Good SGA Certified garden centres should have a great range of both sweet and sour cherries, as well as multigrafts and dwarf hybrids. Some of the varieties you may come across include:
Bing: A late season variety which is great for enjoying fresh, as jams or preserving. A very popular sweet cherry with good flavour. A moderate cropping variety, this tree will provide you with medium to large, heart shaped fruit, with a juicy firm red flesh. The skin is dark red with an attractive lustre. Flavour is sweet. Cross pollinators:Stella, Blackboy, Van, William's Favourite. Incompatible with Napolean.
Black Boy: Medium-sized, round-oblong, dark red skin, firm, very dark red flesh. Good resistance to cracking. Reliable cropper. Fruits mid to late December. Used for fresh fruit, jam and preserving. Beautiful ornamental tree. Spring blossom. Cross-pollinators include: Napoleon, Van, Bedford, Bing, Flavorite, St.Margaret, William's Favourite.
Lapin: Large, sweet dark red cherries. Great for fresh fruit, jam and preserving. A beautiful ornamental tree. Autumn colour. Self pollinating.
Morello: Sour Cherry. Vigorous, multibranched, upright, medium sized tree. Small to medium sized dark red fruit with tart flavour. Fruits late December to January. Used for brining, cooking, preserves and wine-making. Superior flavour when cooked. Beautiful ornamental tree. Self pollinating.
Napoleon: Medium to large size fruit. Pink blush over light yellow skin. Sweet sprightly flavour. Productive and vigorous tree. Fruits early to late December. Used for fresh fruit, glace, crystallizing and preserving. A beautiful ornamental tree. Cross pollinators include: Blackboy, St Margaret, Van, Williams Favourite.
Royal Rainer: An early to mid-season variety which is great for enjoying fresh, as jams or preserving. An attractive new blush style fruit, that has only recently been introduced in Australia. Excellent sweet, good flavour with white flesh. Pollinators: Stella, Simone, Lala Star, Van and Grace Star.
Simone: A early to mid season maturing red Cherry. Large sweet red cherries with firm juicy flesh and of excellent quality. A small tree.Self-fertile.
St Margaret: Large, heart-shaped fruit. Dark red, almost black skin. Firm, flavoursome and juicy dark flesh. Good cropper. Fruits late December to early January. Used for fresh fruit, jam and preserving. Attractive ornamental tree. Pollinates with Blackboy, Napolean, Stella, Bing.
Starkrimson: Large, heart-shaped crimson red fruit, firm flesh and good flavour. Heavy cropper. Compact tree. Fruits mid to late December. Used for fresh fruit, jam and excellent for preserving. Self-Pollinating.
Stella: Large, heart-shaped red to almost black skin, dark red, firm flavoursome flesh. Large crops in heavy clusters. Early to late December. Great in small gardens where space is limited. The best choice for the home gardener. Self pollinating. Universal pollen donor.
Sunburst: Very large fruit, red skin. Medium firm texture, dark red flesh. Very productive. Fruits throughout December. Fresh fruit, jam and preserving. Self-pollinating.
Van: A delicious dark Cherry that bears heavy crops and has excellent quality fruit. Used for fresh fruit, jam and preserving. A mid to late season maturity. Juicy and large sweet dark red Cherries with excellent flavour. An attractive heart shaped fruit.
Pollinators: Stella, Napoleon, Blackboy, Sunburst.
Multi-grafted Varieties
Royal Rainier/Van: Self-pollinating combination.Heavy cropping tree, great for limited spaces and smaller gardens. Royal Rainier is a white-fleshed, sweet cherry, while Van is reported by some to be the tastiest cherry of the all. A good combo for cherry lovers!
Blackboy/Napoleon: Self-pollinating combination. Very productive and popular mid season combination. Prune to ensure equal growth of both varieties. Watch for birds and cherry slug. Little pruning required after framework established. Fruits on the end of short spurs. Blackboy: Large, sweet fruit, dark red in colour, flesh firm and juicy. Napoleon: Large fruit, light colour, with firm sweet flesh. Both varieties used for fresh fruit, jam and preserving. A beautiful ornamental tree.
Royal Rainier/Stella: Self-Pollinating. A good option for the cherry lover with limited space. Watch for birds and cherry slug. Little pruning after framework established. Fruits on the end of short spurs. Mature trees will produce large crops in heavy clusters. This multi gives you the benefit of having two different, yet very sweet and tasty cherries at the same time, as they are both mature around mid season.
Dwarf Hybrids
Black “Cherree” Trixie Miniture Cherry: Delicious, juicy dark-skinned heart shaped cherries borne on a small, self pollinating tree. A delight for small spaces and big pots. 2.5m x 2.5m
White “Cherree” Trixie Miniature Cherry: White fleshed, heart shaped cherry with a lovely blush to the skin. Fruit is sweet and quite pretty. Will reach 2.5m x 2.5m at maturity. May need to cross pollinate with black “Cherree” Trixie.
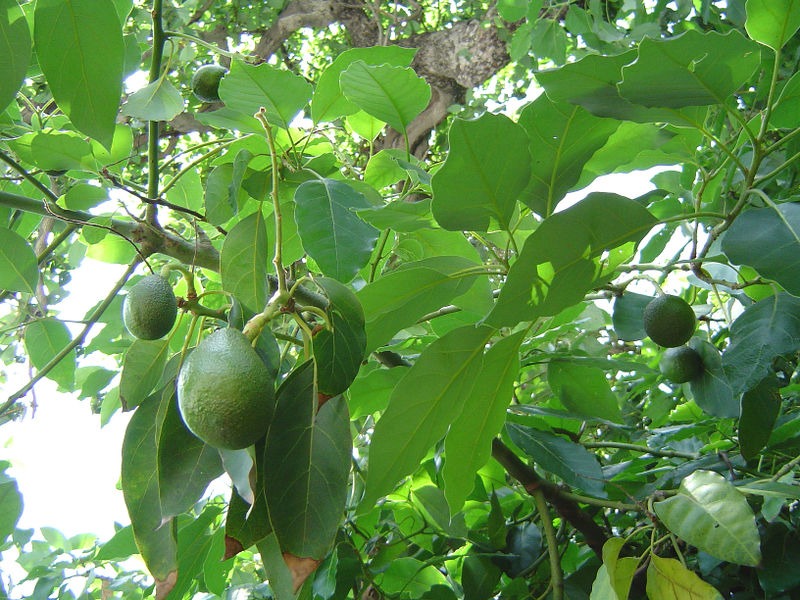
Avocados
All hail the awesome avocado – key ingredient of the greatest dip/side dish/condiment on earth, guacamole (see Helen’s recipe at the bottom of this fact sheet)! Apart from being amazingly tasty, avocados are darned good for us – high in vitamin C, chock full of anti-oxidants, great for our skin and a good source of beneficial mono-unsaturated fats. Oh, and for the blokes, they are a great liver cleanser and may also help prevent hair lose due to their high content of folic acid. Is there anything this fab fruit can’t do?
Generally regarded as a fruit of more tropical climes, many varieties of avo will do just fine in the southern states, given the soil and drainage is just right. You see, as fantastic as avocados are, they can also be a bit fussy, but with a bit of love and attention they will fruit just fine in the southern states. Avocados despise “wet feet”, so improve drainage of your heavy clay soil with gypsum and compost well before planting, and consider planting your avo’s on a slope, or a mound. Soil wise, a slightly acid to neutral pH is fine, so aim for about 5.5 – 7 for best results.
Choose a warm, frost-free position for these tasty trees, remembering that many avocados can reach a height of 5 – 10m at maturity, so leave room for these gorgeous trees. Over the hot summers across much of this country, you may find your avocado looking a bit average, especially in its first few years. Avocados aren’t known for their vigorous root systems, and this can cause them to dry out much quicker than many other plants, so keep the water up to them when it’s really hot (in accordance with local water restrictions of course).
The other thing to remember about avocados is that each variety has a different flowering “habit”, which sees avo’s categorized into two groups, A and B. Now, avocados are partially self-fertile, which means they may produce a bit of fruit on their own, but their yields will be increased if you can whack in one tree of each group. Avocados ripen once harvested, and, dependant on variety, this can take about a week to 10 days.
A word of warning regarding all avocado types – many parts of the plant can be highly poisonous to a number of animals, mainly horses, cattle, goats and birds. There is debate about whether they are poisonous to dogs, with some reports of poisoning. So if you want to protect your pooch, it would be wise to consult your veterinarian!
Avocado – Bacon (B Flowering Variety): The best cold tolerant avocado, Bacon will grow to a manageable height of 4m in cooler climes. Fruit is a medium size and quality and appears on the tree from June – late July, and, unlike most other avocados, will fall from the tree when ripe. Can bear fruit in as little as 4 years.
Avocado – Edranol (B Flowering Variety): An extremely tasty avocado, Edranol is popular in large scale avocado production, especially in South Africa. Edranol loves a slightly sandy, well-drained soil, and will go gang-busters in a coastal location as nit prefers a warmer locale. Expect a medium sized fruit with a darkish skin and butter yellow flesh.
Avocado – Fuerte (B Flowering Variety): Another great cold tolerant variety, Fuerte produces small, pear shaped fruits with a dark green skin and a fabulous nutty flavour. Fuerte can be quite a large, spreading tree reaching a decent height of about 8m x 12m, so give it some space. Fuerte has a tendency to produce fruit every second year (between June and October), and can take about 6 years to produce fruit.
Avocado – Hass (A Flowering Variety):Possibly the most popular of all avocados, Hass bears incredibly flavoursome fruits that keep well. A handsome tree to about 9m x 10m, Hass is fairly cold and frost tolerant once established, and will bear its delicious fruit between September and January.
Avocado – Pinkerton (A Flowering Variety): If you just can’t get enough avocados, perhaps consider growing a Pinkerton! This variety is a massive cropper, meaning you can have gallons of guacamole from this flavourful, medium sized fruit. May be cold tolerant once established, Pinkerton will bear fruit from June – August.
Avocado – Reed (A Flowering Variety):Large, round, thick skinned variety with a smooth, green skin and a rich flavour. Reed avocados store well in the fridge once cut. This variety grows to a manageable 4m x 2m, and will bear fruit after 3 years or so. Fruit matures between November and March.
Avocado – Rincon (A Flowering Variety): A small to medium fruit with a glossy green skin, Rincon is an avocado variety better suited to coastal sites and warmer spots in the garden. Rincon is not a fan of frosts, and won’t tolerate extended periods of cold weather. As a tree, Rincon is a beaut size, about 4m x 3m, and bears fruit between July – September.
Avocado – Sharwill (B Flowering Variety): Sharwill is a NSW & QLD fave, with good reason. This awesome Avo is a regular bearer of good quality, very tasty fruit with a decent oil content, small stone and fair storing ability. Sharwill is not real frost tolerant, and will bear its glossy green, pear shaped fruit between June – August.
Avocado – Wurtz (A Flowering Variety): A gorgeous small tree for gardens, Wurtz is a popular variety if avocado, prized for its rich, flavoursome fruit. A good performer in warmer climates, Wurtz is a dwarf-like tree growing only to 2.5-3m, yet produces a consistent, heavy crop of beaut fruit! Expect fruit from October – December.
Helen’s Rockin’ Guacamole Recipe
2 Avocados Mashed
1 Roma Tomato Diced
1 Eschalot Diced
2 tsp Lime Juice
2 tsp Cumin Powder
1 tsp Dried Thyme
1 tsp Salt (or to taste)
1 tsp Ground or Cracked Pepper (or to taste)
1 tsp Tabasco Sauce
Mix it all together... you might not need to add all of the eschalot depending on how big the avocados are. If you are using this as a spread or similar on toast, you may want to add a bit of mayo as well. Enjoy!
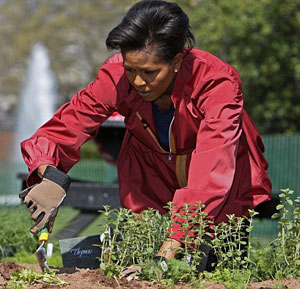
Victory Gardens

It has been bought to my attention that, despite what I may believe, I am NOT the most powerful or influential woman in the world. (In all honesty, I may not even the most important woman in the SGA office!) However, there is one woman who may very well be able to stake this claim – the First Lady of the United States of America, Michelle Obama. From what she wears to what she eats, every moment of her life is reported on, scrutinised and, in many cases, emulated. From fashion to fitness (and everything in between), the impact of Michelle Obama’s actions are far reaching and incredibly important!
So, what on earth does this have to do with gardening? Well, as many of you may be aware, Michelle Obama has turned over an area of the South Lawn to develop an organic vegetable garden at the White House. The garden, a 100 square metre raised bed, will be planted out with the Obama’s favourite vegies and herbs, incorporating a berry patch and even some beehives! The first lady will endeavour to tend the garden herself, with the help of her two kids, and some students from one of the local schools.
As Michelle herself has said (and SGA agrees), growing your own food at home encourages both children and adults to eat better, live better and connect with the earth. It also significantly reduces the environmental footprint of our food, by eliminating the packaging, transport and excessive water and chemical use generally associated with produce from large scale farm environments. By encouraging bio-diversity in their White House patch, and using their own White House produced compost in the garden, the Obama’s vegie patch is a serious step in a super sustainable direction.

But aside from being an incredibly high profile organic vegie garden, the White House patch is so much more. It is a serious political and environmental statement, encouraging all of us to get planet-smart, and start growing at least some of our own produce at home. Think this is far fetched? Think again!
During World War II, Eleanor Roosevelt, the first lady at the time, planted a Victory Garden on the White House lawn. This was in direct response to canned food rationing, and was designed to encourage folks on the “home front” to be less reliant on rationed food supplies and to grow their own food to supplement their basic needs. It worked! More than 20 million Americans setup and ran their own Victory Gardens, accounting for almost 40% of all vegies being gobbled up nationally! And not just at home... they grew edible gardens on apartment rooftops, in abandoned lots, and even in public parks and gardens. And across the pond in good ‘ol Blighty, war ravaged Brits were doing the same. One garden in central London was even set up in a bomb crater!!
The impact that this White House garden had through the 1940’s was astonishing! Supported by a poster campaign, books published by the American Agricultural Society and public education on the health benefits of growing fresh produce, the Victory Garden campaign was one of the most successful attempts at urban agriculture ever!
So, what happened? Why isn’t America (and the rest of the world for that matter) heaving under the weight of home-grown produce, instead of under the weight of a chronically obese society? Why is a vegie patch on the Obama’s lawn, and their pledge to eat healthy, organic, home-grown produce such a big deal? Well, the answer it seems is a combination of affluence, convenience and laziness, and it’s certainly not confined to the good old US of A. Australians too have given away the pitchfork in favour of pizza and many of us seem happier to eat a fast food burger than a healthy, home grown salad!
What productive, organic sustainable gardening needs are positive role models. Those individuals who, by making a decision or undertaking a task, can directly influence millions of others to do the same. And this is my hope with Michelle Obama and the White House vegie patch. Perhaps this modern day Victory Garden will help win the war on obesity, unhealthy lifestyles, and the multitude of environmental sins committed through our love of pre-packaged, processed products and fast food.
So, America has its sustainable gardening role models in the Obama’s, but where are Australians to gain their inspiration from? Will we see Kevin Rudd and Therese Rein tending the once productive (but now fallow) vegie and fruit orchards at the Lodge? Will our federal and state environment, climate change and sustainability ministers roll up the sleeves of their suits and get dirty for the good of the environment, and their own families health? As I was always told as a child, actions speak louder than words and I for one would be heartened to see these politicians practice what they preach.
I am calling on politicians and other high profile Australians to make a difference in their own backyards. Give us some sustainable vegie growing advocates from all streams of our society. There are a multitude of positive environmental and health benefits that could be achieved through Australians growing their own food sustainably, including:
- Waste destined for landfill is reduced, as packaged and processed goods are minimised and kitchen waste is composted at home.
- Produce gardeners have the opportunity to eat more organically grown fruit and vegetables, even those on restricted budgets.
- Undertaking gardening activities helps participants to become fitter and healthier, both physically and mentally.
- The emissions associated with the transportation of food (food miles) are significantly reduced as we grow our own at home.
- Food is grown and eaten in season, when it is at its optimum, both in flavour and abundance.
- We can choose to sustainably manage our vegetable patches thus limiting our exposure to the chemicals and pesticides used in large scale, non-organic farm practices.
- Water is used less intensively and in a more targeted manner in home produce gardens.

And whilst we may not wholly negate the impact of carbon emission disgorged by large scale Australian polluters, we can conceivably head in the right direction through the simple and immensely enjoyable act of growing your own food! And from small things, big things grow so just maybe our pollies can think about converting a bit of the Parliamentary Gardens into an edible patch for the Government Canteen. Get into it... contact your local member, or your environment minister, and ask them what THEY are doing!
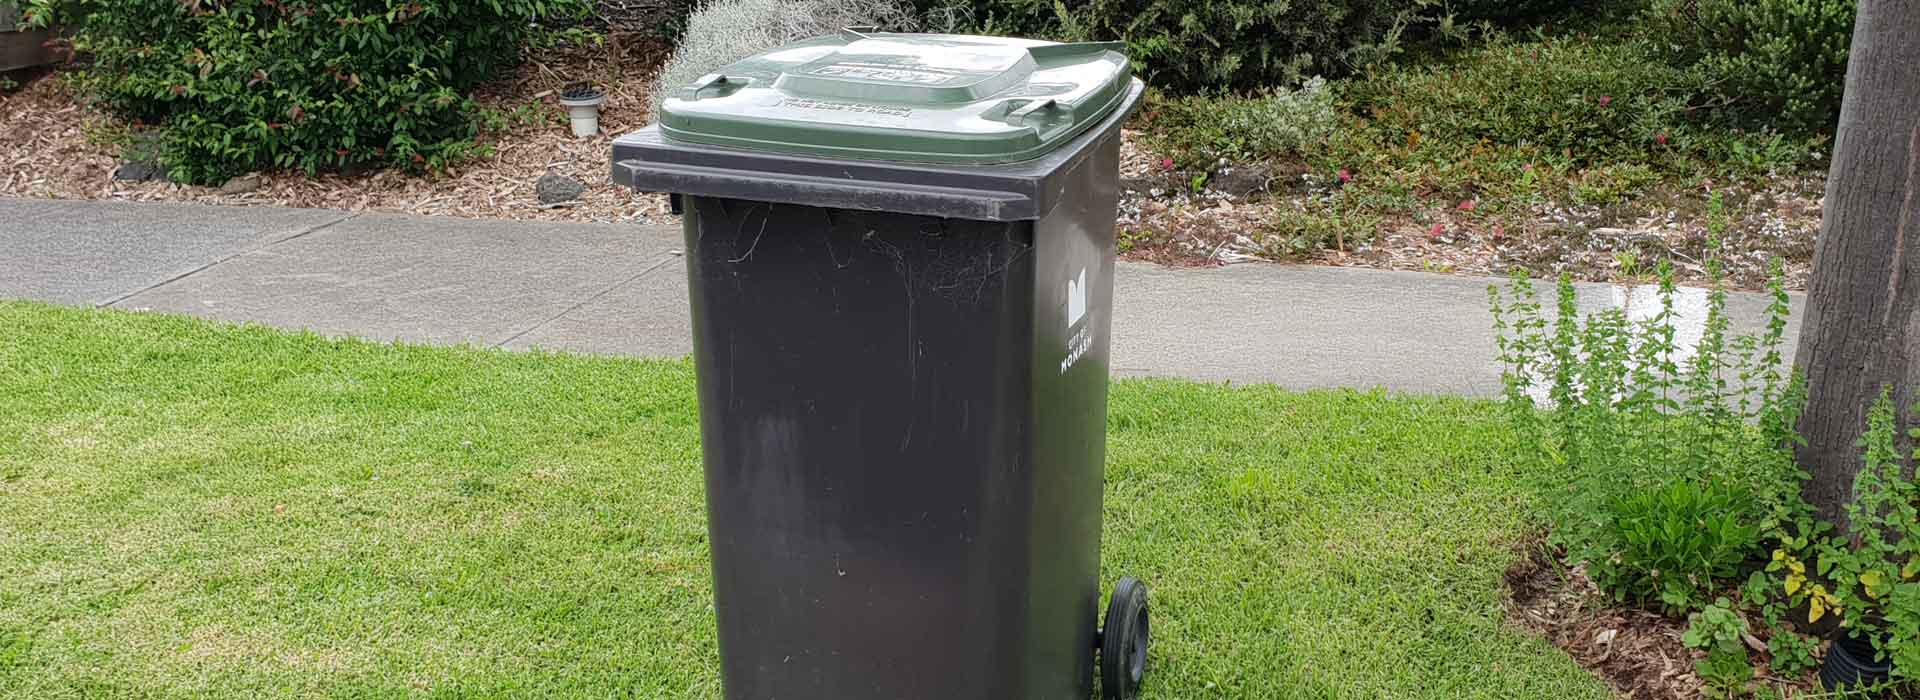
Recycling Green Waste
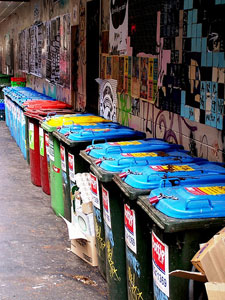
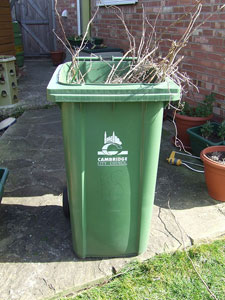
As I sit in my delightful home office and gaze longingly out the window at my little patch of suburbia in search of inspiration, I am greeted by the site of my wheelie bins. There they sit, all three of them, lined up like cheer leaders for three different coloured waste management teams! It occurs to me that these three bins are a bit like the three tenors, (or the three stooges) – everyone knows what two of them do, but people just can’t quite figure out what that third one is for. As I stare at these symbols of the suburbs, it dawns on me that, as a passionate industry professional, it is up to me to get to the bottom of the green waste bin, and explain the ins and outs to you, dear readers! It also dawns on me that I probably need to get out a bit more, but that’s another story for another time! Let’s have a look at our household green waste – what it is, where it goes, what becomes of it, and why it is really important that you do your bit!
Talking Rubbish – Green Waste Explained
My rubbish bins, apart from being excellent backyard cricket wickets and occasionally (and not to be recommended) makeshift ladders, serve a far greater purpose... they get rid of about 400kg of my domestic waste per year! If you think that’s excessive, you’re wrong... that’s the average! Every single Australian is responsible for about 400kg of household rubbish a year, with 180kg of this being comprised of potentially recyclable food and garden waste. It’s this stuff that we refer to as “green waste”, which is essentially putriscable (able to be broken down by micro-organisms) waste from our homes and gardens. Many Australian councils have dedicated green waste wheelie bins, and we need to use them! Green waste should NEVER be placed in the standard rubbish bin... that waste goes to landfill and that ain’t where we want our 180kgs of green waste to go!

Yeah, I know what you’re saying... what difference does it make if my 180kgs of green waste ends up at the tip? While 180kgs seems fairly insignificant, if we look at our personal green waste in terms of greenhouse gas emissions, it becomes an important issue. Each kilogram of organic waste, assuming 50% is green waste and the other 50% is food waste, contains enough carbon to produce 0.17kg of methane. In a landfill situation, where this green waste is broken down anaerobically (without oxygen), approximately 50% of carbon may be converted to methane. Therefore, every one of us is responsible for the emission of 15.3kg of methane per annum . Both methane and carbon dioxide are greenhouse gases, however methane has Global Warming Potential of 21 times that of carbon dioxide. Essentially, our yearly 15.3kg of methane has a carbon dioxide equivalent of 321.3kg.
Almost half a tonne of carbon emissions, per person, per year, if we dispose of our organic waste in our normal bin instead of whacking it in the green bin, or composting it at home! That’s the emissions equivalent of driving a pretty ordinary 4WD from Sydney to Melbourne, or one passenger flying from Melbourne to Hobart! That should be reason enough to make the most of your council green waste bin but, if you still need convincing, read on!
The Excellent Adventures of Green Waste
So, what exactly becomes of our dearly departed green waste, once we have popped it in the bin (or on the footpath, depending on your council)? Well, most green waste, after being collected, heads off to a custom designed, green waste processing facility, where it is sorted, often by hand, to remove rubbish and things that just don’t belong in the bins (more on that later). It is then passed through a massive grinder and laid out in rows (called windrows) where, generally, they are covered with a thermal material (this stops the stink, and helps regulate the temperature). These rows are then heated (maintained at around 55 degrees Celsius) for at least three days, but often much longer. This acts to kill any pathogens, pests and weed seed that may be present in the green waste.
This composted green waste is then passed through another cleaning process, where ferrous metals (like steel, iron based alloys and stainless steel) are removed by large magnets. The green waste is then graded according to size, with the largest pieces being sent back to the grinder! Essentially, this entire process leaves us with compost... made from your very own green waste! This compost is then sold back to landscapers, councils and even nurseries, where it is used and sold as a top notch soil improver, or, when mixed with gravels or sands, is sold as a soil blend. How good is that?
To Bin or Not To Bin
Seeing as though most of our green waste ends up back in the landscape or garden, it is vitally important that we know what can and cannot be whacked into the wheelie bin! Ever seen (or bought) some bulk compost, only to find bits of plastic, bottle lids and even cutlery through it? That’s because someone, somewhere has put the wrong thing into their green waste bin and, despite the pretty thorough screening and cleaning process the waste goes through, rubbish occasionally slips through and taints the entire load. If you think separating your rubbish into the right bins is tedious, consider the painful process of picking 1000 pieces of ground-up plastic bag from your garden! So, what can we safely put in our bins, and what needs to go elsewhere?
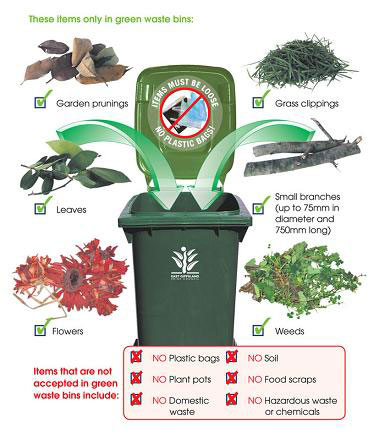
In The Bin
- Grass clippings and cuttings (weeds generally fine, check with your council)
- Small twigs and branches (no thicker than 15cm or longer than 60cm)
- Leaves (both fresh and dry)
- Flowers (from garden and spent fresh flowers)
- Prunings
Not In The Bin
- Plastic bags – do NOT wrap your green waste in any sort of plastic bag
- Food and kitchen scraps
- Soil and Potting Mix
- Rocks, stones and gravel
- Treated timber
- Stumps and branches thicker than 15cm in diameter and over 60cm in length
- Building materials and builders rubble
- Flower pots
- Paper, cardboard or similar
- General rubbish (including e-waste, chemicals, batteries and household garbage)
- Dead animals – you’d be surprised!
While this may all seem arbitrary and not all that important, we can assure you it is. Plastic bags, while being phased out across the country (and it’s about time) still continually find their way into green waste, costing waste management companies both money and time, not to mention the negative environmental impact caused by this stuff mixed through our compost. It’s time to get serious about household waste Australia... compost what you can, recycle all recyclables and use your green waste bin for good instead of evil!
If you need more information, or you don’t have a green waste bin (or collection service) contact your council and get them moving... your planet will thank you for it!
1. Total amount of Organic Waste Produced (p.p p.a) x Methane per Kilogram Organic Waste (0.17kg)
Moon Planting

No Torch Required
Long, long ago in a city far, far away, I was a novice gardener with very limited horticultural knowledge (yes, I know it’s hard to believe). One phrase I kept hearing as a young pup was moon planting and, I’ll confess, it confused me. My grandmother spoke of and practiced moon planting religiously, and this mystified me for one main reason – my grandmother refused to leave the confines of her lounge room after dark, for fear of being mobbed by cane toads. How then could she possibly garden by the moon?
As I and my horticultural knowledge grew, I realised that moon planting had nothing to do with gardening after dark, rather gardening by the phases of the moon. Quite frankly, it was easier for me to get my head around gardening by torchlight than it was to understand the principles of moon planting. But, like any good gardener, I persevered and, while I don’t profess to be an expert in the field of moon planting, I now have a far greater understanding of this long used and passionately practiced permaculture principle. So, for your enjoyment, I present the “Beginners Guide to Moon Planting” and no, you won’t need a torch!
I’m Being Followed by a Moon Shadow

Moon planting is old... really old! Older than my car, my favourite jeans, even my nanna - we are talking ancient! In fact, the moon planting system has been utilised by just about every early culture in the world and its popularity and relevance has not diminished over time. Moon planting has seen a resurgence of sorts over the last 40 years, thanks in no small part to the popularity of permaculture, and there are some valid reasons for this. It is said that by planting, cultivating, harvesting, weeding and the like in the appropriate moon phase, the flavour, yield, and vigour of your edible crops can be significantly increased, without the addition of fertilisers. This is a top outcome - for your wallet, your taste buds, your health and the health of the planet! But, what’s it all about, does it really work, how do we do it and how on earth do we decipher those moon planting charts?
We know, just from sitting at the beach and watching the tide, that the moon has an impact and affect on the earth, but what does this have to do with gardening? Well, if you’re into moon planting, a fair bit. The Synodic Cycle (the moon or lunar cycle) not only controls the tide, but is also reported to have a serious influence on the surface tension of liquids, and, in turn, plant growth. Scientific studies have shown that subtle changes to the biological functions of plants occur in direct correlation to the planets tidal changes, due to alterations to the Earths electromagnetic fields. Yeah, it’s all a bit complex, but think about it this way – the moon has an impact on water movement on earth, plants take up water from the soil through their roots, while seeds require a fair whack of the wet stuff to germinate. It makes sense then, that the phase of the moon would impact upon the way plants take up water and in turn, the way plants germinate and grow!

So, how can we use this knowledge, and the moon, to our advantage in the garden? Simply by knowing the phases of the moon (relax, there are only four main ones) and what they represent, we can begin to plan our moon gardening calendar. The moon moves through a complete cycle every 29 and a bit days, and, during that time, we have four main moon “quarters”:
New Moon Phase
When: From New Moon (crescent moon or dark moon) to the first quarter moon
What Happens: The moon is waxing (growing bigger) in this phase, and living things apparently feel an upsurge of energy! One thing is for sure though, sap rises during this period. Delay doing anything in the patch until a tiny wee fingernail of the moon is actually visible.
What to do in the patch: Planting, grafting and transplanting leafy annuals is recommended in this phase, as is whacking in cereal and grain crops. It’s a great time to mow the lawn, prune many plants and provide low environmental impact liquid fertiliser to the patch.
First Quarter Phase
When: From First Quarter to Second Quarter
What Happens: The moon is still waxing (growing bigger) in this phase, and the sap is still flowing! Gardening is NOT recommended in the 12 hours before the full moon.
What to do in the patch: Still a great phase for starting things off and even better for planting, grafting and transplanting fruiting annuals (those that produce above the ground, and have their seeds inside, like tomatoes, capsicums, beans and peas). Cereals and grains can also go in now, and it’s still okay to feed if you need.
Full Moon Phase
When: From 12 hours after Full Moon to Third Quarter
What Happens: All living things, be it plants, pets or people, are at the peak of their electromagnetic energy during the full moon phase (we’ve all heard about folks getting the crazies around this time, it’s all about the energy!).
What to do in the patch: Sap is flowing downwards during this time, so whacking in bulbs and root crops that produce underground is perfect. Pruning and harvesting is recommended during this phase, but avoid planting most foliage and edible plants, as their initial growth will be impressive but will wane (just like the moon during this phase)

Last Quarter Phase
When: From Third Quarter to New Moon (dark moon)
What Happens: This phase is barren which, in gardening terms, can be translated as, well, a bit boring and tedious.
What to do in the patch: This phase is all about doing those annoying jobs in the garden, the ones we put off all the time, like weeding, cultivating, pest control and fertilising. It’s also the best time to mow the lawn, especially if you want to slow down the growth of the grass. Preparing patches for impending planting is a perfect project during this phase.
So, now that you are armed with all this information, I can hear you ask "does this moon planting caper actually work?". Well, to be honest, I don’t have an answer. Many of my colleagues swear by it, while others (like myself) tend to garden when we have time, irrespective of the phase the moon is in. There is loads of evidence available from both schools of thought, and, at a recent garden show I attended, moon planting calendars were selling like hotcakes. Speaking of calendars.
Whatever way you look at it, moon planting is illuminating, with or without a head torch! Happy gardening all you stars!

Caterpillars
Hi, my name is: Caterpillar
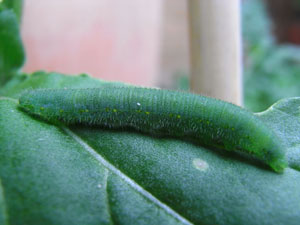
Describe yourself: I am a child star, and appear in a really well known children's book! It's true, I am very hungry, and even though I am very young (we are the larvae of moths and butterflies), my enormous appetite is impressive! I'm very recognisable and come in many sizes and colours. I'm even known to be striped or spotted. I hatch from an egg and from these humble beginnings I rapidly grow. By the time I'm a teenager I can be from 25mm to 40mm long.
Hobbies: Eating and chewing leaves and sometimes boring into fruit. I work late into the night and often chew young plants right off at ground level! When I'm an adult I fly around laying eggs for the next generation to emerge.
Likes: Leaves, (especially soft, fleshy ones), fruit, fleshy young flower buds. I'm good at hiding and have some great camouflage techniques!
Dislikes: Birds, Assassin Bugs, Paper Wasps, Lacewings and Ladybirds. I hate soaps - like home made chilli soap, or store bought stuff. I can't stand Dipel... that stuff makes me totally sick! Success Naturalyte really ticks me off!

You'll know you've met me when: Your plants' leaves are full of holes; there are loads of my dark green droppings around, and your fruit and flower buds have big bore holes in them!
Breaking up ain't hard to do... if:
- Spray your plants' leaves with water and knock me and my mates right off our perch!
- Squash me and my mates by hand or [ay the kids next door to do it! It's icky but effective!
- Collect me in a bucket and feed me to the chooks!
- Encourage or release some of my well known enemies like Assassin Bugs, Ladybirds and Lacewings.
- Release some Bacillius thuringiensis bacteria to kill me and all members of my family. (It hurts no others!) You can buy this in your local nursery.
- Cover your edible crops with fine mesh or similar. Then my beautiful mum can't land and lay her eggs.
Photographs: Elaine Shallue, SGA
Phytophthora Root Rot

The fungus Phytophthora (Fye-toff-thra) root rot has caused quite a few disasters as it's traveled around the world. One species (P. infestans) was responsible for the Irish potato famine. Late blight (or Irish blight) of potatoes wiped out season after season of potato crops across Ireland in the 1800s. Potatoes were the staple food in Ireland at the time, often eaten three or four times a day. The result was a famine that decimated the population.
And now another devastating species, P. cinnamomi has found a new home in Australia. It's likely to have been introduced with European settlement and is now found in Western Australia, Victoria, Tasmania, South Australia and coastal Queensland, where it is having a devastating affect on hundreds of thousands of hectares of native vegetation.
Western Australia in particular has been badly hit with the disease. It has infected the majestic jarrah forests in Western Australia, where it is slowly killing vast areas of vegetation, including the trees.
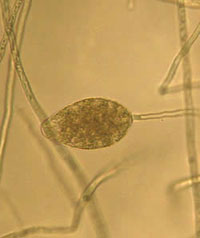
It's a fungus
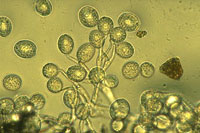
P. cinnamomi is a fungus that grows through the root system (and sometimes the stem) of a plant. It can only be seen using a microscope.
It destroys the root system, thereby preventing the plant from taking in water and nutrients. In fact, infected plants usually die from lack of water and nutrients. Some plants can survive the disease.

The fungus releases spores into the surrounding soil, which travel in soil water to infect the next plant. The microscopic image shown here displays sporangia, which release spores.
Interestingly, Phytophthora root rot does not usually cause a lot of damage in undisturbed vegetation in areas where annual rainfall is less than 600 mm.
Symptoms
It's difficult to diagnose the disease accurately without relying on laboratory tests and it can be confused with a number of other non-disease problems, such as drought stress.
Leaves may develop brown patches at the tips and margins and there is generally a yellowing off and dying back of foliage. The foliage dries out and young feeder roots darken. When it attacks large mature trees, the disease can take years to kill the plant.
Prevention the Only Cure
The alarming spread of P. root rot in Australia is accompanied by the fact that efforts to control it so far have failed. Research is focusing on examining the vulnerability of plant species and communities, especially the high risk vegetation, and on the ecology of the fungus itself.
The only real way to combat the disease at this point in time is by limiting the spread of the fungus. Once the disease has established the next focus is on reducing its impact. A combination of quarantine, hygiene and treatment with the chemical phosphite are the current control methods.
Quarantine is particularly important in protecting areas of high conservation value. Hygiene measures, such as sanitising tools, machinery, boots and tyres helps prevent the fungus from spreading as a result of human activity. Phosphite is used as a spray on infected plants with some success and does induce long-lasting resistance against the fungus. It has a low toxicity for mammals and breaks down quickly in the soil, but at high levels it can be harmful to certain plant species.
Phosphite must be used carefully, as more research is required to fully determine its limitations and optimal methods of use. Spraying with phosphite gives about 2 years control of the fungus, whereas stem injections will give about 5 years control.
Unfortunately, treatment with phosphite is not sustainable, as it needs to be repeated frequently. Phosphite is also subject to regulations regarding its use, which varies from state to state. Check with your local DPI before considering its use.
The fungus has another advantage in that the spores can live for up to 10 years in the soil, and the fungus itself can live up to 20 years.
Information sources:
Plant Protection 1, by Kerruish, R.M. & Unger, P.W., 2003, RootRot Press, ACT.
Australian Government, Department of Environment & Heritage
Images (from top) courtesy of DPI, Victoria; DSE, Victoria; and USDA Forest Services.
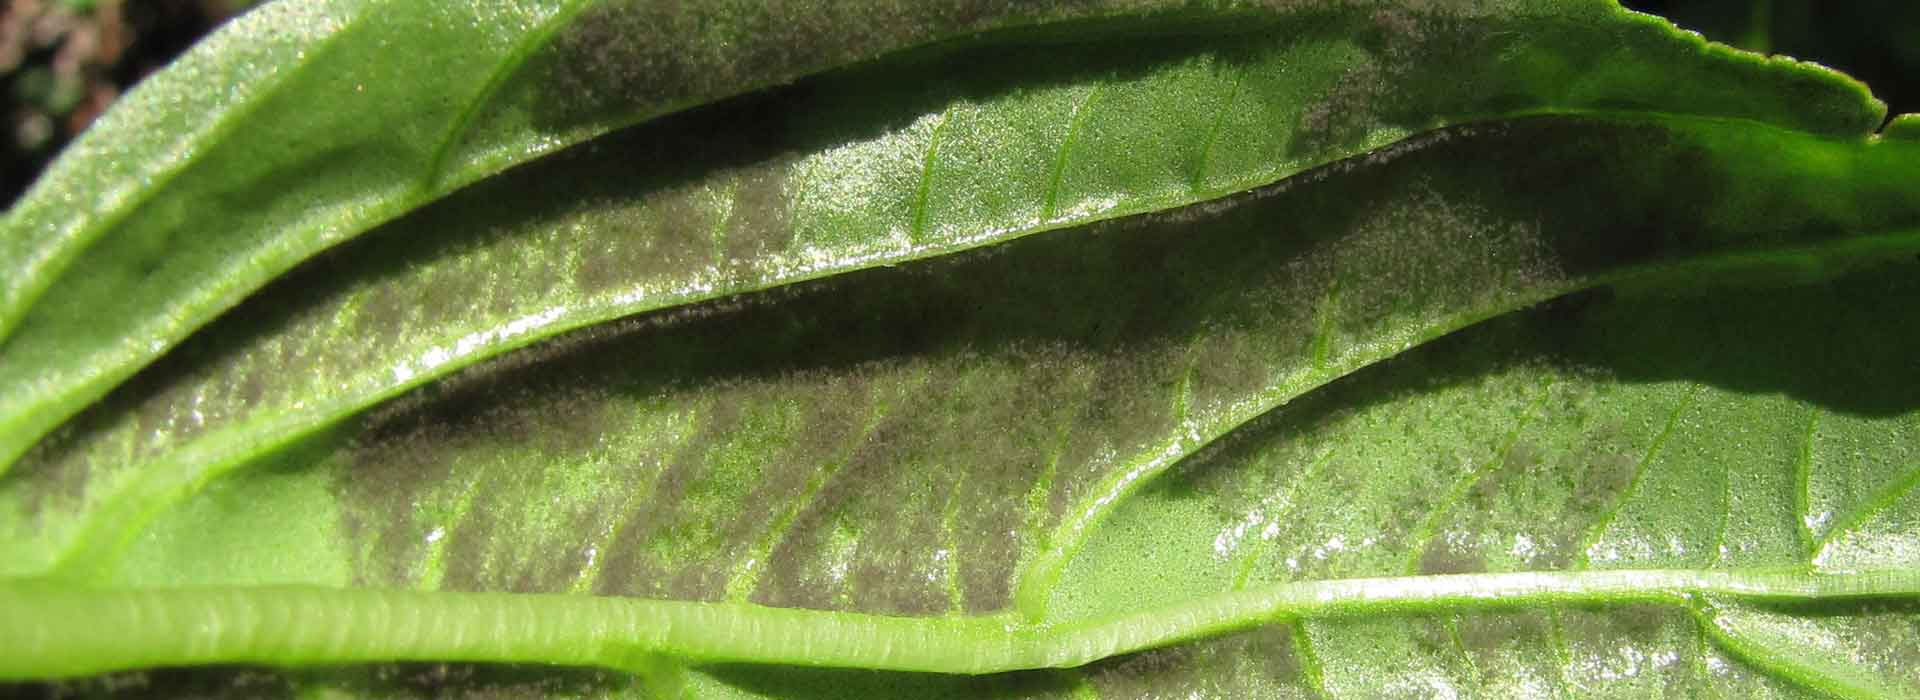
Downy Mildew
Hi, my name is: Downy Mildew
Describe yourself: I get really sick of people thinking I am powdery. He's my cousin, and, to quote him, I am also a pretty fun guy (you know... fungi!). I'm a little duller than him though, some may say grey, but I prefer grey-brown. I look kinda furry, but I am pretty shy!
Hobbies: Don't like going out that much, mainly hang around on the undersides of my favourite leaves (grapes, cabbages, onions, lettuce, stocks and vines). I like sporing, but am pretty shy, so I only do it at night for release in the morning.
Likes: I love it wet, especially when there is 10mm or more of rain, it's over 23 degrees and leaves are wet for 24hours. Picky I know, but I just can't get enough of it! I love water……in fact, my spores can't live without the stuff! I love young leaves…..the younger the better!
Dislikes: Hate dry weather, drip irrigation, clean gardens, full cream milk sprayed onto me, home made bi-carb remedy or store bought fungicides. I really dislike seaweed solutions in the soil around the bottom of my plants!
You'll know you've met me when: The upper surface of your leaves is yellow and patchy, and you can see me on the lower surface! In cool wet areas, I am the king!
Breaking up ain't hard to do... if:

- Don't water the leaves late in the afternoon, especially if it's cool
- Pick up any fallen leaves and dispose of... don't compost!!!!
- You don't overcrowd your plants, Downy Mildew loves no air circulation
- Don't overfeed plants with high nitrogen fertilisers... it's just bad news!
- Make up a milk mix (about 3 parts full cream to 10 parts water) and spray it on affected plants. It won't prevent it but it will knock it right back!
- Excessive overhead irrigation will seriously encourage me!
- Try some store bought stuff, low environmental impact of course
 Photographs:
Pic 1: www.ces.ncsu.edu
Pic 2: www.umassvegetable.org
Pic 3: http://hgic.clemson.edu Description: Downy Mildew symptoms as seen on the upper leaf surface
Pic 4: www.apsnet.org Description: sporangiophore and sporangia of downy mildew
Banner image: Forest & Kim Starr, CC BY 3.0 us, https://commons.wikimedia.org/w/index.php?curid=71901983
Choosing a Compost Bin

Ahhhh, the good old days. Where milk was hand delivered in glass bottles, kids could play in the street until the lights came on, lawns and gardens were watered by sprinklers (remember them??) and composting meant a smelly pile of rubbish behind the back shed. Now, while I lament the loss of most of these childhood activities, I have to admit I don't miss the stinking compost heap. Don't get me wrong, I love compost, but I also love the technology that has seen these often inefficient heaps transformed into mean, green, compost making machines.
Problem is, there are so many compost bins on the market at the moment that it can be totally overwhelming. Plus, there are a whole host of things to consider when you look at buying a compost bin, including budget, space, amount of greenwaste produced, pets, vermin and the amount of time and effort needed to produce magic compost. So, to help you along, here is a swag of information on a number of commonly used, currently available compost bins, and their features, be they good, bad and ugly. Bear in mind that new products are released all the time, so, if the bin you are interested in ain't on the list, just let us know, or pop on the forum and have a yarn!
Buyers Guide to Bins
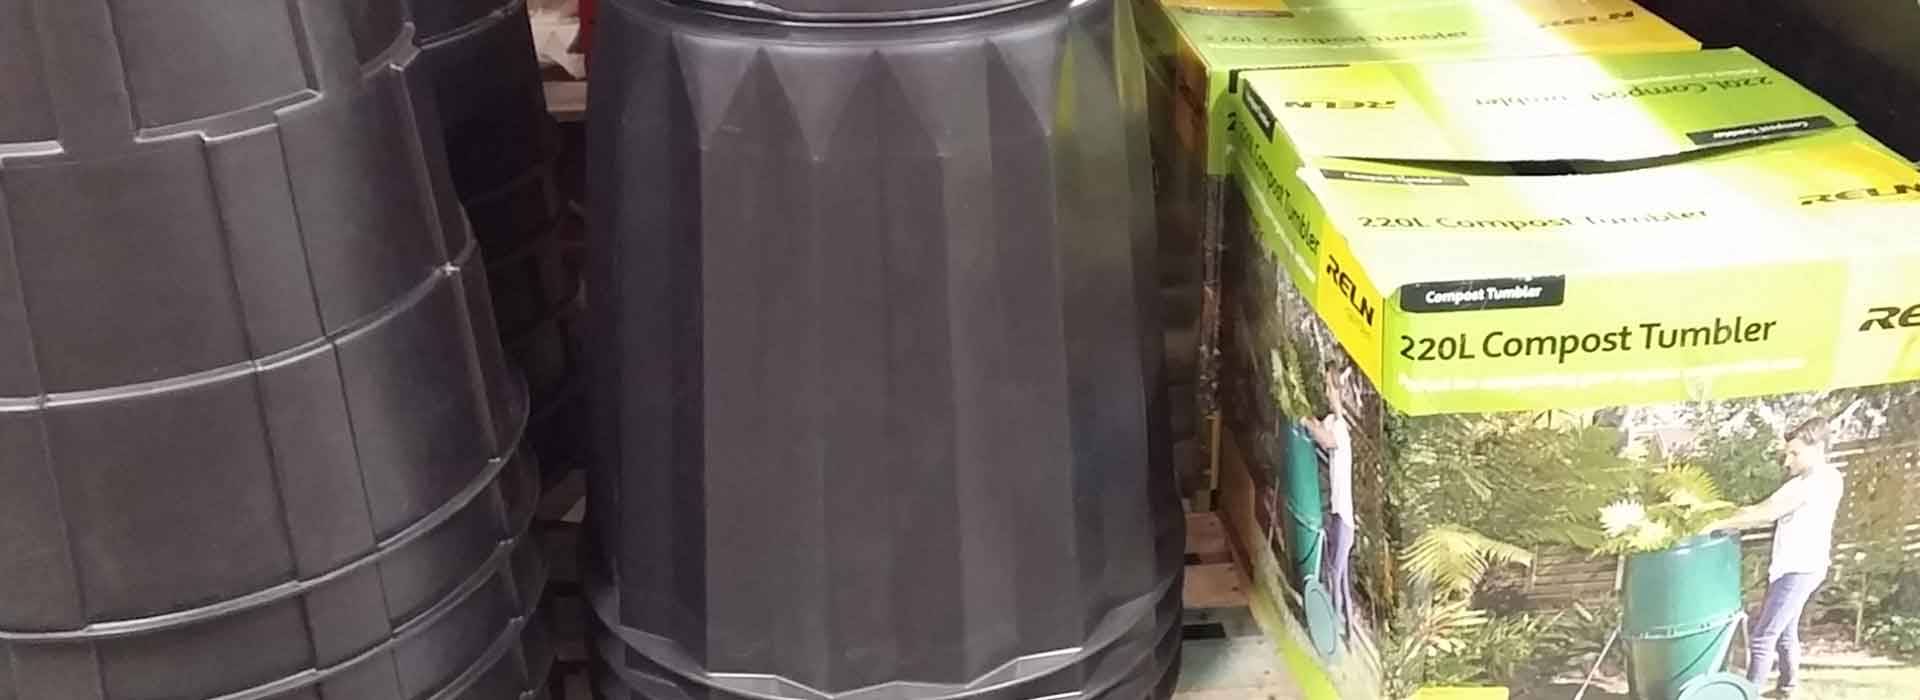
Product Name: RELN Compost Bin
Size/Capacity: 225 litres
What's it made of: 100% Recycled Plastic
What's the deal: Straight forward open base compost bin. Has a hinge and lid at the top for whacking in your waste. Basic black. You need at least two bins, one for decomposing material, and the other for using now. SGA recommend three bins, one empty, to be used when turning the compost.
Why we like it: They are cheap and cheerful, readily available, easy to assemble, and manufactured from recycled materials. It's also an also Aussie product so low offset miles!
Why we don't: They are hard work, and, if not turned frequently, things can go pear shaped. Open base can attract vermin and curious pets.
Work required: Medium to high. Heaps require aeration and turning. Clever composters can pop a piece of perforated agi pipe through the centre of the heap to improve aeration.
When will I see compost: Six to eight weeks and beyond (dependant on weather, location, and how often you aerate the heap... the more the better)
Product Name: Gedye Compost Bin
Size/Capacity: 200 litres or 356 litres
What's it made of: The green ones are high density virgin plastic, but the black ones are 100% recycled plastic.
What's the deal: Very stable open base compost bin. Has a large opening, covered by a well secured lid. Basic (recycled) black or naughty non-recycled plastic green. You need at least two bins, one for decomposing material, and the other for using now. SGA recommend three bins, one empty, to be used when turning the compost.
Why we like it: Has greater stability than some other open base bins. Shorter wider profile can make access easier. Fairly cost effective, and has a six year warranty. Go the Australian made product!
Why we don't: They are hard work, and, if not turned frequently, things can go pear shaped. Open base can attract vermin and curious pets. Having to buy a few of them does add up! Make sure you choose the recycled option.
Work required: Medium to high. Heaps require aeration and turning. Clever composters can pop a piece of perforated agi pipe through the centre of the heap to improve aeration.
When will I see compost: Twelve to fourteen weeks and beyond (dependant on weather, location, and how often you aerate the heap... the more the better)

Product Name: Tumbleweed Compost Maker
Size/Capacity: 220 litres
What's it made of: High density UV treated plastic bin mounted on galvanized steel tubes.
What's the deal: A free-standing, above ground compost bin, fully enclosed and mounted on an A-frame. The bin is able to be "tumbled" over, which aerates the heap without you having to dig it. The ends are vented to allow air to be drawn in, assisting the composting process.
Why we like it: Fully enclosed system means no vermin and pongy pooches, which is definitely a good thing. The "tumbling not digging" concept is on the money as well, and for a fairly complex looking bin, it's dead easy to construct. Five year warranty makes us smile! Australian made. Fairly quick composting process.
Why we don't: Not always the easiest things to turn, especially if the bin is full and you are less than buff. Needs to be flipped a few times a day (ideally). Can't be lodged up against the fence or behind the shed, as it needs a bit of clearance to flip it. The manufacturing process and materials used are not all that sustainable (why not used recycled plastic?!?), but the longish life span offsets this a bit.
Work required: Low to medium. A few quick tumbles every day should do the job nicely!
When will I see compost: Four to six weeks (dependant on weather, location, and how often you tumble the heap…..the more the better)
Product Name: Aerobin 400
Size/Capacity: 400 litres
What's it made of: High density UV stabilized plastic.
What's the deal: Fully enclosed, free standing compost bin. Incredibly stable, with large square base. This bin has an aeration core, which essentially draws air into the unit, meaning the aeration happens without you having to lift a finger. Aerobin has a leachate tank and tap at the base, meaning any liquid compost can be caught and utilized. The lid is hinged, and two sides can be removed at the base to access the compost. While the product has been designed and developed in Australia, the Aerobin 400 is currently manufactured in India.
Why we like it: This is composting made simple! All the hard work is done, and you reap the rewards. The temperature remains fairly constant inside, so once the heap gets started, composting happens in a flash. Aerobin is capable of breaking down products not generally recommended for use in other bins. Fully enclosed, so is vermin and pet proof. Leachate collection tank is a top concept. The bin is a fairly decent size, great for larger households and properties.
Why we don't: For a start, it's big... too big for a lot of situations. It's not the simplest thing to put together, so instructions need to be followed very carefully. You may have to take out a second mortgage to purchase one, and the three year warranty doesn't seem quite long enough for the cost. The tap for the leachate tank can be incredibly difficult to access, and clever composters may want to extend the tube a touch with some 13mm poly pipe, or raise the bin on some bricks or similar to make leachate collection simpler. Recycled plastic would be a bit more sustainable. It has a fairly significant carbon footprint, due to the product being manufactured in India!
Work required: Low. Once you have managed to put the unit together, there is minimal input required.
When will I see compost: Twelve weeks initially, and then the supply should be fairly continuous for the rest of time (providing you still feed your greenwaste into the bin!).
Product Name: Eco Bokashi Bucket
Size/Capacity: 20 litres (although a larger 120 outdoor bin is also available)
What's it made of: The glossy black bin is 100% recycled plastic.
What's the deal: Fully enclosed "bucket" system, designed to sit inside the house, preferably under the kitchen sink or similar. Works on a fermentation process, whereby your greenwaste is broken down, forming an incredibly nutrient rich leachate, and a pile of non-smelly waste which can be buried straight into the garden. Fermentation grains are needed to facilitate the process.
Why we like it: Fully enclosed system means no vermin or flies. If all things go well, the fermentation process means the bin shouldn't smell at all. Small size makes it tops for apartments and single/couple households. Australian manufactured is always good. The leachate is magic (just don't forget to dilute it before applying it to plants, it is pretty strong). The whole process is fairly quick. Fermented waste is excellent when preparing vegetable gardens.
Why we don't: Well, size ain't everything, but this bin can be a bit small for some situations. Burying the fermented waste in the backyard can prove an issue, especially in apartment or townhouse type situations. You need to use fermentation grains as part of the process and they can be a little expensive and challenging to track down. It can go a bit mouldy if you do not follow the instructions exactly! If you don't bury the fermented waste deeply enough, your dog may suspect you've buried his dinner and try to retrieve it!
Work required: Low to medium. Burying the waste may not be everyone's idea of a good time!
When will I see compost: Once the bin is full, it takes a week for the waste to ferment... that's fast!

Water Storage Crystals
Water crystals - this has got to be one of the hottest topics at the moment... and I'll give it to you straight.. I don't use them. Ever. I have never found it necessary, as my soil is so chock full of organic matter that it remains nice and damp all the time. There is a plethora of products on the market, proclaiming to "store" water in the soil.
I myself have a few concerns about some products on the market at the moment, particularly polymer based products. You know the stuff I'm talking about... the little "jelly" looking crystals that can absorb hundreds of times their weight in water and can last for years. The insides of baby nappies are essentially the exact same product that is utilised in many water crystals! They are a polymer based product (a petrochemical as we all know), and is, in fact a copolymer of polyacrylamide (a big name that spells bad news!). I have significant issues with the overuse of polyacrylamide in the garden, one because it is a petrochemical (not very sustainable, and slightly toxic), but it gets worse.
Putting it simply, polyacrylamide is a polymer formed from acrylamide subunits that can also be readily cross-linked. Handle this stuff with caution... and think carefully about using it in the garden, especially near edible plants. Some research indicates that polyacrylamide can degrade under normal environmental conditions, releasing acrylamide, a known nerve toxin. That's not really ideal, and I reckon it's unnecessary!
Polymer based products need water to perform, and some research has also suggested that polymer based water products may compete with the plant for water if allowed to dry out. Also, a whole pile of this stuff is manufactured in China and shipped to Australia, pretty unsustainable emissions-wise if you ask me. The other issue I have with polymer based watering products is that they are highly unpredictable, and the rate of moisture can be significantly altered by high temperatures and other factors, which pretty well defeats the purpose!

What I reckon people need to be aware of is how they place these products if they are going to use them, especially for the establishment of trees. We all know that roots "seek out water" and this is no exception with solid water or water storage crystals. If placed incorrectly, there is a real possibility of roots all heading off in one direction to where the water is, creating a "lopsided" root system, which isn't a problem early on, but will be as the tree grows. Lopsided roots + wind + damp soil = bad news.
There are some products available that are fairly natural, about 98% water with 2% natural vegetable gum to hold it all together. It's not affected by temperature, and won't over water as it ceases dispersing when the surrounding soil is wet. I think these are pretty good when attempting large scale plant establishment, especially trees within a landscape. Just be aware that some of these products are also manufactured overseas, which gives them some negative points in the whole sustainable thing!
It must be remembered that these are irrigation supplements, not total irrigation solutions. If you must use this stuff, don't rely on it to do the hard work for you, and for goodness sake follow the instructions on the container... overdoing it will lead to plants literally "popping out of the ground"! The best water storage aid? Good compost, good aged animal manures, and good soil management.
References
1. Wisconsin Department of Transportation. Madison, WI."Polyacrylamide as a Soil Stabilizer for Erosion Control." January 2001. Report No. WI 06-98.
2. ^ Smith, E. A., S. L. Prues, F. W. Oehme."Environmental Degradation of Polyacrylamides and its Effects of Environmental (Outdoor) Exposure." Ecotoxicology and Environmental Safety 37(1). June 1, 1997.
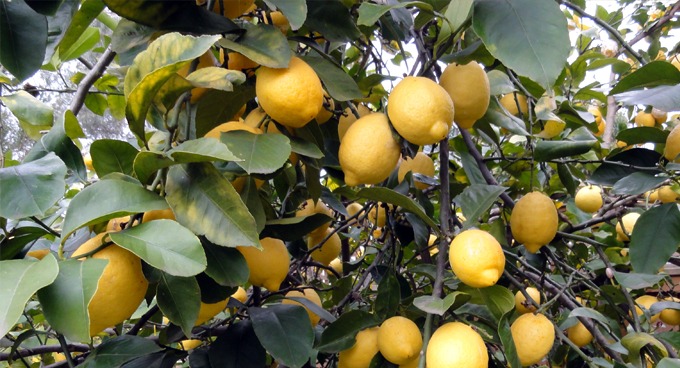
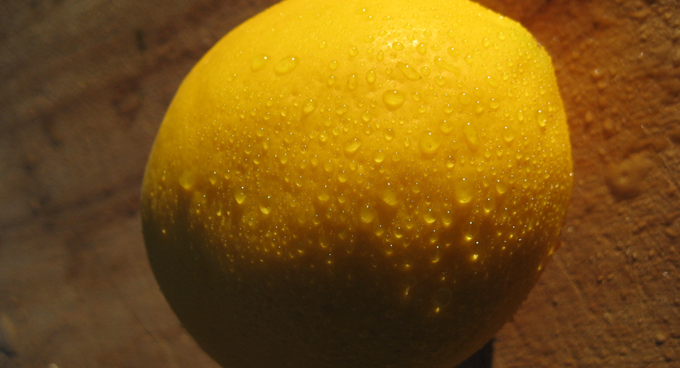
Cool Climate Citrus
Ahh citrus..who doesn’t love a bit of fresh lime in their beer, a cheescake chock full of home grown lemons, a juicy, just picked mandarin or a gorgeous orange on a hot summers day? Problem is, us folk living in the cooler areas of Australia can be a bit challenged by citrus, due to the fact that the bulk of them originate from warmer climes. So, which varieties do best in the cooler areas of this great land? Well the good folk at SGA have put together a list of citrus hits for your part of the world. So grab a G and T, sit back, and enjoy!
Lemons
1st Place – Without a doubt, the best lemon for colder spots is the Lisbon…cold tolerant, thick skinned, great tart lemon flavour, full of juice and, best of all, it does darned well in clay soils. On the downside, Lisbon is COVERED in thorns, especially when young, making it a little unsuitable where pricks may be a problem. Lisbon grows to a medium height (about 8m) and is vigorous as well as being long bearing.
Honourable Mention - Okay, we have to mention the Eureka, possibly Australia’s most popular lemon. Look, it will do alright in some areas, but it despises cooler spots and will really struggle in cold snaps. A nice sized tree with great lemons, the Eureka can bear fruit almost all year round and is pretty well thornless. The thing to remember with the Eureka is that they HATE clay soil and wet feet, so prepare your spot well!
Limes
1st Place – No surprises here – the best lime for cooler climes is the Tahitian. A beaut, golfball sized fruit that has a fabulous tart lime flavour is perfect in beers, cocktails and marinades. Down south, this luscious lime bears fruit from Autumn to Spring on a tree with no thorns! And, just when you thought it couldn’t get any better, the Tahitian Lime can also be grown quite happily in a large pot.
Runner Up – Let’s give a nod to the Kaffir lime, a decent variety for growing in many parts of Australia. Grown predominately for it’s foliage (which is used in a range of Thai dishes and my sister-in-laws super steak marinade), Kaffir limes are great in pots, but look out for those spikes. They prefer a free-draining soil, and are not big fans of extended cold periods and frosts. The skin of the kaffir is a great zest.
Honorable Mention – A special mention must be made of the finger lime, our very own native citrus. An understory plant of QLD and NSW rainforests, the finger lime can be grown with some success in cooler areas, just as long as you find the right spot. These guys need good drainage, protection from direct sun and wind and a bit of a feed to get them humming. The best variety for cool climate success and fruiting is, without question, the Alstonville, a green lime to about 10cm in length that will happily fruit in cooler climes. Don’t expect too much in the first year, but hold onto your hats after that! The prickliest bush on earth!
Oranges
1st Place – By George, the best Orange for temperate climes is the Washington Navel. Setting fruit in early winter, the Washington Navel is the best orange for eating straight off the tree, has a gorgeous flavour, and will tolerate cooler areas. On the less positive side, the juice can sour fairly quickly in the fridge, and they can be a little prone to pest and disease problems. A gorgeous shaped tree to 4m tall, this guy will do pretty well in a large sized pot.
Runner Up – Coming hot on the heels of our winner is the ever-popular Seedless Valencia. This beaut little tree (to 4m) has delightfully sweet fruit that can be held on the tree for months, and can be sweeter than many other varieties in cooler areas. The juice is beautiful, which is no surprise considering that Valencia oranges are responsible for most of the world’s OJ. The fruit on this tree ripens a bit later in the season (early September in some cases), and the tree itself seems to be less prone to attack from nasties than the Washington Navel. Not a lover of frost and intense cold snaps.
Honourable Mention – If marmalade is your thing, whack in a Seville. A gorgeous shade tree (very popular street tree in Spain if memory serves me correctly), Seville produces an incredibly tart, bitter fruit with an absolutely divine perfume. Will do OK in the southern states, but find it a nice, warm, sunny spot, and show it some love!
Cumquats and Calamondins
1st Place – Tough call on this one, especially considering how well these citrus do in cooler areas of Australia, especially around Melbourne. If we have to pick a winner, let’s go for the Australian Cumquat (also known as the Calamondin). This is a gorgeous small tree, a stunner in a pot, and can even be hedged if pruned well after fruiting. This super citrus will fruit several times a year, with the main crop borne in winter. The fruit is small, round, bright orange when ripe and incredibly tart and acidic, making it just perfect for liquors, jams and other preserves. Can be eaten straight from the tree, skin and all.
Runner Up – A nod has to go to the Nagami cumquat, a gorgeous wee tree with fruit that is ridiculously sweet (the skin) while being mind-numbingly sour (the juice) at the same time. Beautiful as an ornamental, this citrus is a symbol of fertility, and is often used in Chinese New Year celebrations.
Mandarins
1st Place – Imperial, with juicy, sweet fruit and a fair cold tolerance wins this round. A great backyard variety, Imperial is a reliable fruit setter at home, with a thin, easy to peel skin that is a gorgeous bright orange colour. Imperial has very few seeds, so is great for fussy kids (and adults!). The fruit will ripen late Autumn to Winter, and a happy Imperial tree should continue to fruit for many, many years.
Runners Up – If flavour is what you are after, it is hard to go past the good old Satsuma mandarin. Cold tolerant, this mandarin is an early bearer, the fruit having few seeds and the flavour sweet, juicy and low in acid. Try a Robbie Engall Seedless, which is essentially a “puffy skinned” Satsuma, making it more child friendly and easier to peel!
Ellendale is also a great option as well, being a bit more cold tolerant than some other varieties. The fruit itself is large, quite sweet and rich, but can be very seedy (can’t we all). This mandarin may be challenging for kids, as the skin is incredibly tight, and a bit hard to peel.
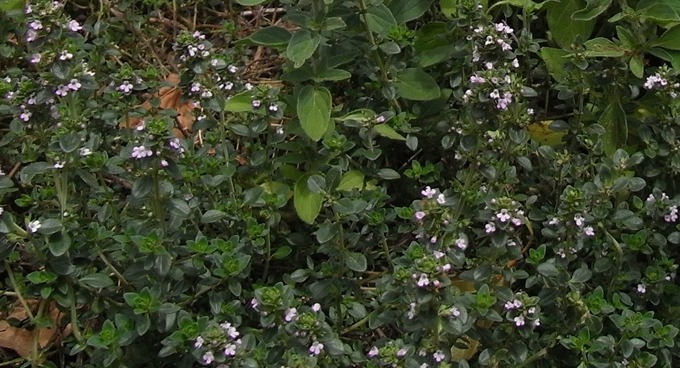
Thyme
Tasty, good-looking, versatile and tough as boots, thyme has got to be one of the easiest culinary herbs around. Prized for its antiseptic qualities (try thyme tea for a chest cold, you’ll be amazed!), thyme is an excellent plant for vegie patch borders, dry spots and pots.
Planting Time: All year
Position: Full sun
Water Needs: Low
Difficulty: Easy
How Long: Thyme is ready when you are.
Whichever of the 350 thyme species you choose to plant (loads of which are available at your local nursery); all will thrive in a sunny, hot, dry spot. Thyme is a low growing (no more than 25cm) herb that spreads, so allow 20cm between each plant.
Thyme needs well-drained soil, a raised bed with a little bit of compost through it is perfect. Thyme responds well to mulch through the warmer months, but many gardeners, especially those in temperate and cool areas, remove this mulch over the colder months to allow the soil to warm.
A more low maintenance plant you couldn’t wish for! Thyme will respond well to a drink of worm wee or compost tea during spring and after flowering, but that’s it.
As for watering, with thyme it is almost unnecessary. In fact, thyme has more issues with over watering than under watering. Keep well away from thirsty plants and during warmer weather, a drink once a week should be more than sufficient.
Thyme, like many culinary herbs, can be picked as required. A perennial, thyme in the right spot should kick on for years and years. Cut back after flowering to promote vigorous, bushy growth and experiment with varieties for unusual flavours and flower colours.
Oh, and here’s a hot tip: the leaves of the common thyme Thymus vulgaris (or lemon thyme Thymus citriodora) can be steeped in boiling water for 15 minutes, strained and mixed with lemon juice and honey to make a fantastic medicinal tea, especially for sore throats. Should be avoided by pregnant women.
Thyme pic © Elaine Shallue (SGA)
