Last August, I wrote an article for SGA about my first attempt at a Sustainable Wicking Worm Bed. For details see (https://www.sgaonline.org.au/sustainable-wicking-worm-bed/). The bed above is a larger version developed to suit the needs of my small suburban back yard.
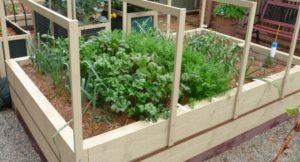
I have kept the size down because I will need 4 of these to replace my conventional 4 bed crop rotation system, and I have limited space. The length of wicking beds is restricted only by the available length of plastic liner, but usually their width is limited by the distance you can reach without climbing all over it. This bed is 2700mm long x 1650mm wide x 600mm deep.
I have smaller specialised beds for growing dwarf fruit trees (Meyer lemon and Hamlin orange), Tomatoes and Strawberries (runners just planted). The Tomato bed is growing Broccoli until it gets warm enough for Tomatoes.
I have used the past 12 months gathering knowledge and applying it to the first wicking worm bed I made. I learned that the bed worked extremely well using very little water and maintaining a moist soil ideally suited to growing vegetables. The worm farm prospered in the moist conditions consuming about 1 litre of finely chopped kitchen/garden waste per week. The bed above is using twice that quantity. Two different types of worm inhabit my wicking worm beds. These are composting worms and burrowing earthworms.
Composting Worms are surface dwellers that thrive in decomposing organic matter. 
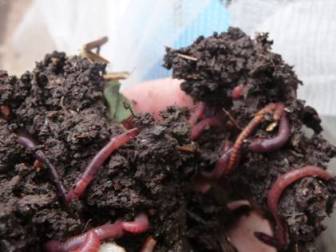
They prosper in the ideal conditions provided by a wicking bed worm farm with its consistent moist environment, protected from predators and shaded from sunlight. My composting worms are a mix of the following:-
Red Wrigglers [Lumbricus Rebellus].
TigerWorms[Eisenia Fetida].
Indian BlueWorms[Perionyx Excavatus.
Garden worms burrow deep into the soil creating nutrient rich pathways for plant roots to colonise as well as fertilising the soil. They distribute nutrients and micro-organisms from the worm farm through the plant growing area. Their tunnels provide efficient distribution of water and air to the plants roots. When establishing a new wicking worm bed, I harvest garden worms from soil in my conventional organic garden beds, and supplement these by buying Amynthus Gracious/Cortius worm eggs.
Despite the high levels of microbial activity in the bed and the continuous supply of nutrients from the worm farm, I top up the soil after harvesting a crop with rich material from my compost heap. The bed has an isolated ecosystem, and I need to maintain this supply of diverse micro-fauna originating in the larger garden ecosystem.
I also inoculate some of my plants with Mycorrhizal Fungi (available on the internet) by dusting the seeds before sowing them, or the root ball when planting seedlings. This fungi develops a symbiotic relationship with plants by penetrating their roots to set up nutrient exchange sites. They then send their long fine root like Hyphae in search of nutrients and water. The Hyphae exude enzymes dissolving rock and lignin in the soil, releasing nutrients and building soil structure.
In return for the fungi’s supplies of nutrients and water, the plant manufactures vitamins and carbohydrates for the fungi’s use. Unfortunately Brassicas and beets do not form symbiotic relationships with Mycorrhizae.
I don’t dig the soil in my wicking worm beds; it breaks up the structure and disturbs the worms too much. The soil doesn’t get compacted because it is continuously aerated by the worms and micro-organisms in the soil.
I use very little fertiliser to supplement the finely chopped kitchen/garden waste I supply to the worms. However, before planting crops, I add a little blood and bone and rock dust to the beds surface. If the growth of flowering and fruiting plants is too lush and sappy, I supply extra potassium by adding seaweed extract to the bed’s water tank. A little lime is added as a surface dressing for plants requiring a neutral or alkaline soil. I test for pH to get this right.
I have a non commercial web site which provides detailed information on how I built my (so far) 5 above ground wicking worm beds, 1 triple in-ground wicking worm bed and 8 wicking bins for anyone who would like to try. The address is www.jas49580.blogspot.com .
Photos:
Related Articles:
Sustainable Wicking Worm Bed
Progress Updated March 2013 When I built my first wicking worm bed 10 months ago, it was a test bed designed to gain experience with the process. My…
Community Gardens – 12 months on, the journey continues!
It is nice to reflect on the year that has been and to acknowledge with a sense of accomplishment a year of hard work and many milestones. And I’m…
7 Comments
Comments are closed.
Just wanted to say thanks for such great and detailed instructions both here and on your blog. I will definitely be building some wicking beds to your design, when I get my own place!
Hi Caroline, Your concrete idea sounds great. Was it broken up into small pieces? The arched conduit pipe is very interesting. You might consider using a dado rail around the outside of the bed about 100mm down with small galvanised bullet head nails underneath to hold your shadecloth down with no gaps for insects to get in. I find this works very well and it is quick and easy to unhook for access to the plants.
Another advantage is if you need to put heavier shadecloth over everything on really hot days, they will hook on over the top of your regular light shadecloth quickly and easily (ref. http://jas49580.blogspot.com.au/2013/12/home-page.html#more).
I have had mixed results with fruit in Ecobeds. After growing exceptionally well for 12 moths, my dwarf meyer lemon had a setback in the spring. I unknowingly allowed the soil to flood during our wet spell in Melbourne. The overflow had blocked and it took some time to clear. The lemon is recovering now, but there will be no crop this year. Hopefully you’ve used my more recent designs for overflow, where the pipe connects directly into the filler pipe (http://jas49580.blogspot.com.au/2013/10/home-page_4916.html#more) or the distribution pipe (http://jas49580.blogspot.com.au/p/heavy-framed-ecobeds.html), sixth photo. There’s very little chance of either of these getting blocked.
My dwarf hamlin orange is living very happily in an Ecobin. Despite the lack of space, I am able to maintain a community of worms and keep the soil dressed regularly with finely chopped kitchen waste and plenty of compost (under mulch and shadecloth. My raspberries have a problem living in Ecobins. They have very quickly packed the bins with their growth, and it is very hard to keep them fed. In a larger bed with more space, this might be easier, but they may still over-run the bed.
Finally, and I must apologize for such a long winded reply, Roots of fruit trees have not penetrated the liner (although those in Ecobins would be hard pressed to get through the bin wall) and all are very stable in 300mm of soil. Happy gardening. John
Hi John,
Thanks for your reply. I have got 4 mandarins growing in an ecobed and have recently planted kiwifruit and kiwiberries into ecobeds by my pergola. Hopefully I’ll have lovely shade soon as well as fruit to eat!
I saw on your other website that you are trialling new materials to prevent the soil getting into the reservoir. Did you find that the shade cloth didn’t work well enough? Did you have a stocking or protection to exclude soil around your ag pipe? How did you determine that the wicking wasn’t working efficiently enough? I had a problem with the ping pong balls coming unstuck and can’t get them out of the PVC pipe! I am going to try letting the beds dry out so the ball goes to the bottom of the pipe and put silicone on the end of the dowel to extract it.
This weekend I am hoping to build an inground waterwick herb garden with the centre of it raised for those herbs that like drier conditions like rosemary. I am growing mint plants (with my kiwifruit) and they are growing so fast – loving the moist soil.
I have just planted some cucumbers in an ecobed and have attached some metal uprights at the ends with galvanised mesh sheet secured between them as a trellis for the cucumber. I need to get some vegie nets to put over my strawberries – any recommendations of where to source these?
I have 4 ecobeds for vegetables, 1 with blueberries and strawberries and 1 with raspberries (though it is getting quite crowded!). Each bed is 3m x 1.5m and 600mm high. Then I have my mandarin and kiwi fruit beds.
I have noticed such a difference in the growth of plants, and LOVE not having to water so much or stress when it’s such a hot day. And it’s great to have a strucutre to attach shade cloth to as well.
So thanks again for your detailed plans and I look forward to hearing more about your updates.
I’m so sorry to have missed your comments Caroline, I haven’t visited the SGA website for a while, but I am so pleased you have advanced so far with wicking beds.
The trialling of coir and sugar cane straw is really about trying to find an organic solution to the tank cover. The shadecloth covers I have been using work fine, and my oldest Garden Ecobed is nearly 3 years old now and working perfectly.
I have been refurbing my wicking bins every year for some time, so I get a regular look at whats happening in the tank. Soil (and worms) migrate into the scoria, but very little gets into the ag pipes even though I dont use a sleeve on them. I think most soil particles small enough to get through are easily washed out again each time the tank is filled.
I’m sorry you are having problems with the ping pong balls. Originally I used superglue to stick mine, but all of them now have a substantial blob of silicone sealant “feathered” round the ball and up the stick to increase the grip area. I haven’t had problems for quite some time.
You said you plan to let the beds dry out so you can extract the detached balls. I think its important not to refill Ecobeds untill they are empty (or nearly empty) and the fill them up to the overflow point.. This is because the bed draws fresh air into the soil as the tank empties, and then expells used air when the tank is filled. Its a valuable feature of Ecobeds, and ensures fresh air reaches the symbiotic microbes in the Rhizosphere where they fix atmospheric nitrogen and carbon for use by the plants. Apologies if you already know this.
I get my vegenet online from http://www.greenharvest.com.au/index.htm. Diggers club sell a lighter version, which is fine, but gets too easily damaged on the nail hooking points I use.
I grow my strawberries in my vegetable Ecobeds. I planted a row of suckers last year at the end of the first bed in a planned 4 year crop rotation. Next spring the second row of suckers (from bed 1) will be planted in the second bed, and so on untill all the beds have a row growing in them. In the 5th year the strawberries in the first bed will be taken out and composted and replaced by a new row of suckers grown at the other end of the bed. and so on….
The idea is to replace the strawberries as they get too old, and ensure the replacement has fresh soil free of pests.
More importantly for an Ecobed, however, is that it provides a habitat for Mycorrhizal fungi which form important mutualistic relations with most plants to help extract nutrients from the soil. These fungi form colonies with enormous root (Mycellium) capacity and will bond quickly with new seedlings planted in the bed. I usually grow a few perennial herbs at the other end of the bed to help extend the reach of the fungal hyphae.
I am very impressed with what your doing Caroline, and hope you can quickly overcome your ping pong ball problem.
Kind Regards
Hi John, I have decided to use recycled concrete instead of scoria and it seems to be working well. I did sink the mini worms farms into the soil so they should keep cool. I also built shade structures using the same sort of brackets that hold the PVC pipes in place (but smaller ones) to arch conduit pipe over the garden beds and then fastened the shade cloth with cable ties. I did them tight at the top and loose at the bottom so the shade cloth can slide up the conduit to allow access. So far so good! I have now built 4 beds and have 2 more planned. I am growing blueberries and raspberries in two beds as permanent gardens and will rotate crops through the others. I’m very interested to know how the wicking beds work for fruit trees. Do the roots have enough room to support the tree? Do they grow through the plastic liner? Thanks so much! Caroline
Hi, I have used your design to build a garden bed. But I wondered if using other medium instead of scoria would work as the scoria is really expensive. Also I’m trialling a simple worm farm just using the black plant pots as these already have holes in them and I cover them with bits of old carpet to keep the heat off. Are there any other things you would change from your original design? Thanks heaps for the sharing of your knowledge! Regards, Caroline
Hi Caroline. I’m sorry to be so late replying, but I am delighted you are trying my Ecobed design. I use scoria because it works best for my purposes, but I have tried other alternatives with mixed results. The cheapest I have used are wood chips, free from my local council. They accumulate these from their tree maintenance activities. The only problem I had is that when dry, the splinters perforated my tank liner, however after soaking in water for a few days, they softened enough not to be a problem. Other options I know about are coarse sand, gravel and some people just use soil. I prefer non organic media in the tank because of the danger of putrification (build up of anaerobic bacteria). I am finding that worm farms on their own are only moderately effective, but in conjunction with top dressing the soil with plenty of compost, and leaving for a few weeks under mulch before planting, they are a great asset. The worms and accompanying microorganisms migrate to the new food source and provide plenty of fertility. In an enclosed system like an Ecobed, you need somewhere to keep your worms and microbes alive (the worm farm), but you also need to constantly renew the soil with new living organisms. I see no problem with your simple worm farm so long as you sink it into the soil. I protect mine with straw and a piece of shadecloth on top to discourage birds. Kind Regards, John.