Soil Blocks – Starting Seedlings Organically
Soil blocking is a sustainable way to start seedlings. Efficient, easy, fun and great for growing strong healthy seedlings, soil blocks are used in large-scale horticulture in Europe and are gaining popularity elsewhere. Soil blocks are small self-contained blocks of lightly compressed soil that allows seedlings roots to be air pruned and allow plants to re-establish quickly following transplanting due to minimal root disturbance.
While most Australian gardeners may not have heard about soil blocks, soil blocking has been a tried-and-tested method in Europe for decades and has been dated back to the Aztecs some 2000 years ago1. This pot-less method of raising seedlings is especially popular in the Netherlands, where it is used on a large-scale in commercial horticulture. Soil blocking is rapidly gaining popularity with home gardeners and organic market gardeners in the UK and USA. So, what’s all the fuss about? In a nutshell, soil blocking is a sustainable method for raising seedlings that is inexpensive, and best of all, results in strong and healthy seedlings!
What are soil blocks?
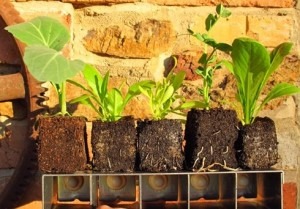
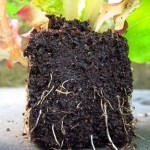
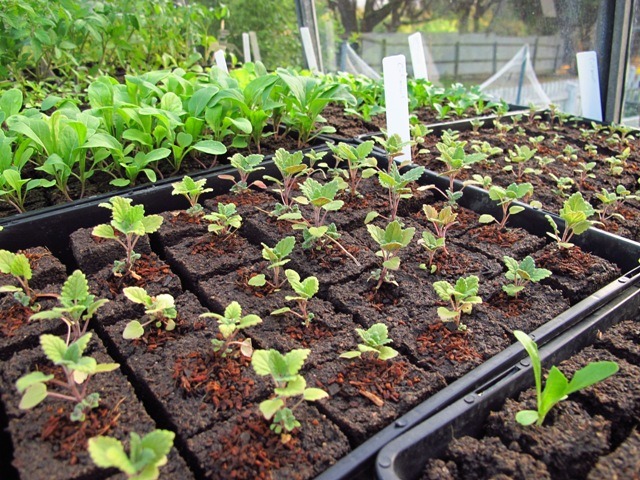
 Soil blocks are small self-contained blocks of lightly compressed soil. Seeds are sown directly into a hole made in the block. As the seedling grows, its roots reinforce the block and undergo air-pruning. When it comes to planting out, it’s as simple as popping the block in the ground. No splitting, no teasing out roots ...no fuss!
Advantages for the organic & sustainable home gardener (and farmer!)
 One of the major advantages of the soil block method is that it makes it easy to transplant seedlings without injuring the roots. This is particularly good for plants that do not like their delicate roots to be disturbed, such as pumpkins, zucchini, coriander and dill, to mention a few. But all seedlings will benefit from minimal root disturbance. Many gardeners find soil block seedlings re-establish more quickly after transplanting and produce healthy plants. Another important feature of soil block seedlings is their healthy root system: seedling roots undergo natural air-pruning, resulting in a stronger root system that will not become pot bound.
Before discovering soil blocking we experimented with several alternatives to grow our seedlings. We tried newspaper pots, loo rolls, salvaged plastic punnets and cell trays. Cleaning plastic pots was time-consuming; we weren’t keen on adding glue from loo rolls or newspaper inks into our organic veggie patch (soy and vegetable based inks are used in newsprint but inks may also contain other less environmentally friendly additives and pigments); and then there was the question of where to store all the plastic pots and loo rolls?
Soil blocking solved many of these issues for us as it eliminates the need for pots and is entirely compatible with organic gardening.
Making soil blocks can be as simple or fancy as you choose. If you only need a few seedlings you can form soil blocks with your hands. A second low-cost option is to use salvaged materials and make your own soil blocking tool (See below). The third option, which we went for, is to purchase a soil blocking tool2.
“Soil block mix” recipes
The key to starting healthy and strong seedlings in soil blocks is the soil block mix. The mix provides the space for healthy root growth and nutrients for the growing seedling.
A reliable “soil block mix” recipe:
- 4 parts sieved compost. This can be from our own compost heap, neighbours & friends, community garden or certified organic compost from a garden centre
- 1 part worm castings (optional). This works well as a binder and provides nutrients
- 1 part coir-peat (soaked overnight in cold water, or just add hot water). This helps retain moisture and nutrients.
- A sprinkle of rock dust (optional). Provides minerals and nutrients. May only be necessary if your compost is lacking minerals
- Water
Like any recipe, you can experiment and optimise it to suit the ingredients available to you. Some recipes include perlite, vermiculite, coarse sand or soil to help with drainage or blood and bone as a source of nutrients.
Making the soil mixture3
Mix together the dry ingredients
- Set aside some of the dry mix (1/2 of your total if it is your first time).
- In a container with a flat bottom (e.g. old baking tray or large tub), add 1 part water to 2 parts dry mix and mix well. You are after a consistency of sticky mud or porridge.
- Add more water until the right consistency is obtained. This may differ each time according to the ingredients.
Check that your mix is of a good consistency
- Simply squeeze a handful.
- Drops of water being squeezed out of the mix? – Great!
- A stream of water running down? – add more dry mix.
- No water dripping out? – add more water.
Forming the blocks
 By hand
- Think playdough: make shapes that can stand on their own.
- Push a finger into the block to create a hole for the seeds.
Using home-made blockers constructed from various containers such as:
- Cans
- Sections of polypipe
- Small glasses
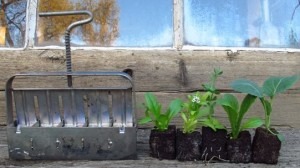
Using a commercially available Soil Blocking Tool (Ladbrooke)
 If you use a Ladbrooke Mini 4, you will need 5 litres of dry mix which will make 30 blocks (different models make different size blocks).
- Push the tool down into the mix until you see some water coming up the top of the tool (charge several times if necessary).
- We find that for efficiency, pile your mixture 7 to 8 cm high.
- Twist the tool slightly (to remove any suction) and lift.
- Scrape off excess mix on the bottom of the blocker.
- Eject the soil blocks into your desired tray.
Seeding and care
- Fill the hole in each block with one or two seeds.
- Cover the seeds with a thin layer (a few millimetres) of worm castings or compost.
- Gently mist with a spray bottle until the holes are filled with water.
- Keep soil blocks moist by either misting with a spray bottle or soaking soil blocks in shallow water.
- When roots appear on the sides of the blocks they will start to hold the soil block together and indicate that the seedlings are almost ready for transplanting.
A guide to which Ladbrooke Soil Blocker to use
Mini 4 (2”)
- Start everything in these. Great for bigger seeds and plants.
- Zucchini, cucumber, melon.
- Growing tomatoes, chillies and other seedlings to larger size.
- If small seedlings are required for transplanting, use Mini 5.
Micro
- Save space
- E.g. if in kitchen window sill, heating pads, seed starting/germination boxes.
- Using seeds with unknown or low germination rate.
- “Pot up” into the Mini 4 (2”) blocks.
Mini 5 (1.5”)
- To start everything but the biggest seeds
- Good for space efficiency.
- Save space in greenhouse for larger garden.
Where to find Soil Blockers in Australia
Victoria: KABUU - www.kabuu.com.au
New South Wales: Gundaroo Tiller, Allsun Farm - www.allsun.com.au
South Australia - Heirloom Harvest - www.heirloomharvest.com.au
References
1) www.johnnyseeds.com/t-soil-block-makers-eliot-coleman.aspx
2) www.soilblockers.co.uk
3) www.baremtnfarm.blogspot.com.au/2012/02/using-soil-blocks-on-farm.html
Richard Lee is an ecological urban farmer in training specialising in Soil Block Seedlings, herbs and baby salads. Trained as an evolutionary biologist, he now runs KABUU.com.au, a start-up urban agriculture enterprise based in Melbourne with the goal to transform currently vacant and under-utilised urban spaces into thriving food producing systems supplying quality fresh food to local communities.


