As population and cities grow, houses on traditional quarter acre blocks are becoming more expensive and you may only have the option of renting or choosing a living space with a smaller footprint. For many this might mean forgetting about a garden, but it doesn’t need to be so. It is possible to have verdant growth and even a thriving veggie patch in small spaces and in ways that allow moving it all when you need to live elsewhere.
A Garden Full of Pot(s)
Great for veggie and herb growing, pots allow you a moveable feast, meaning that if your lease expires or you move to a larger property, you don’t have to give the plants up. It also means that you can move plants in and out of shade as the seasons change.
The problem is, glazed and terracotta pots can be pricey, especially if you need a few of them, and plastic pots can be… .well… ugly! So, what’s to be done? Never fear, there are many economical solutions! And the word for the week is scrounge…
Glazed and Confused
First stop… the local pot shop. Have a look in their seconds area, or even ask them if they have some gear they are throwing away. You’d be amazed how much decent stuff gets marked down to virtually nothing in garden centres and pot retailers, and what little gems you can find. Cracked and broken pots should be snapped up – cracks and chips can be turned to the back, and pots broken in half can be excellent vessels for trailing plants (like, oregano, thyme, and strawberries). Do look out for massive pot clearance sales, as you can often pick up some unbelievable bargains here also.
Be aware though that some glazed and terracotta pots can have huge environmental footprints, and may not be the most sustainable solution!
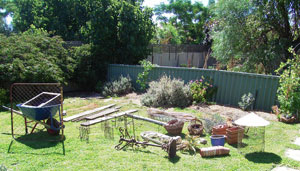
Next place to visit… the local tip! This may not be the most appealing idea, but tips can be amazing and you would be astounded at the range of gardening gear you can pick up for almost nothing! Think pots, sleepers, containers, sinks (if you find a cheap kitchen sink… grab it!!), bits of wire and shade cloth, stakes, ornaments, lattice… whatever you think you could work into your garden. The photo to the right shows what can be collected from a tip in just one (cheap) trip. And you’re pulling stuff out of landfill, going for the full reuse, reclaim, recycle on hard rubbish… super sustainable and cheerfully cheap!
Fantastic Plastic
Where ever you happen to see a plastic pot, regardless of size, grab it… they are so useful in the garden for a whole host of things. You’ll often see these just hanging round on footpaths and by rubbish bins… grab them! Have a look at your garden centre too… the really big pots are perfect for miniature fruit trees, and can be pretty cheap. But, they can look really ordinary, so, read on, we have a couple of solutions.
Plastic pots are enormously versatile and the bulk of them end up in landfill. So hang on to them… you’ll be amazed what you can use them for – storage, moving soil, mini worm farms, raising seeds, striking cuttings, making scarecrows… the list is endless. Plastic pots can be painted (with non-toxic acrylic based paints), and you will find this a rewarding and garden enhancing project!
Other options are “mis-tints” (these are the colours that didn’t quite work, and get sold off cheaply) or sample pots, and get painting! If you happen to own (or can borrow) a hot glue gun, you can “draw” some designs on the pot before painting… they look amazing, and give your boring old plastic pots some real life!
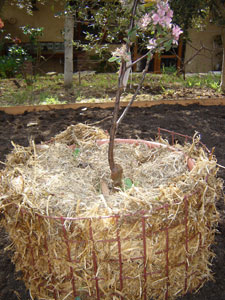
The other thing you can do with plastic pots is disguise them. It’s simple… if you have spare land space, place your planted pots in the appropriate space, grab some wide plastic trellis mesh, a couple of stakes and a bale of pea straw. Wrap the mesh around the pot, leaving about an inch gap between the pot and the mesh, attach the stakes to the mesh and hammer them in. Then, simply chop off any excess mesh width and stuff the area between the mesh and the pot with pea straw. Use the left over pea straw to mulch the pot plant. The result is a really rustic looking, permanent appearing pot disguise, for the princely sum of about $10 a pot (including the pot!). It also insulates the pots and stops them heating up and damaging delicate young plant roots.
If you can track them down, polystyrene fruit boxes are great in the garden… all you need to do is punch a couple of pencil sized holes in the bottom if they don’t already have them. These can also be painted, and look good as an edge for a garden bed, or around an entertaining or sitting area. They are deep enough to grow a whole host of perennials, annuals and edibles, so why not give it a go? They also make excellent worm farms, potato pits or storage boxes for the shed. Ask at your local fruit shop or market, they generally just toss them out.
Keep it Clean!!!
Even if you despise cleaning, this is really important. If you’ve grabbed some used pots from the tip, hard rubbish, the local op shop or wherever, it’s really important to clean them out before you plant into them. Ideally, soil should not be brought into the property, as it seriously increases the risk of soil borne pathogens, viruses, diseases and bugs attacking your precious plants. To clean pots, first brush them clean (an old dish brush is perfect) over some old newspaper so you can wrap up the suspect soil and dispose of it in the green waste bin. Follow this up by rinsing the pots in warm, soapy water (some people add a thimble full of bleach). You’ll need to use a bit of elbow grease on terracotta and glazed pots.
Raising Babies
Thrifty and experienced gardeners know that they get the best value by growing plants from seeds. Lazy gardeners know the costs can begin to add up if you need to purchase tiny seed raising pots to get you started. But there are solutions that cost you nothing!! Firstly, egg cartons are useful for seed raising trays – just pop seeds in and leave them in a warm, sunny, humid place. Once the young plants are big enough, cut up the tray into the twelve individual sections, moisten well (including the egg carton base) and just plant them out.
The other option for seed raising, and raising cuttings, is to make newspaper pots – just fold newspaper around a bottle or other pot of the appropriate size. They can be planted straight into the ground or container… so no risk of damaging the roots when transplanting! No issues with the newspaper ink either… Australian newspapers use vegetable based inks in their printing process, so it’s safe, and sustainable! You can also use soil blocks described here.
It’s all about Position!
Containers look best when they’re grouped together. A group has a greater visual impact, cuts down on watering, creates some mini-biodiversity and means you don’t have to walk so far to enjoy a plethora of plants. Group plants that require similar levels of watering together, bearing in mind that plants in terracotta pots will dry out a bit faster than others. It’s a good idea to keep your ‘frequently nibbled upon’ edibles by the kitchen door, as they are more likely to be used and monitored there. Put the ornamentals further away so they can be admired. Why not experiment with some mosquito repellent plants (like citronella, geranium, rosemary and lemongrass) in an area where you like to sit during the warmer months.
Pick Your Plants
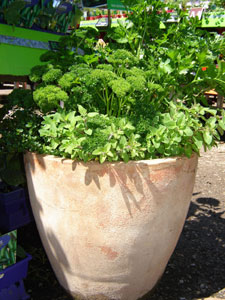
A large range of plants can be grown in pots, but if you really want to save money, and make the most of your space, grow as many edibles as you can. The initial outlay for potting mix, compost and accessories will be well and truly offset by the amount of money you save buying household veggies, herbs and fruit. Growing your own food at home also reduces your carbon footprint (fewer trips to the shops, less packaging), and saves you a lot of time. So, here is a selection of tasty plants for pots:
Veggies: Tomatoes, spring onions, silver beet, baby carrots, capsicums, lettuces, rocket, chilli, eggplants, spinach, Asian greens and beetroot.
Herbs: Coriander, parsley, basil, mint, chives, curry plants bay tree, Vietnamese mint, oregano, thyme, sage, rosemary and lemon grass.
Fruit: Dwarf citrus trees, Tahitian Limes, pepino, feijoa, Ballerina dwarf apples, guava, olives, strawberries and dwarf stone fruits (like peaches and nectarines)
Remember to plant what you like to eat, and cook with. There is no point taking up valuable space and resources with edibles you don’t enjoy or won’t use.
Watering
In many parts of the country, and at certain times of the year, water is a luxury, especially in the driest inhabited continent on Earth. So, let’s have a look at some affordable water saving tips, tricks and techniques.
Storing Rain Water
If you are renting, it is fairly unlikely you are going to get a water tank installed and on a balcony or courtyard there is not much space. But there are solutions.

A rubbish bin
Converting a wheelie bin into a rainwater tank is cheap and effective. Most garden related retail outlets now sell wheelie bins in a variety of sizes and guises. With a little bit of work and a couple of fittings, these bins can provide useful storage. Some retail outlets will actually fit wheelie bins out for you (complete with basket filter and tap fittings at the base). But if you are up for a wee challenge, see the end of this page to learn how to build one yourself from scratch!
Create a diversion
How does the water actually get into the bin. You’ll need to buy some cheap fittings – but you can take them with you if you move. The best option would be a downpipe diverter. They are available in round or square to suit different piping. Remove a small section of the downpipe and fit the diverter into the gap. If you are renting, keep the removed section to enable you to replace it when your lease is up. Generally they require a small length of garden hose to be attached to a supplied tap fitting, and can be turned on and off as required. Make sure you measure up before you go shopping, and don’t try to fit a square diverter in a round hole.
Grey water
Grey water is water from your shower, bath and laundry. It does not include water collected when the taps are warming up, or water collected in a bucket from washing your fruit and veggies. Both of these types of water have no detergents and soaps in them, and are therefore not included in the following do’s and don’ts:
- Untreated grey water must never be stored for any longer than 24hours… ever!!!!
- Untreated grey water and vegetables DO NOT MIX!!!!! Edible plants (with the exception of fruit trees) should never be watered with untreated greywater.
- Don’t let children, pets, partners or random strangers play in or drink greywater
- Untreated grey water must be dispersed via subsurface irrigation (that is, in the soil, or on top of soil and under mulch).
For more information about grey water see articles accessible here.
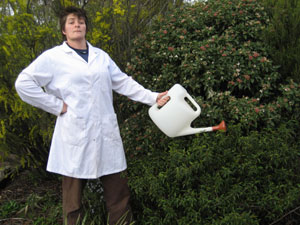
There are a number of ways to collect and divert greywater but by far the best method is to use buckets. Every shower in every house (rented or otherwise) should have a bucket to collect warm-up water. You would be amazed how much clean, fresh water you can collect every time you bathe, and this water is perfect for veggies, herbs and pot plants. You could buy an additional bucket for the kitchen sink, and wash your fruit and veg in it. This water can then be used in the same way, as it is clean and free of soaps, detergents and nasties.
Diversionary tactics
Remember that a cheap black rubber funnel diverter may seem like a bargain, it may lead to tears. They have the unfortunate habit of back flowing, generally into your (rented) laundry!
Remember, many grey water (and rainwater) systems need to be installed by a licensed plumber. If you are renting you would need to consult your landlord to see if you can come to a mutually beneficial arrangement regarding grey water.
General water saving tips
Even if water is plentiful where you live at the moment, it is always useful to miminise its unnecessary use.
- Don’t water lawns – unless of course you have pets or small children who need a bit of time on the turf.
- Lawns can be really thirsty and many parts of Australia under water restrictions do not allow the watering of turf at any time.
- Laundry water will allow turf to survive, but remember, the irrigation has to be sub-surface!
- Group plants according to water requirements.
- Check if plants actually need a drink before irrigating. The best soil moisture tester of all is a finger.
- Add organic matter to the soil, and use mulch. This increases the water holding ability of the soil, and the mulch will reduce evaporation considerably.
- Weed… it’s rewarding, and reduces competition for water.
- Water the roots, not the leaves.
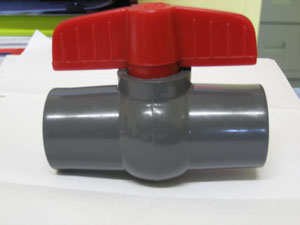
Building your bin
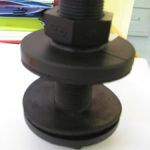 When you have your wheelie bin, buy a 20mm (3/4) tank adaptor (Picture at right), 20mm ball joint tap (Picture below left) and a 3/4 sprinkler adaptor (Picture below right). Then find a rectangular plastic seedling tray – most nurseries are generally happy to give them away or you might already have some).

Place the seedling tray upside down on the lid of the bin, and draw around the outside. Using a hacksaw or jigsaw, protective gloves and some fine motor skills, cut around the outline. It’s better to go too small rather than too big so that the seedling tray will sit snugly (the right way up) in the lid of the bin, and will act as a water filter.
Once this is done, lay the bin on its back, and on the front drill a hole as close to the base as possible. Make sure it’s a snug fit for the threaded tank adapter. It needs to be snug to avoid leakage! Crawl inside the bin and fit the tank adapter, so that the long threaded section is to the outside of the bin. Screw this in tightly … very important again to prevent water wastage. Once this has been fitted, stand the bin back up, and put the ball joint tap onto the thread of the tank adapter, and then screw the sprinkler adapter into the end of the tap.
A few tips:
You will not be able to wheel the bin when it is full, so don’t even try. One litre of water ways one kilo, so a full bin can be upwards of 100 kilos. So think carefully about placement before allowing it to fill. Secondly, filtration is the key, so it would be a good idea to put some mesh inside the seedling tray at the top.
Unless you need to move the water uphill, you shouldn’t need a pump. The “head pressure” in the bin should be sufficient to see the water disperse fairly well, either through a standard hose, porous hose or dripper. However, without a pump, when you’re watering, you will notice that the water will disperse more rapidly close to the bin and begin to slow down as you move further from the bin. You can also fill buckets and watering cans from the bin and water by hand.
Related Articles:
Citizen Science: A Pathway to Gardening Success and Biodiversity Conservation
In recent years, the realm of science has experienced a remarkable transformation, one that invites people from all walks of life to participate…
A Sustainable Gardener’s Guide to Thrifty Gardening
Creating an eco-friendly and cost-effective garden involves more than just nurturing plants; it's about adopting a sustainable approach that…
