 Biochar has been hailed as a useful contributor to reducing the world’s increasing carbon emissions since it stores carbon in the soil1 . It has also been recommended as an alternative to chemical fertilisers, since it remains in the soil to increase productivity for a very long time2. We review what is known about biochar and its use and one of SGA’s supporters, Keith Laker, shares with us his experience of making and using it in his garden. It is claimed that the pre-Columbian Amazonians created rich fertile soils by burning their agricultural waste in pits and covering the smouldering material with soil. This material, called terra preta de Indio, was stored underground. It is believed that it was then incorporated into the soil by earthworms.
How biochar is made
The production of biochar requires that all or nearly all oxygen in the atmosphere is excluded in the process of pyrolysis – in contrast to what happens when biomass (i.e. plant material including grain stalks, wood, grass, bamboo, nut shells) combusts above ground with adequate oxygen supply3. The process used in pre-Columbian days, however, actually produced significant amounts of carbon dioxide and other gases along with the charcoal. In contrast, modern systems control the temperature so that at 400 – 500 oC biomass burns quickly and produces more char along with small amounts of liquids and gases. At temperatures higher than 700 oC, more liquid, energy and gas are produced and they can be harnessed for energy supply. Although some carbon dioxide is produced, it is less than would be released if the biomass had been allowed to decompose in landfill to release methane – a more powerful greenhouse gas.
There are many commercial systems around the world for processing biomass. Many are small scale, suitable for use by communities and farms for processing local waste materials. Depending on the system, different proportions of energy or char are produced. In many instances, systems for energy production have been favoured because of attempts find alternatives to fossil fuels.
What are its benefits to soil?
As well as being a soil sink for carbon, biochar is reported to increase crop production by virtue of its highly porous structure. Since biochar is highly porous it helps retain soil moisture, absorbs nutrients on to the microsurfaces inside particles and retains them, improving the efficiency of added fertilisers4. It improves soil structure for earthworm populations and enhances microbial growth by providing increased internal surface area for growth of bacteria and especially fungi which process soil organic matter making it available to plants 5,6. Since it does not decompose readily, it does not need to be replaced each year.
The downsides
It seems that different biochars have different properties depending on the type of biomass used, which crops it is used for and the type of fertilizer applied along with it. A major criticism is that, because of world demand for fuel, commercial crops low in food productivity are being grown instead of good food producing crops and that forests may be felled just for the purpose of producing biofuel and accompanying biochar.
A personal experience with making and using biochar
An SGA supporter, Keith Laker, writes:
You can make your own biochar using a home-made TLUD (Top lit up draught stove). I made mine from a design in the book The Biochar Revolution and from watching Youtube videos of other people’s efforts. This Youtube link shows a stove made from materials very similar to my own. Watch this youtube video.
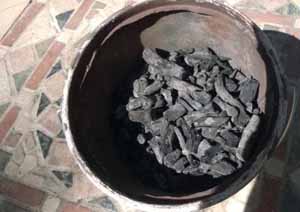
 TLUD stoves burn waste wood from the top down rather than the bottom up. At the end of the burn process the wood is carbonized but retains its shape.
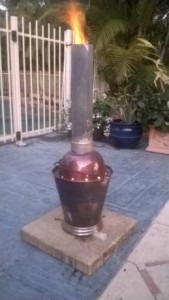
My TLUD stove is made from a stainless steel bucket, an upturned stainless steel bowl, a ducting connector and a short length of galvanized pipe for the flue.
Holes have been drilled under the bucket to let in limited air when the stove is first lit. The main air source is from the holes drilled around the rim of the upturned bowl.
 During the burn process the bucket is fractionally raised off the ground by sitting it on three long nails so a little air can enter through the holes in the bottom.
To light the fire from the top I spread a small amount of citronella lamp oil on the top layer of material and then drop a lit piece of paper, again dipped in lamp oil, down the flue.
The fire burns brightly with virtually no smoke. TLUD stoves can be used as cookers and for heating water in many developing countries. The skill, gained from a bit of trial and error, is knowing when the wood has burned enough to carbonize but not too much so it turns to ash. I use a folded bit of paper inserted under the stove next to the nails. When it starts to scorch I know the heat has reached the bottom of the bucket and the burn process has to be stopped.
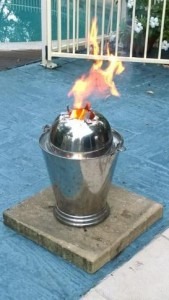 The three nails elevating the base of the bucket are removed to stop air coming in from underneath.
The flue and bowl are removed and the fire rapidly begins to die down. I smother the fire by using the heavy lid of my cast iron Cheminea outdoor fireplace which conveniently fits the top of the bucket, and leave it overnight to cool. You can also douse the fire with water to end the burn process.
The result is carbonized wood ready for inoculation.
The charcoal has a very fine and porous structure which powerfully attracts and holds beneficial soil microbes and water. This can mean that when initially applied, it can draw in microbes from the soil. For this reason many biochar makers believe it is better to inoculate the biochar with nutrients such as compost tea, worm juice, Seasol and other organic fertilizers and let it “brew” for about three weeks before adding to the soil7.
The recommendation is four parts compost to one part biochar. My compost is primarily grass cuttings and green waste made in a tumbler. I also add worm juice and castings. Everyone develops their own recipe. The mixture is then left to charge for three weeks before use.
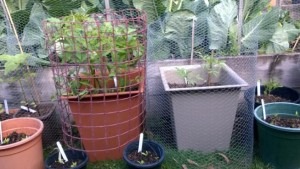 Results? I’ve done some simple experiments where I planted identical seedlings, some with biochar some without. Here is an example of two pots of tomatoes, same species, planted at the same time. The biochar ones are on the left (note the possum guards.
In fact we have never had better tomatoes than we had this year, all either planted with inoculated biochar or have had biochar added later. We planted heirloom Periforme Abruzzese and Tigerellas. They have fruited phenomenally. Likewise our broccoli, cauliflower, beans and silverbeet.
Photos: Keith Laker.
Keith is retired small business owner involved in energy efficient cooling, solar and heating products for typical suburban homes. He founded Breeze Power Natural Cooling Pty Ltd, a natural, whole of home cooling system that partners roof top solar panels. His passion now is improving the life force of the soil in his garden.
References
1. Lehmann J, Gaunt J, Rondon M. (2006) Bio-char Sequestration in Terrestrial Ecosystems – A Review. Mitigation and Adaptation Strategies for Global Change 11, (2): 395-419.
2. Woolf D, Amonette J E, Street-Perrott E A, Lehmann J, Joseph S.(2010) Sustainable biochar to mitigate global climate change. Nature Communications 1, Article Number 56.
3. Winsley P. (2007) Biochar and bioenergy production for climate change mitigation.
Zealand Science Review 64: 1-10.
4. Taylor P. (2010) The biochar revolution. www.biochar-books.com/.
5. Laird D A. (2008) The charcoal vision: A win–win–win scenario for simultaneously producing bioenergy, permanently sequestering carbon, while improving soil and water quality. Journal of Agronomy 100 (1): 178-181.
6. Major M. Biochar for soil quality improvement, climate change mitigation and more. (accessed 08-10-2014).
7. Crowley D, McGiffen M, Hale Lauren. (2011) University of California, Riverside. Biochar as a Carrier for Microbial Inoculants.
Related Articles:
Citizen Science: A Pathway to Gardening Success and Biodiversity Conservation
In recent years, the realm of science has experienced a remarkable transformation, one that invites people from all walks of life to participate…

A Sustainable Gardener’s Guide to Thrifty Gardening
Creating an eco-friendly and cost-effective garden involves more than just nurturing plants; it's about adopting a sustainable approach that…
