
White Curl Grub

Hi, my name is:
White Curl Grub (cockchafer in the southern states)
Describe yourself: Well, I’m white and, as my name suggests, kinda curly (more C shaped to be precise) with three pairs of legs during my destructive juvenile stage. I’ll admit it, I’m a little bit fat, I grow to about 25 – 30mm in length, and am often confused with the Aussie 'witchetty grub'. As an adult, I’m way less damaging to your plants and lawn, and am a pretty attractive scarab type beetle, often known as an African Black Beetle.
Hobbies: Making a serious mess of your lawn and generally causing your precious yard to look dreadful! As an adult beetle, I mate and lay my eggs throughout the spring. I hatch as a grub, eat through summer, pupate in autumn and rest over winter.
Likes: I can’t resist the roots of grass, especially when I am an older larva (a teenager to be precise). As a youngster, I’ll feed on decaying organic matter, and hang out in the soil as an adult beetle. I especially love long periods of dry weather – it just makes me want to munch grass roots. I also don’t mind the roots of other plants such as corn, tomatoes, grapevines and petunias.

Dislikes: Birds, bandicoots (they love to feast on me), parasitic wasps, tea tree oil and molasses. I’m not a huge fan of well irrigated lawn areas either... I just can’t pupate in the wet. There is a particular type of nematode that upsets me as well.
You'll know you've met me when: Your lawn has loads of dying and brown areas that look a bit like dry sections. The grass can be easily pulled out of the ground or rolled back like a carpet.
If you want to dump me, you could try to:
- You lay a bit of wet carpet or a hessian bag on affected areas of the lawn overnight. My adult relatives are not real bright and will cluster on this stuff, meaning they can be collected and disposed of in the morning.
- You whack a bit of biodegradable detergent and water into a bucket, and pour this on the affected spots. This forces me up to the surface, where birds will gobble me up.
- Fork over the lawn, as this often exposes me to the big, wide world, where hungry birds and bandicoots are just waiting to gobble me up.
- Keep the lawn well irrigated, especially over spring and summer. (restrictions permitting) as mum doesn’t like to lay eggs in wet spots.
- Try a tea tree or molasses mixture on the lawn, this can upset me a fair bit.
Wicking Beds
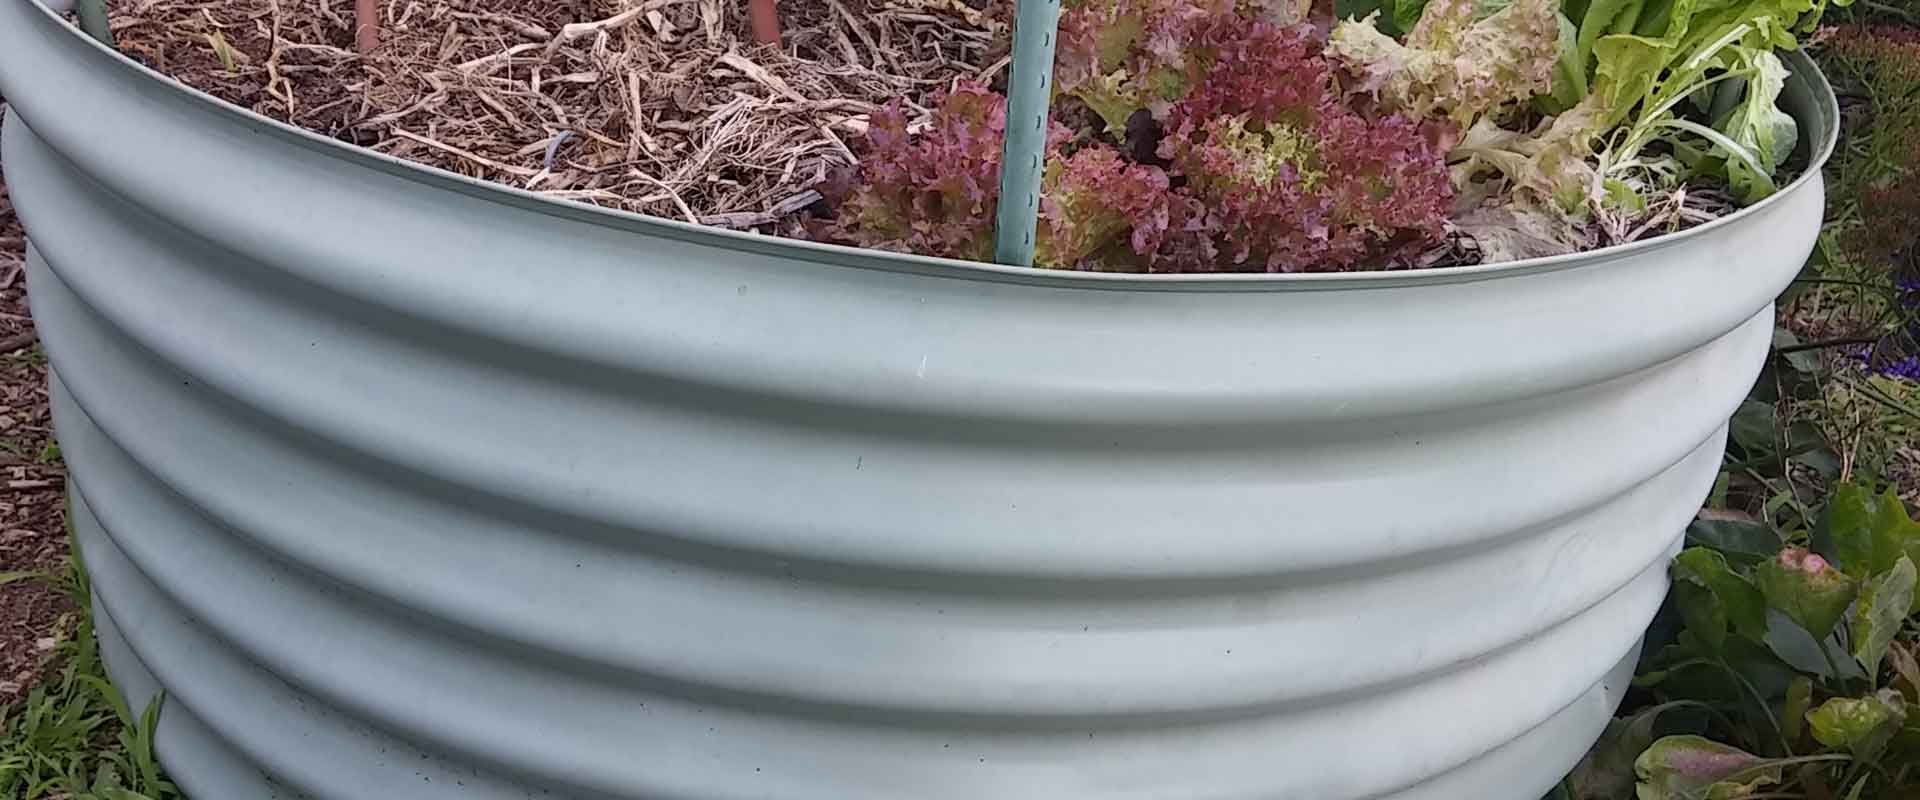
Wicking beds are one of the gardening innovations which have become mainstream. You know, I’ve been doing this horticulture thing for a while, and over that time, I’ve seen a number of garden designs, products and “innovations” come and go. Remember the giant scoping rake hands? What about the combination chilli sauce/garden pest spray? Even the ever-popular “upside down tomato planter” has me scratching my head a little! But every now and then I come across an inspired innovation, a dandy design that makes me excited to get out into the patch and give it a go. One of these I’ve been convinced of this week is wicking beds, and I hoped you’re as interested in them as I am. And they can be constructed on the soil in your garden or on hard surfaces in a courtyard and even using a polystyrene box.
What Is a Wicking Bed and Why Would I Want One?
So, what is a wicking bed? Well, as I explained to a colleague of mine, it’s essentially a giant “self watering pot” in the form of a garden bed. Okay, there is a fair bit more to it then that, but the idea is a garden bed designed to draw water up from a reservoir below, hence “wicking” through the soil directly to the roots. A system devised by Australian engineer Colin Austin, wicking garden beds (and wicking worm beds) are gaining popularity as a wonderfully water wise garden bed alternative.
Drawing water from a reservoir below the growing medium, wicking beds operate on the concept of capillary action, with the soil and plant roots drawing this water upwards as required. Essentially, this means that a properly constructed and maintained wicking bed should have nice, moist soil most of the time, with the roots accessing the water as they require it.
 Wicking beds have a number of benefits, both environmentally and horticulturally. Firstly, it’s a great set up for thirsty gardens (like vegie patches) in areas that have lower rainfall, or are affected by water restrictions. Wicking beds also deliver the water were it’s needed (the plant roots), which minimises water wastage, and can also help to reduce the risk of funky fungal foliage issues. Also, wicking beds are said to be more effective at sequestering atmospheric carbon than many other traditional types of garden bed set ups, meaning it’s a win for us, and the planet.
The Wicking Bed How To
So let’s look at the nuts and bolts of constructing a good, functioning wicking bed. Essentially, it’s all about having the right depth, right medium (both for drainage and for growing you plants) and taking a bit of time to construct the bed properly. It may sound tedious, but you will thank me in the long run. So where do we start?
1. Choose a suitable site for your patch (full sun for vegies), ensuring that it is level (or you are able to level it) – wicking beds work best when they are level, as this ensures even water dispersal down the track.
 2. The total depth of the patch may vary depending on what you wish to plant, but, for a wicking vegie bed, the overall depth needs, ideally, to be 600mm. This equates to 300mm for the reservoir/water saturation zone and 300mm for the growing/root zone. It should be noted here that wicking bed wizards all agree that water cannot be wicked further than 300mm, so bear this in mind when you are looking at preparing your patch.
It is possible to use polystyrene fruit/vegetable boxes e.g. broccoli boxes, for wicking beds. In that case, the overall depth will be reduced.
3. Of the 300mm reservoir/saturation area, about half of this (150mm) will contain gravel or scoria (we prefer scoria since it holds water) and the water inlet pipe, while the other 150mm will contain a soil blend. Prepare this area first. If using a polystyrene box, omit the 150mm soil blend layer.
4. If you are gardening on soil, dig a hole to a depth of 150mm, ensuring it is level. This will form the water reservoir. If you are placing your garden on a hard surface, ensure it is level and move to next step.
 5. Make the sides, so the bed has a total depth of 600mm, including the hole you just dug. If using a polystyrene box it will, obviously,be less. Line the entire bed with good quality builders plastic or pond liner, ensuring there are no tears or holes. To prevent tears in the builder’s plastic, you may wish to add a shallow bed of sand to the base of the reservoir hole.
6. Now it’s time to put in the water delivery system. To do this, place about an inch of scoria into the bed for the horizontal pipe to sit on. This will act to improve the drainage. Then, install a length of 50mm wide PVC pipe vertically, attached to a PVC 90 degree elbow the will sit near the base of the bed on top of the scoria you have just placed. Next, attach a length of 50mm slotted agricultural pipe (this has outlets holes in it) to the elbow, and this will run the length of the bed, along the centre. Place a cap on the end of this agricultural pipe.
7. Cover the pipe and the bottom of the bed with scoria, to a depth of 150mm. Cover the scoria with geotextile to prevent soil particles moving into the reservoir and blocking the pore spaces. Shade cloth could be used but it will allow some soil to pass through to the reservoir.
8. Fill the next 150mm of the wicking bed with a good quality water retentive soil – this will form the “saturation layer” and is NOT where your vegies will be planted. If using a polystyrene box, this layer is omitted.
 9. At the top of this soil level (300mm), you will need to install an overflow – this will allow excess water to leave the wicking bed after significant irrigation events, or long periods of rain. If using a polystyrene box, this overflow will be at the top of the reservoir i.e. at 150mm. One of the easiest ways to do this is to use a water tank tap outlet, and drill an appropriate size hole through the end of the wicking bed opposite the water inlet. This is important, and may help prevent the soil in the root zone becoming waterlogged and useless.
10. Fill the remainder of the bed (another 300mm or so) with a good quality soil/compost blend. We recommend 1/2 mushroom compost, 1/2 organic soil mix, as research and experience has shown that wicking beds work best with a higher than usual compost portion. DON"T use the soil from surrounding gardens, especially if it has a high clay content. Mulch well with a straw based mulch (to about 5-7cm), taking care not to cover the PVC pipe opening.
 11. Using a hose, and in accordance with local water restrictions, fill the wicking bed reservoir using the PVC pipe opening. You may wish to use an old tomato stake or similar as a “dipstick” to see how deep the water is. Fill the reservoir to about 200mm.
12. Once the soil is damp (you may need to water from the top initially as well to encourage the wicking to begin), plant out your wicking bed with your favourite incredible edibles.
13. Sit back, water less, and enjoy your wicking bed and its harvest!
We know you may need a printout to take out into the patch and get constructing, so we have a PDF for you here!
How To Keep Your Wicking Bed Working
Like all things in the garden, the wicking bed is certainly NOT a no maintenance set-up, and, if left untended for a long period of time, could very easily turn into a sludgy, smelly, salty unproductive mess. So, some things you may need to be aware of and monitor in your wicking bed over time are as follows:
- Ensure the overflow/drainage hole or pipe does not become blocked or non-functional. Give this a good clean out every few months.
- Be aware that, as a closed system, everything you put into the bed stays in the bed. Overuse of fertilisers (even some of our trusted organically derived ones) may see the soil sour fairly rapidly, leading to an increase in saltiness. This is certainly NOT ideal for many of our productive vegies and herbs.
- Greywater (that is, water from the bathroom and laundry) should NOT be used in a wicking bed at any time
- Compost and soil mixture will need to be topped up seasonally, as will the mulch. A good idea may be to lightly turn the top 300mm of growing area with a garden fork at this time, to “freshen up” the soil.
- Cover the open end of the PVC pipe (the water inlet) with a tile, brick or similar. This will prevent mosquito larvae from breeding in the tube or garden reservoir.
- If you have used a polystyrene box you may need to renovate the bed since plant roots may have reached the top of the reservoir or actually penetrated. Just remove the soil and check the geotextile and reservoir - it is not too difficult!

Living with Possums

Living with possums isn't always easy, but there are a few things we can all do to live in harmony with possums in our shared urban spaces. Let's face it... we are never going to get rid of them all together, and why should we? They were here long before we were, and it is our destruction of their habitat that has forced them into our houses, our gardens, and lives. So, what steps can we take to make sure we can all get along together?
Possums in the roof?
There is one reason that possums will shift in to our roof spaces... lack of hollows in their habitat. You see, Common Brushtail possums utilise tree hollows for resting and nesting during the day, and are pretty happy to do so. But, the removal of remnant trees in urban areas has severely diminished the number of hollows available, and thus, we end up sharing our houses with them. So, what can we do to help them... and us? If you currently have possums in the roof, here are a couple of tips that should encourage them back into the wild:
1. Make or buy a suitable nest box for the Common Brushtail possum, and install it in your garden to act as an alternate den site for our furry friends. For more info on nest boxes, check out websites such as this for more info.
2. Locate the nest the possum has built in your roof, remove it (when the possum is out and foraging) and place this inside the nest box. This will encourage the possum to move to its new location.
3. Place a piece of fruit inside the nest box. Apple or bananas seem to work best. This will entice the possum to investigate the nest box, and hopefully decide to stay. It should be stressed that feeding of possums is not recommended (except as a one off during relocation).
4. Block of access to your roof. This can be done by loping any overhanging branches, and placing collars around the trunks of trees that possums utilise to access the roof. Collars can be made from a number of products, but 60cm wide sheet iron seems to work pretty well.
5. Place camphor blocks OR mothballs in the roof space, particularly around the area where the nest site was. DON"T place both! Possums really dislike these smells, and will be reluctant to return.
6. If possible, pop a light up in the roof space, and leave it there for a few days (on of course!). The combination of alternate nesting site, bad smells and light should be sufficient to discourage them.
7. Once you are satisfied that the possum has left the building, block any known entrance points. Wiping around the entrance points with household bleach will remove possum scent, and make re-entry pretty unappealing!

Possums eating your plants?
Even the most patient and wildlife friendly gardeners tear their hair out over this one, but, after significant research, I can tell you that there are solutions to stop your precious plants being gobbled by hungry possums! Possum repellents work by two methods: taste and smell! Research conducted has shown that smell deterrents are somewhat more effective than taste, but also suggests that a starving possum will eat just about anything! So, here is a list of some tried and true methods of deterring possums.
1. Net affected plants with shade cloth or white bird netting at night time. Quick, cheap, and darn effective! This is absolutely the best way to protect young plants and seedlings from possum attack. Why not supplement this with a hanging cat scare face or two? Available from nurseries, these scare faces look like cats and have reflective eyes, pretty scary if you are a possum!
2. Sprinkling blood and bone fertiliser around the base of ornamental plants and fruit trees can act as a significant possum deterrent. They hate the smell, and will be less inclined to munch on treated plants!
3. A home made garlic spray of 2 tablespoons of crushed garlic in one litre of hot water, left to stand over night, strained and sprayed onto foliage, fruits and tasty growing tips is an old favourite of mine, and it seems to work. Subsequently, try chillies or Indonesian fish sauce. Just remember to wash your produce before eating!
4. A spray made from Quassia chips (chips of bark from a South American tree). Add 100 g chips to 2 litres water and heat for one hour before straining. Add one tablespoon detergent. Dilute at rate of 1 part of solution to four parts water and apply as a spray. Quassia chips are available at many nurseries, and are pretty affective, forming the base ingredient of many commercially available possum repellents (e.g.: Poss-Off).
5. My grandmothers' personal favourite, and one she swears by, is the tea-based deterrent. Boil two litres of water; add 4 heaped teaspoons of Lapsang Souchong tea and leave to cool. Strain of liquid and apply from a plastic spray bottle directly onto affected plants. Reapply every two weeks and always after rain. Make a fresh brew every time.
6. Wack a bit of undiluted Tabasco sauce on affected plants……a sure solution unless your possum likes it hot!
7. A watered down solution of a little detergent and some English mustard sprayed directly onto the foliage and fruits of tasty plants.
8. Commercially available possum deterrents such as Poss-Off or Scat, work by emitting an unpleasant odour, so, when used according to the instructions on the products, claim to deter the little blighters!

It should be remembered that no one solution is guaranteed, and reapplication of sprays should be a regular and on-going activity. It is recommended that most sprays be re-applied every two to three weeks, and after rain. Try using these repellent sprays along "possum highways" as well (e.g.: tops of fences, well used tree branches). As possums are creatures of habit, any disruption to there regular routine can be really upsetting, and will often result in the possum moving away to seek a feed elsewhere.
Persistence is the key! A habit (as we all know) is not broken in a day, so keep up the spraying, re-apply, and over time the undesirable behaviour should dissipate. Good luck!

Earwigs
Earwigs are striking little numbers, about 12-20mm in length. They are smooth, shiny, dark chocolate brown, with sensational pale yellow legs, shoulders and pincers! Oh yeah, they are as gorgeous as they sound... and they don't actually crawl into peoples ears!
They love organic matter... sheltering in it during the day, cosy with all their friends! Night time is their time for getting busy and they just adore eating out. They will pretty much try anything you've got in your garden!
They particularly like fruit, vegetables and field crops, but will also go for zinnias, roses and dahlias. They feast on the roots of seedlings, mosses and lichens. They particularly love it when you overwork your garden reducing the biodiversity. They enjoy cool, moist weather, especially in spring and autumn.
Birds and lizards will help to keep them under control, and they hate a really clean and tidy garden with no hiding spots.
You'll know you've got an earwig problem when all your plants' growing tips, stems, flowers and fruits have lovely gouge marks and nibble spots in them. They love to munch seedling roots, and can destroy a bed in a single night.

Tips for getting rid of them
-
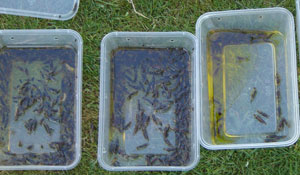
- Set up an earwig trap – grab a few clear plastic takeaway food containers (with lids), tip about 3 – 4mm of pure linseed oil into the bottom of each, punch several 5mm holes in the side of containers (above the level of the oil, but below the lid) and position these traps in the mulch, around the plants being attacked by earwigs. Go to bed, and check the traps the next morning – you will be amazed how many earwigs you will capture during the night! Empty the traps, refill, and re-position for an earwig-free existence.
- Set up a trap, using an upside down pot stuffed with newspaper or straw... I can't resist these.
- Place a dish of vegetable oil, buried up to the rim, near your seedlings. I love it but it's not good for me.
- Let your chooks scratch about in the garden for a while (just make sure the chooks have had a nice big feed of greens first!).
- Clean up any detritus and junk around the garden.
- Create a diverse garden. This encourages predators... enough said!
- Half fill a jar with beer and lay it on its side where I am most active. I love beer, but when I drink it I die.
Photographs:
Banner photo: David Short, UK.
Pic 1 - Elaine Shallue (SGA)
Pic 2: Linseed oil earwig traps and their victims, after only one night! Amazing! Photo courtesy of Tom Ahrens (keen Melbourne gardener!).

Capsicum and Chillies

Capsicum spp.
Chillies would have to be about the greatest things on earth (okay, slight exaggeration, but they are pretty awesome!) I love chillies so much I have driven for two hours just to get one dipped in amazing Belgian dark chocolate. Apart from combining my two favourite foods, this is a taste sensation that must be experienced by everyone at least once. For those of you who can't fathom the idea, I am considering setting up an offset scheme, where you pay me to eat your share of chilies dipped in chocolate. Well, it sounds like a good idea to me!
Planting Schedule
Warm: All year (in frost free zones)
Temperate: August - December
Cool: September - November
Position, Position, Position!
Capsicums and chillies are so easy to grow that I have never had a Yummy Yard without them. That said, it has a lot to do with picking a great position. Just like their cousins the tomatoes, they need a warm, sunny spot that is not too affected by the wind. They are total sooks when it comes to frost and in cool areas they tend to die back over winter and re-shoot in spring. In areas with really, really hot summers, a wee shadecloth tent may be exactly the thing for these guys. I use between a 30% - 50% shadecloth, and consequently have no problem with sun scald or fruit set.
One other thing to remember is that both capsicums and chillies can be grown in pots and containers. In fact, I have given chillies in decorative pots as Christmas gifts for as long as I can remember (I really must put a little more thought in this year). Point is, they're virtually fool proof, look amazing and are so great in pots.
Another thing to remember is that because chillies and capsicums are related to tomatoes, eggplants and potatoes, it's important to rotate these crops. Leave about three years between planting any of these guys in the same patch. See my hot tip for a great idea to overcome this.

Talking Dirty
Like their close relations, chillies and capsicums will do best in a deep, well draining soil with a bit of compost in it. That said, I have seen capsicums do well in really clay soils and in sandy soils. The secret to their success is warm soil, mulch and room to breathe. Leave about 50cm - 60cm between your capsicums when planting out, as this gives them space and free air movement. It also allows the sun to warm the soil. Prepare the soil a month before planting by throwing in a bit of pelletised chook poo. Then mulch over and count down the days.
Feed Me!
Feeding these guys is fraught with danger, and is often totally unnecessary. If you must feed, make sure you don't do it with a high nitrogen fertiliser. This will turn your plants into big, green wimps, with heaps of sooky leaves and no fruit. Generally speaking, manufactured fertilizers are too high in nitrogen which damages both the plant and the environment. Give 'em a bit of pelletised poo blend when the fruit first forms, and repeat this each month... that's it!
What about the Water?
Capsicums are deep-rooted, but this doesn't mean you don't have to water them. They need regular, deep soakings of water which will vary depending on your soil type. Sandy soils need more water, clay soils less, and combo soils are somewhere in between. Confused? Don't be afraid to stick your finger into your soil and check your moisture levels. If the dirt sticks, the soil is damp. If it doesn't, water well!!!

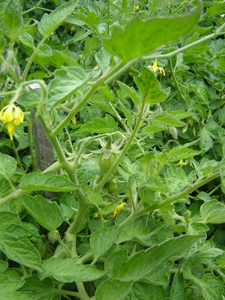
Are We There Yet?
Chillies are perfect for both the impatient gardener (me) and the lazy gardener (also me), in that they can be picked at just about any time. In fact, you can leave them on the bushes until they shrivel, and them thread them on some string (or dental floss, which works well as a string substitute in a student share house). Chillies at all stages of maturity can be eaten, and the more you pick, the happier your chilli plant will be.
Capsicums are not quite as simple, but they are pretty close. They can be picked at just about any time, but should never be left on the plant too long as over ripe capsicums become rank and attract pests. It should be noted here that many people find fully-ripe capsicums easier to digest than green ones (I have no idea how or why I know that, but it is true).
And, with both chillies and capsicums, cut them off the plant when you harvest them instead of pulling them off... this hurts the plant and breaks my heart!
Pests and the Rest
Chillies are amazingly pest free, due to the fact that most pests don't seem to like chilli. Capsicums can be susceptible to blossom end rot and fruit fly, and can suffer sunburn like a redhead on the Gold Coast! I have to say that I reckon chilies and capsicums are so trouble free, even my mum could grow them.

Hot Tips
My hot tip here relates to crop rotation, relations and disease avoidance. But this is not always a popular tip so take from it what you will. My suggestion is to plant a realistic but limited selection of tomatoes, capsicums, eggplants and chillies together each season. Then rotate them in this formation every year thereafter. I mean, you only need two chillies, two eggplants, three capsicums and four or five tomatoes to have a superbly productive patch. And I personally reckon this is the best way to manage crop rotation. After all, a family that rotates together stays together (or something like that).
Oh, and one other... if you do happen to try the divine chilli-chocolate combination, or any other chilli dish, and find the little devils too hot, always have a drink of milk instead of water!
Eat Me
Chilli Sauce
4 Birdseye chillies
3 tbsp vegetable oil
1 onion
2 cloves garlic
½ tsp allspice
1 tsp sugar or honey
2 homegrown tomatoes or ½ cup preserved homegrown tomatoes
¼ tsp salt
Put chillies and 350 ml water in a saucepan. Bring to the boil then simmer for 5 minutes. Save the water. Chop the chillies.
Fry onion and garlic in oil. Add allspice, salt, sugar, tomato, and chopped chillies and chilli water. Simmer until reduced and thick.
Serve with Mexican but will also blow your socks off with Lebanese, on wraps and sandwiches, with barbecued meat, baked fish etc.
One Two Three Ratatouille
This makes enough for a very large feast of fresh, homegrown vegetables. You can easily half it to make enough to serve 2 people.
1 eggplant
2 onions
2 cloves garlic
2 red capsicums
2 zucchini
2 tbsp tomato paste
2 cups tomatoes
2 tbsp freshly picked herbs
3 tbsp olive oil
Chop all vegetables into even sized chunks.
Crush garlic
Place one tbsp oil into a large mixing bowl. Add eggplant and toss until coated with the oil.
Heat a large wok, deep frypan or wide saucepan over high heat.
Add eggplant to the pan. Try not to stir the eggplant too much but turn it methodically with tongs so it browns on all sides. Place a lid on the pan between each time you turn the eggplant.
When the eggplant is tender and soft, remove and set aside. Leave the pan on the heat as the zucchini is coming next.
Place the zucchini in the large mixing bowl with another tbsp oil and toss. Fry the zucchini as you did the eggplant. Remove it and place it with the eggplant.
Place the onion and capsicum in the large mixing bowl with remaining oil. Toss to combine.
Fry the onion and capsicum until soft and tender. Add the garlic and tomato paste and stir for one minute. Add the tomatoes. When mixture boils, place zucchini and eggplant back in to the saucepan. Bring to boil again and reduce heat to a simmer.
Simmer until tomato thickens.
Season, and stir through chopped fresh herbs and serve with either cous cous, polenta, rice, potatoes, pasta etc
So simple, yet tastes so good using freshly picked herbs and home grown vegies.
Top Tomato Varieties
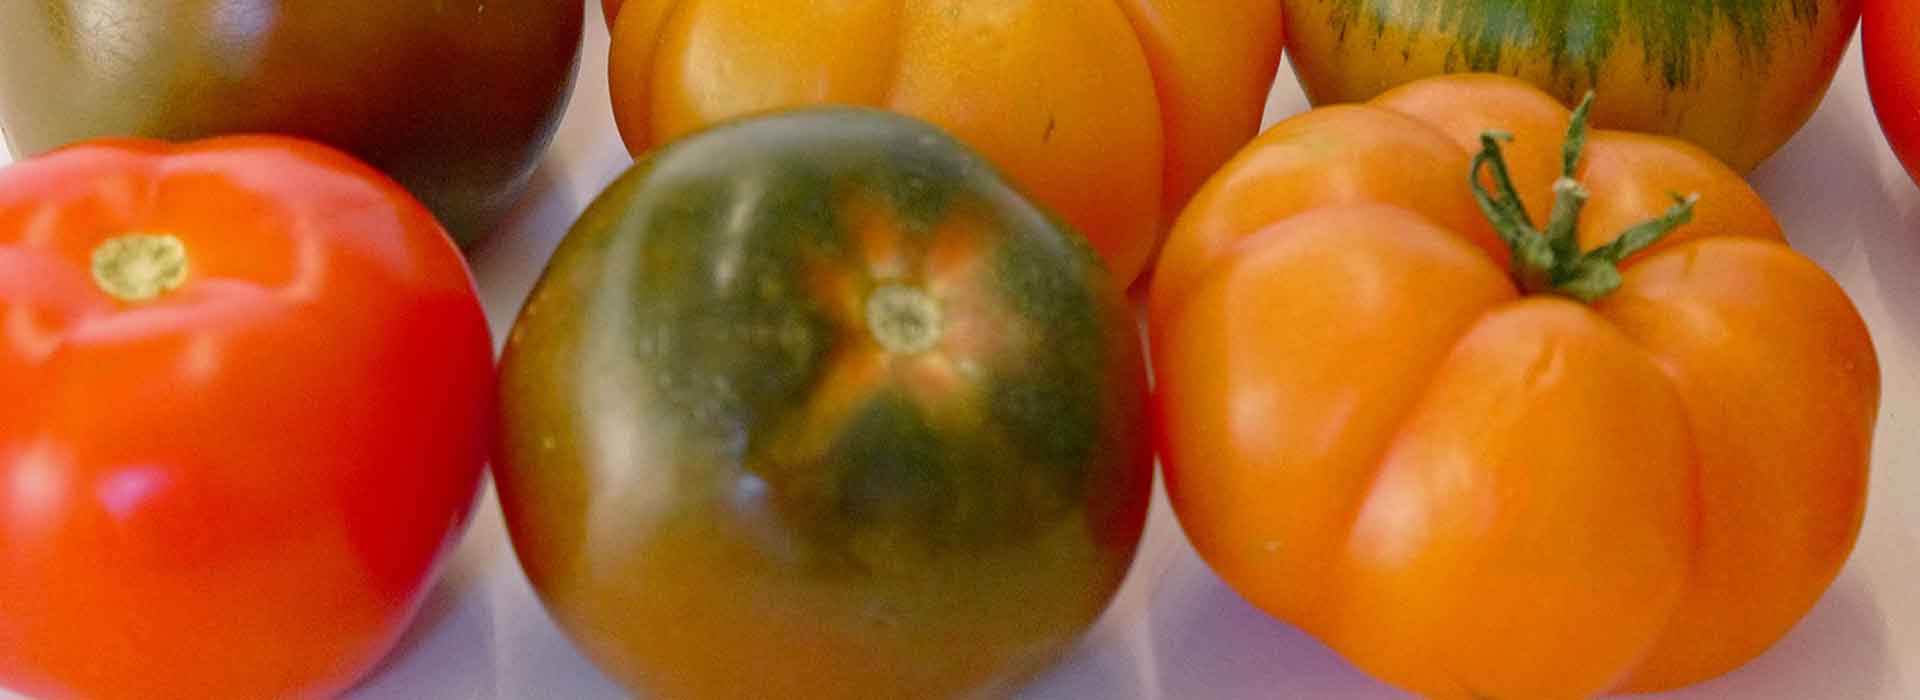
How many tomato varieties are there? Probably thousands! If you're keen to enjoy the amazing flavours of home grown tomatoes this summer we've compiled a handy list to get you started that covers many of Australia’s best tomato types. We also recommend checking out the amazing book Tomato: know, sow, grow feast by Penny Woodward, Janice Sutton and Karen Sutherland which covers everything you could possibly want to know about successfully growing your own tomatoes.
Please note that the availability of different varieties can vary from year to year and by supplier range. It's a great idea to visit your local nursery to see what's released each year (in either seed or seedlings) and is suitable for your area.
To source even more varieties, including organically-grown and heirloom varieties, have a look at the catalogues of the wonderful seed suppliers who offer special deals for our Friends of SGA members.
An aphabetical list of top tomato types
Amish Paste is an open pollinated indeterminate mid season variety which needs staking and grows 1 metre to 1.5 m, with quite variable egg-shaped fruits 4-5cm wide and in the range 5-12cm long. It has solid very tasty flesh, ideal for making preserves, stews and for drying.
Apollo is an F1 hybrid and an indeterminate early variety which needs staking or else the strong bushes will collapse. They usually make 2 to 2.5 metres in height, with globular fruit about 5-6cm in diameter. The best fruit set is early season, which is just as well because it doesn't have much disease resistance.
Apollo Improved, an F1 on an indeterminate bush, is an early variety. It needs staking and has the mild flavoured low acid taste of the old Apollo but with improved disease resistance to bacterial Wilt and Root Knot Nematode. It also has firmer fruit and sets fruit at temperatures as low as 10oC.
Beefsteak is an open pollinated mid season indeterminate of 1-1.5 metres in height, with 10-12cm solid deep oblate fruits on very sturdy bushes.
Bite Size is an F1 hybrid indeterminate that grows from 2.2 to 2.7 metres in height, so that it needs a sturdy stake and is best trained to three leaders to capitalise on maximum fruit set. The cherry type fruits are up to 3cm in diameter and mature in 77-84 days from seed. Has disease resistance from Verticillium Wilt, Fusarium Wilt, Bacterial Speck and Late Blight.
Black Russian is an open pollinated variety with an almost black exterior to its deep oblate 4-6cm diameter fruits. The inner flesh is a deep chocolate colour.
Burnley Bounty is an open pollinated indeterminate on a 1.5 to 2 metre bush with a good crop of 8-10cm deep oblate fruits that set very late in Victoria. Seed has been known to retain some viability for 15 years! Probably not as popular as it has been in the past, due to its susceptibility to disease, but grows well hydroponically
Burnley Gem is an open pollinated determinate with a bush to 1 metre that produces early globular fruit 4-7cm in diameter and sets well in hot dry areas. Burnley Metro is an open pollinated determinate on a 1 metre bush that produced 8-10cm deep oblate fruits in the mid to late season. Available as punnet seedlings.
Burnley Surecrop is an open pollinated semi-determinate cultivar with a robust 2 to 2.5 metre bush that yields 5-6cm globular fruits in early to mid season and reputedly sets fruit two weeks earlier than Grosse Lisse. Has disease resistance to Verticillium Wilt, unlike Grosse Lisse.
Cherry Cocktail is an F1 hybrid collection of three cherry type fruits that set red, orange and yellow 2-3cm fruits with a tasty mild flavour. They are indeterminate cultivars, each climbing vine needing a strong 2 metre stake or a weld mesh ring to contain the huge trusses of fruit set all summer and autumn. Resistant to Verticillium and Fusarium Wilts.
Cherry Gold is an indeterminate to 2 metres with 1.5cm cherry type golden fruits that set a hundred or more per truss. The trusses are often over half a metre long and set in mid to late season. Available as seedlings in punnets.
Cocktail Supreme is an F1 hybrid indeterminate that's synonymous with S900 and grows to a vigorous 2 metre climbing vine. A very tasty thick skinned 2-3cm cherry type fruit for mid to late season that sets 20-50 fruits per truss, which are best picked as they ripen. Available as seedlings in punnets or for production nurseries from Sandoz Seeds.
First Prize is an F1 hybrid determinate, recently marketed as Patio Prize, that makes a 0.5 metre bush and grows into a sturdy container specimen that sets prolific trusses of globular 2-4cm fruits in the mid to late season. In a well watered garden they are prone to fungal diseases.
Green Zebra is an open pollinated indeterminate that grows to 1m and is also known as Green Streaked. The globular 5-7cm green striped fruits have a creamy texture to their flesh, with an outstanding flavour and yields of 13 kgs per bush are common. They take 96 days to mature from seed available from Digger's.
Grosse Lisse is an open pollinated indeterminate that will grow to 2 metres. I've even seen it over 3.5 metres high up a trellis! It has been the standard by which most Australian home gardeners in southern states have measured their tomato growing prowess for the past 50 years. It sets fruit in very hot conditions for mid to late season, after 100 days from seed or 80 days from seedlings. The fruits are tasty 6-10cm oblate and smooth, best picked with a hint of pink and ripened indoors or the acid levels rise, however if you like the wild taste, then you leave them to sun ripen. While the original Grosse Lisse had little disease resistance there are recently developed improved selections, being passed off as 'old' Grosse Lisse, which have considerable resistance to some fungal diseases.
Jubilee is an indeterminate 1.7 to 2 metres with 6-8cm golden orange deep oblate fruits, with a mild flavour for mid season crops. Sets fruit in 72 days from seed.
KY1 is a determinate cultivar with a bush to 1 metre for early to mid season fruit which has excellent flavour in the 6-8cm oblate fruits, noted for making great sauce.
Mighty Red is an F1 hybrid also known as Carmelo in California. It is a very strong indeterminate bush that will easily make 3.5 metres, but is best pruned hard when it is young to induce a more manageable habit. The tasty globular 8-10cm fruits literally push each other off the massive trusses. Well suited to a wide range of soil types. Resistant to Root-Knot Nematode, Verticillium Wilt, Fusarium Wilt, Tobacco Leaf Mosaic Virus and yet it sets fruit in the heat and tastes just like Grosse Lisse!
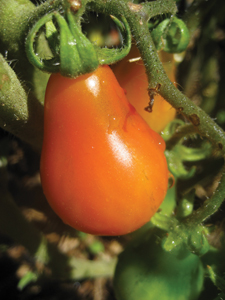
Mini Red Pear is an indeterminate that will grow 1.2 to 2.2 metres in height and set a prolific crop of tasty 2 x 3cm red pear shaped fruits in mid season. Mostly available as seedlings.
Mini Yellow Pear is also known as Yellow Baby and it's an indeterminate vine that will grow 1.2 to 2.2 metres in height and set trusses of 5-15 tasty yellow pear shaped fruits with low acid of about 2 x 3cm in size in the hot mid season.
Mortgage Lifter is also known as McGarity, an open pollinated indeterminate that will grow to 3 metres and sets huge trusses of pale pink mid season fruits, 12-15cm in diameter with a mild flavour. Bushes recently averaged some 17kgs of fruit in trials at Seymour Vic.
Oxheart is an open pollinated indeterminate that will reach 2 metres and produce solid deep oblate or heart-shaped 10-15cm fruit of a pale pink colour with very few seeds in them and low acid. A single fruit can exceed 500 grams. They grow well in cool climates and yield best in the mid to late season.
Patio Prize is an F1 hybrid also known as First Prize, a compact determinate to 0.5 metres, it produces 2-4cm globular fruits in the mid to late season. Available as seed in the Attunga range.
Red Cherry is an indeterminate to 1 metre in height with a high yield of mid season cherry style fruits of 2cm diameter, that mature in 65 days from seed.
Roma is an open pollinated determinate with a bushy habit to 1 metre and mid season egg shaped fruits of 4cm by 6 cm long, that are used for bottling and cooking as well as drying. The modern Roma VF Plum as it is called in USA, is disease resistant to Verticillium Wilt and Fusarium Wilt and is the cultivar widely sold in Australia as Roma.
Rouge de Marmande is an open pollinated indeterminate bush to 2.5 metres. An old favourite for the early to mid season crop with excellent flavour and an exceptional fruit set in cool areas such as Tasmania. The almost flat deep oblate fruits are usually 6-8cm in diameter, but show considerable variation in size when compared to some of the modern cultivars. They are very versatile in the kitchen. Seed readily available from Yates, Kings, New Gippsland and Grower's Pride.
San Marzano can be grown in a small pot (minimum 25cm diameter). It is a thick skinned fleshy roma, perfect in salads, or cut in half long ways and fried up on. Because it is a bush type, there is no need to stake it. It is very popular for the 1 or 2 person household, and doesn't grow out of control.
Super Beefsteak is an open pollinated robust indeterminate that grows in the range of 1.5 to 2.0 metres tall. A mid to late season variety with massive 10-12cm globular fruits. It matures in 85 days from seed and is resistant to Root-Knot Nematode, Verticillium Wilt and Fusarium Wilt. Seed is available in the Erica Vale, New Gippsland and Kings selections.
Super Marmande is an open pollinated indeterminate, synonymous with Marmande VF, Marmalade Super and Supermarmande, which differ from Rouge de Marmande in that they have resistance to Verticillium Wilt and Fusarium Wilt, while retaining the superb Rouge de Marmande flavour and ability to set fruit in cool regions. Super Marmande matures in 62 days from seedlings with an early set of delicious deep oblate fruit 7-10cm across
Super Prize is an F1 hybrid of determinate parents that grows to 0.5 metres. It is an improved version of First Prize, showing disease resistance to Verticillium Wilt and Fusarium Wilt. It's a mid to late crop with 2-5cm globular fruits. An ideal balcony crop for container vegetable gardening.
Super Roma is an open pollinated determinate that grows to 1 metre and in the mid to late season sets a bumper crop of almost seedless egg shaped fruits, 6cm long by about 4cm thick, that are perfect for bottling, juicing or fresh. They mature in 76 days from seedlings and are resistant to Verticillium Wilt and Fusarium Wilt.
Tiny Tim is an open pollinated determinate that makes a bush 1.5 high. An early season variety it sets huge trusses of 2-3cm cherry type red fruits. Matures in 80 days from seed and makes a sturdy container plant given support.
Tommy Toe is an open pollinated indeterminate that creates a bush 2.2 to 2.7 metres tall when given support. A mid to late season variety the 2-3cm cherry type fruits are one of the tastiest tomatoes I've eaten. They have a very heavy fruit set of at least 10kgs per bush.
This article is compiled from information gathered from www.greenfingers.com.au and www.tomato.com.au.
Pics 1, 3 and 4 by Mary Trigger
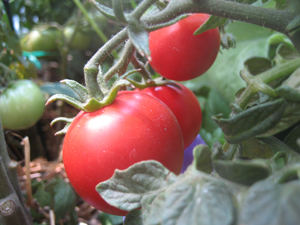
Pic 2 by Helen Tuton
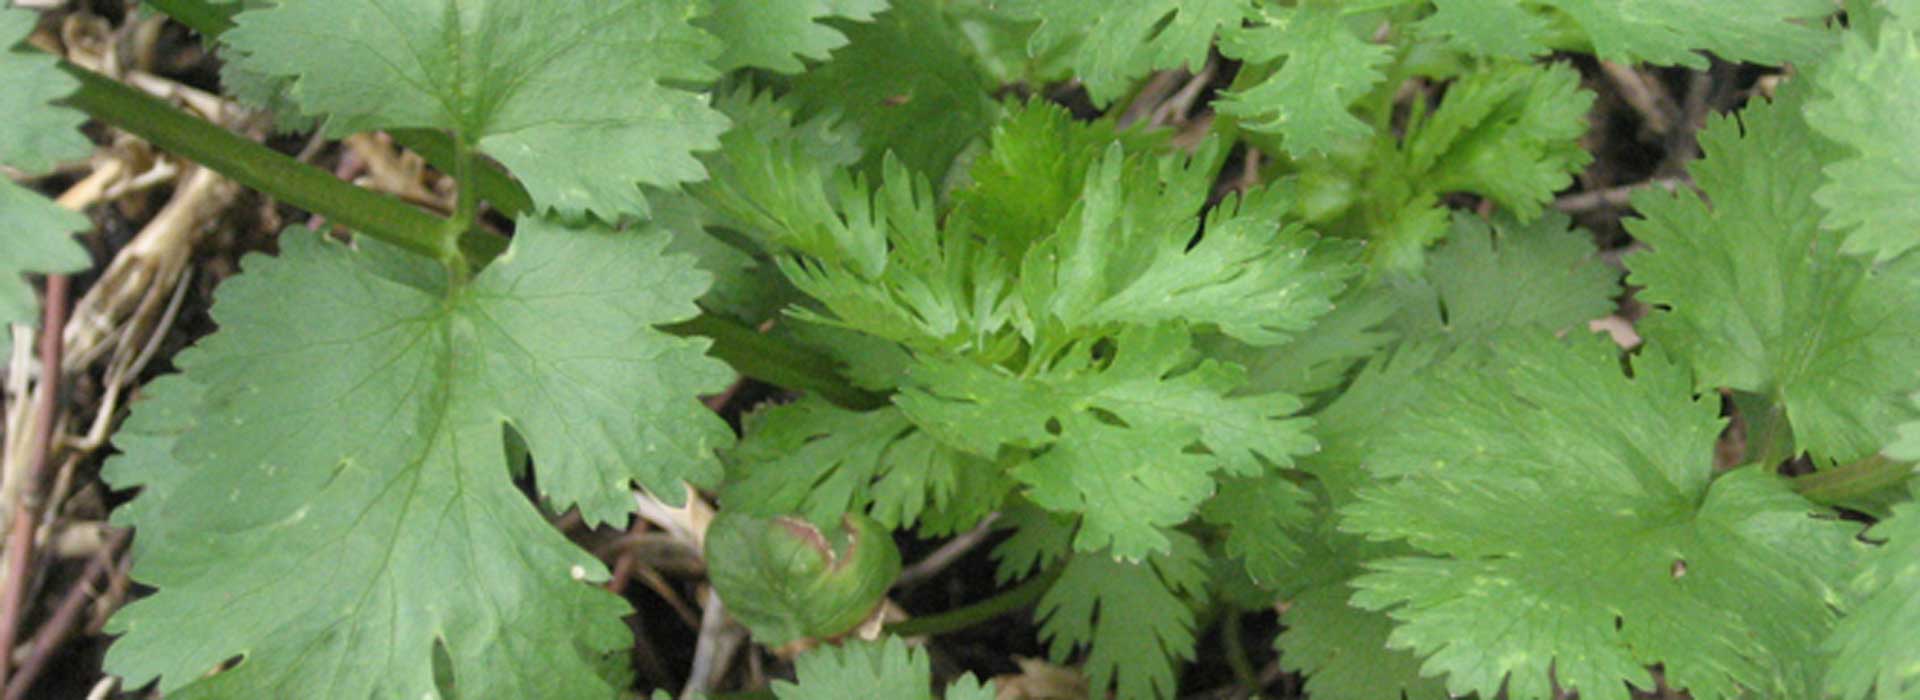
Coriander
Coriandrum sativum
For anyone who loves Asian, or Asian-inspired cooking, coriander is an absolute must have in your Yummy Yard! This fast growing annual, with a head a bit like Italian parsley, is an awesome backyard buddy. Its welcome in my kitchen anytime (unlike my dog, who isn't!). So, let's plant out this beaut little herb!
Planting Schedule
Warm: Early March and again in early September
Temperate: Early March and again in early September
Cool: Early September
Position, Position, Position!
Like my real estate agent says, it's all about position! Why am I bringing this up? Well, our good friend coriander has a bad habit. Ever heard of a plant "bolting"? I always thought this meant plants were being stolen faster than Cathy Freeman does the 400m! But no, it means the plant has a tendency to set seed prematurely which can greatly affect the flavour and yield of leafy vegetables and herbs.
So, to prevent this happening and encourage masses of tasty leaves, position your coriander where it will receive some shade in hot areas. This isn't really necessary in temperate to cool areas unless you get scorching hot summers.
Talking Dirty
Like most herbs and a few other Yummy Yard favourites (just like our mates Tomato and Strawberry), coriander will do well in a container or in the vegie patch. These mean, green growing machines love nothing more than a rich, moist soil in a nice sunny spot (except of course in really warm areas... looking at you Queensland!).
If planting in pots choose an organic potting mix. These mixes are designed for container gardening and generally don't have all the totally unnecessary synthetic fertilisers in them. If you're planting in your patch, working in some lovely organic matter, like compost prior to planting is a top idea. Coriander will thank you for it!
Feed Me!
Feeding coriander was once rumoured to prevent it bolting, but I reckon this is totally unnecessary if your soil is full of tasty organic matter, like compost. If you feel the need for feed, a compost tea or liquid seaweed fertiliser is all I would recommend.
What about the Water?
Now, one thing that will make coriander bolt is an erratic watering schedule. A soil with heaps of organic matter and a nice mulch layer will keep moisture in the soil longer, but don't be frightened to jab the old soil moisture tester (i.e. your finger) into the garden bed to see how damp it is. This applies especially to coriander grown in containers, as pots (especially terracotta) will dry out faster than a celebrity in re-hab! Coriander left to dry out thinks its days are numbered and bolts, so monitor the soil moisture and water when needed.
Are We There Yet?
Like a lot of the Yummy Yard herbs coriander can be eaten all the time. I generally wait until the foliage is about 20cm high as I reckon the flavour is best at this time. There are a couple of ways you can go about chowing down on your coriander. Either chop off the foliage as required or pull the whole plant out of the ground (a bit like you would a carrot) and use everything. The entire coriander plant can be used in cooking - leaves, stems and roots and they are dead easy to prepare.
Pests and the Rest
This has got to be one of the greatest Yummy Yard plants for a number of reasons. Least of all being that coriander, generally speaking, suffers from bugger all pests or diseases. In fact, coriander is often used as a good neighbour in companion planting. This is due to the smell of the plant being unappealing to insects and the rest. As we have learned, coriander bolting is probably the biggest issue. But even this can be prevented by following the instructions above or by choosing "slow bolt" varieties at your local SGA garden centre.
Hot Tip
My hot tip for coriander is don't just use the foliage. The roots have an amazing and intense flavour as do the stems. And, after washing thoroughly, the roots will enhance your cooking enormously. Oh, and one other thing, if your plants do happen to bolt and set seed don't despair. Just cut off the seed heads, take them inside and dry them out on a bit of baking paper. Once dry, the seeds can be stored and used for some entirely different kitchen flavours! Too easy!
Eat me!
Coriander pesto
1 bunch coriander
20 ml peanut oil or olive oil
Juice ½ lemon
1 clove garlic
50g peanuts or cashews dry roasted in a frying pan if raw.
Blend coriander, olive oil, lemon juice and garlic in a food processor or mortar and pestle.
Add peanuts or cashews and blend to a lumpy puree.
Season with salt and pepper.
This pesto is oh so versatile. Use it in a stir-fry or with pasta. Smear it on fish before you bake or BBQ it. Layer it between slices of eggplant, capsicum and zucchini, then bake the stacks in the oven. Mash it with avocado for a new twist on guacamole.
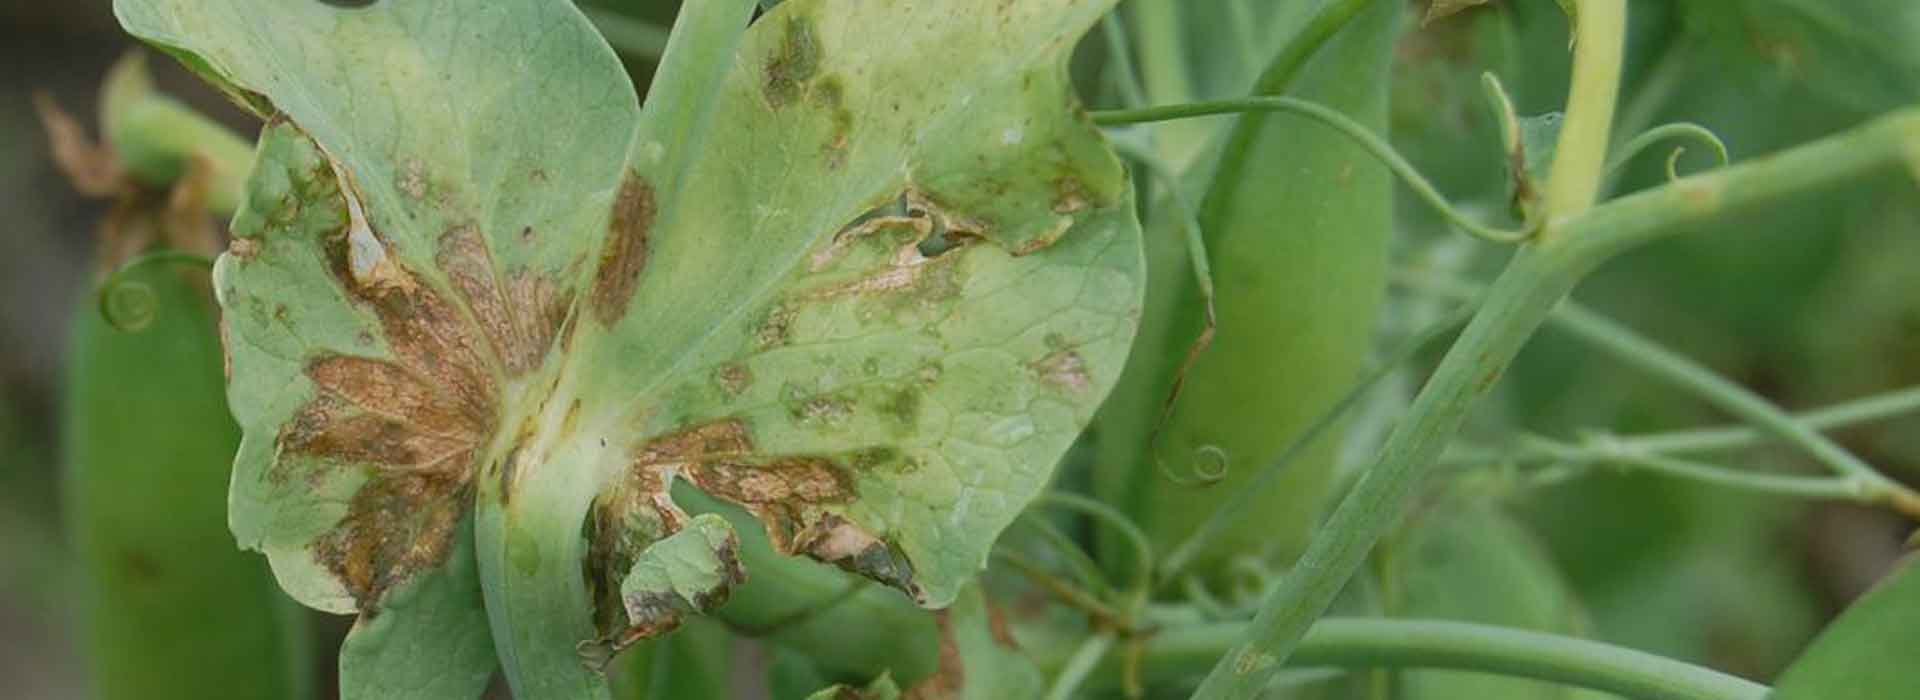
Pea Blight

Bacterial disease such as pea blight can be tricky to diagnose since bacteria aren't visible to the human eye; in fact they can only be seen under high magnification (x 1,000).
Pea blight is caused by Pseudomonas syringae pv. pisi and/or P. syringae pv. syringae. Laboratory tests will reveal the presence of bacteria, but as these tests can be costly, it's not really a consideration for the home gardener.
Disease symptoms on plants can be confused with fungal diseases, environmental extremes, chemical toxicities and even senescence.
Take heart though, blight of peas can be more of a problem in large scale horticulture than in the home garden. But in the home garden it could affect all the peas in a small space and wipe the whole lot out. However, in the home garden it is easily controlled by keeping your soil healthy with organic matter and manures, and rotating crops.
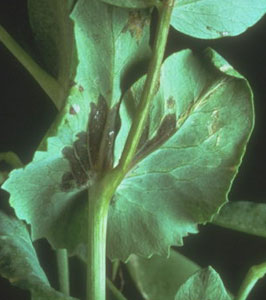
Symptoms
Small, dark-green marks that look soaked with water appear on the leaflets (as shown here). These lesions enlarge and merge together (coalesce), but are limited in their expansion by the leaf's veins.
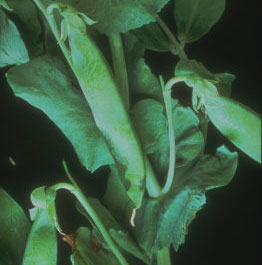
The lesions on leaves turn yellowish and are later brown and distinctly papery. Lesions on pods (shown below) are sunken and turn an olive-brown. Lesions can also develop on stems near ground level, beginning as 'water-soaked' areas. When these lesions coalesce they cause the stem to shrivel and die.
Stem infection may spread upwards into the leaves and stipules.
Infected seedlings are killed very readily, but even advanced plants can be killed by the disease.
Heavily infected seed may be discoloured. However, there is no visible effect on seed with light infection.
Spread
Spread of the bacteria is by seed or survival in pea trash. Rain-splash and wind-borne water droplets can also spread the bacteria.
Excessive rainfall and strong winds are the most favourable environmental conditions. And plants damaged by frosts and heavy rain are most susceptible to attack.
Prevention
Blight is most severe in wet seasons, so be vigilant when conditions are most favourable to the disease.
Purchase clean seed and, of course, do not use seed from plants that have any disease symptoms.
Seed treatments are not effective for the control of bacterial blight.
Do not grow peas in the same place each year, or even adjacent to an area of pea stubble. In fact, peas should not be grown in the same place more than once in three years.
Early sown crops are more vulnerable than late sown crops. Never sow earlier than recommended for your district.
Control
Bacteria will survive on pea stubble, so if infection is suspected, bury the pea trash 10cm below the soil surface, which reduces the survival time of the bacteria significantly.
Better still, remove all infected plant parts, bag and put in the rubbish bin.
Peas should then only be grown on a rotation of one in four years.
There are copper-based compounds available for the control of this disease in field peas but their effectiveness is 'limited and inconclusive' (DPI Victoria). Fungicides are for fungal diseases, they do not work on bacteria.
Information sources:
Kerruish, R.M., & Unger, P.W., 2003, Plant Protection 1, 3rd Edition, published by RootRot Press ACT.
Richardson, H. & Hollaway, G., 2007, 'Bacterial Blight of Field Peas', Agricultural Notes, July, AG0148, State of Victoria, Department of Primary Industries.
Lizards
Generally when we think of backyard habitat, we think of beautiful birds and butterflies, fantastic frogs, persistent possums and a host of other cute critters. Unfortunately, we tend to forget about one of the most important and most vulnerable of our native vertebrates – the reptiles!
Now, before you recoil in horror, or turn off the computer to watch one of those gripping TV series, consider this: our urban reptile and frog populations have declined enormously since European settlement, to the point that one in four of our 850 reptile species are now in serious strife.
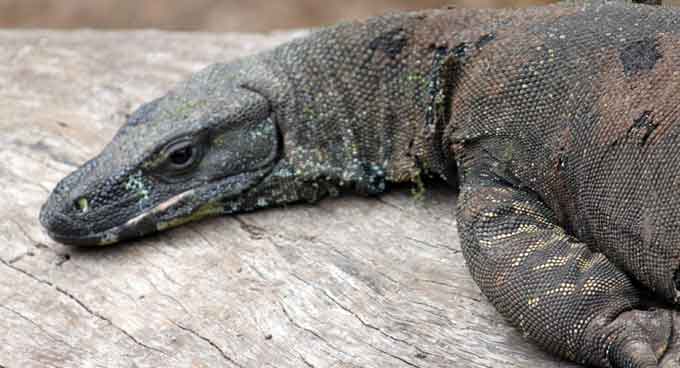
Think that’s no big deal? Think again. Of the 850 species of reptile found in Australia, 90% of these are found nowhere else in the world, meaning we really have to do something about this rapid decline, and fast. There are five distinct families of lizards in Australia; geckos, dragons, skinks, legless lizards and goannas, many of which would love to hang out at your place!
Reptiles get seriously overlooked when we talk about habitat gardening, but they are enormously important in a biodiverse backyard. But, how do we encourage them in, and, more importantly, how do we ensure they survive and thrive in our gardens? This article is designed to give you a swag of ideas, tips, tricks, dos and don’t when it comes to creating a lizard lounge at your place.
Love Your Lizards and Can the Chemicals!
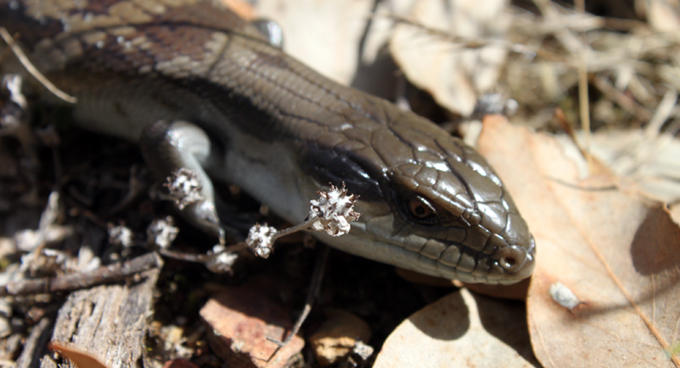
Not convinced that a lizard or two is the ideal addition to your garden? How about the promise of free, natural pest control in the patch? Many lizards and little grass skinks feed on insects and larvae, while larger lizards such as Blue-tongues and shinglebacks will happily slurp up slugs and snails. While we are talking about lizard lunches, it is important to avoid using chemicals and products in the garden that may harm or prove fatal to your beloved lizards. Wiping out the insect population in your garden with a pesticide may seem like a good idea, but in doing this you are removing the lizards’ food source, and, if they can’t get a feed, they won’t hang around. Avoid using snail and slug pellets, as these can prove deadly to our lovely lizards!
Gimme Shelter!
To encourage lizards to your garden, provide the following:
- Tussock grasses, ground covers and hiding spots in rocks and logs.
- Protected sunny spots on rocks, logs or brick paths
- Natural leaf litter to support insects and larvae
- Logs, fallen branches, natural cracks in soil and ground-cover plants
Lizards need debris that will provide shelter and a bit of a hiding place from critters that might make our lizards their lunch. This can include leaf litter, wood mulches, twigs on the ground, rocks, logs, old clay pipes, appropriate native plants – all of these give lizards shelter, and provide habitat for insects and micro-organisms, delicious if you are a lizard!
Some native plants that lizards love include: Dwarf Baeckia (Baeckia sp.), Dianella sp., Purple Coral Pea (Hardenbergia violacea), Mat Rush (Lomandra longifolia), Native Violet (Viola hederacea), Kangaroo Grass (Themeda triandra), Weeping Grass (Microleana stipoides), Wallaby Grass (Austrodanthonia spp.) and assorted Grevilleas and Bottlebrush (Callistemon sp.) to attract insects. Don’t forget to mulch these plants with a nice layer of chunky leaf and wood based mulch (not pine bark or redgum).
Lizards Rock!
Lizards, unlike us, are cold-blooded and rely on the sun to raise their body temperature and keep them happy and warm. Lizards love nothing more than lounging the day away on rocks, logs or brick paths, but do ensure that the sunning area is protected from predators, and offers lizard shelter nearby, just in case they are startled out of their sunning slumber. A really good idea is to elevate the rocks slightly, or put them in a little pile so the lizard can slip under it if threatened. Whack a few plants nearby, and you’ve got yourself a Lovely Lizard Lounge!
Flat Out Like a Lizard Drinking!
Lizards get the bulk of their moisture from the food they consume, and are incredibly efficient when it comes to moisture retention, however they will happily have a drink if water is provided, especially in really hot weather. Pop out a shallow bowl, in a protected spot and your lizards will lap it up!
Okay, there is one rule to remember here… if you build it, they will come! There is no need to head down to the local park and collect lizards, and, in most places, this is illegal and can draw a hefty fine, so please don’t do it! Lizards will seek out a well designed and lizard-friendly garden, and, although it won’t happen overnight, it will happen!
Once they have moved in, you can pretty much sit back and enjoy. Try and keep pets away from your lizards (they do tend to munch and frighten them), and, don’t rake up mulch, leaf litter and sticks too often… this upsets the little ecosystem, and can do more harm than good.
Now all that is required is to sit back on a sunny summers day, and enjoy your lizards lounging in your patch!
Lizard Pictures by Mary Trigger (SGA)
Frog Ponds

Like a famous American frog once said, "It's not easy being green", and this is particularly true for our amazing Australian amphibians. Although we have been blessed with a unique frog diversity (Australia is home to over 200 frog species), loads of them are croaking at an alarming rate! Of our frog species, about 43 of them are listed as endangered or vulnerable, and three are presumed extinct. These guys are hopping mad about habitat loss, and they need our help! So, set aside a piece of your patch, and get frog bog building!
Getting Started - Frog Bog Basics
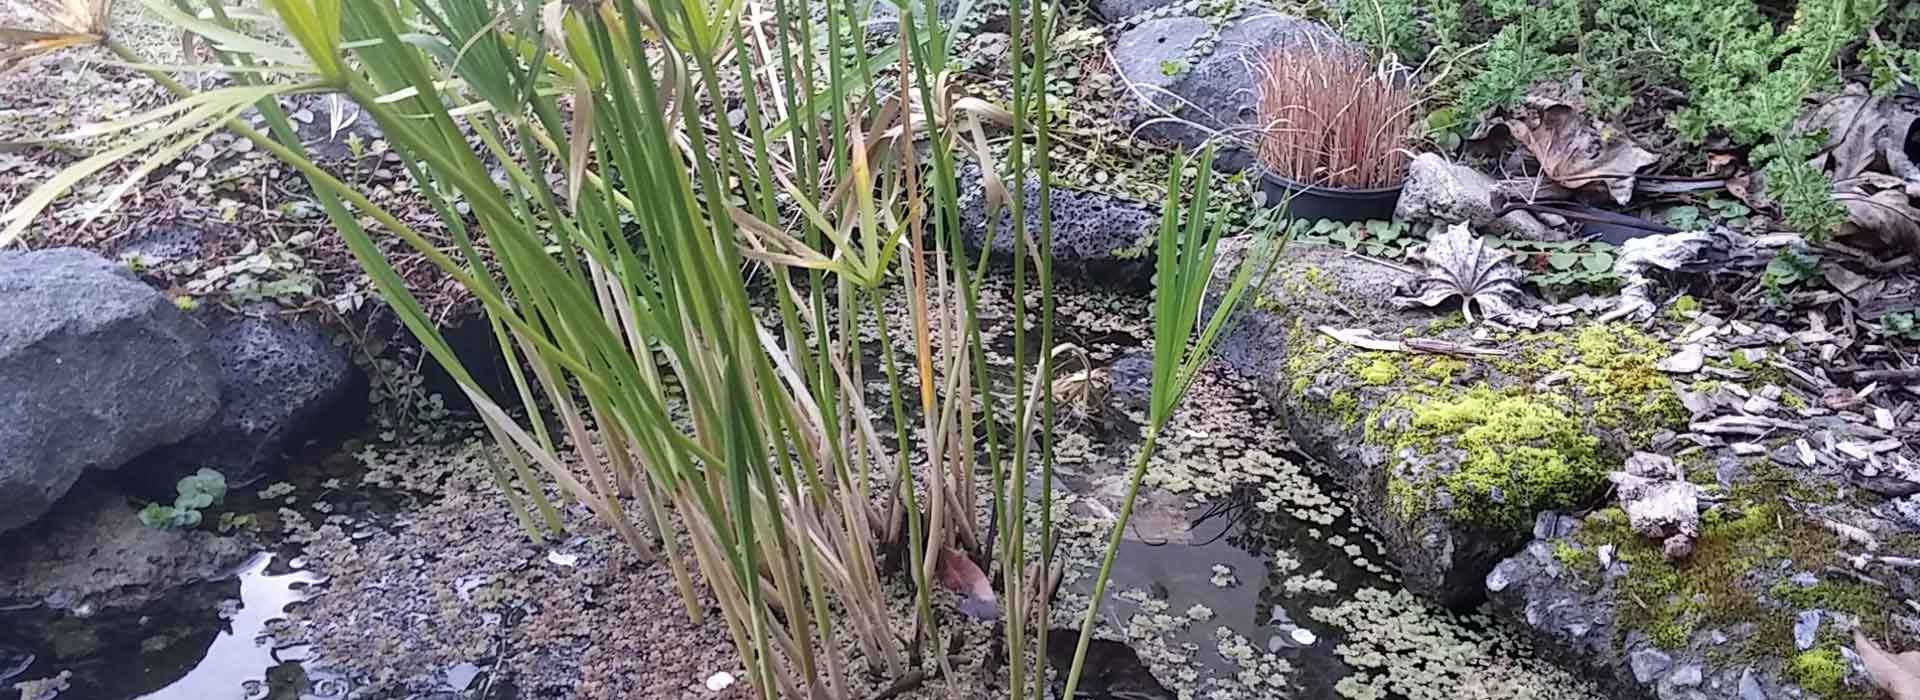
There are a few things we need to be aware of before we consider frog bog construction. Frogs, like us, need moisture, food and shelter, so consider this when placing and designing your frog bog. Ideally, a frog bog would be located in an area of the garden that receives some shade and some sun (about 70% shade and 30% sun). This will ensure that a little bit of algae grows, which is necessary for happy hoppers, and the fallen leaf litter will provide a bit of sustenance for tadpoles in the pond.
While we are talking shelter, the adult frogs need dedicated areas adjacent to the pond where they can hang out! Providing rocks, logs, leaf litter and appropriate shrubs will keep the frogs happy and you will be rewarded with a chorus of frog song all night! While we are talking about the frog song, consider your neighbours when locating the frog pond and keep the bog well away from their windows - especially bedrooms. Frogs can croak and sing all night and nothing says neighbourhood dispute like a badly placed bog!
In the moisture stakes, a good, frog attracting pond needs a total of about 1m³ of water, so consider this also before picking your spot. Frog ponds need to vary in depth, with a deep section of at least 50cm (more on that in the Design and Construction section), so be aware of underground pipes and tree roots in the planning stages. When designing a frog pond, it's a good idea to consider utilising the natural slope of your block, wherever possible.
Placed in lower areas of your garden, the pond may be fed naturally by runoff rainwater, but the other advantage is that the surrounding ground will stay damp. This makes perfect frog habitat because Australian frogs don't live in water all the time. In fact, they are used to their watery habitat drying out during summer and so take to the shelter of lush grasses and plants. If designing your pond this way, be aware that many fertilisers, pesticides and herbicides can do dreadful things to frogs, tadpoles and their food sources, so limit your chemical use in the patch!
Get Building - Design and Construction of your Frog Bog
Now that you have located the perfect spot for your frog pond, it's time to get building. One of the most important aspects of frog bog design is variation in depth. You see, tadpoles need sections of deep water (about 50cm minimum) to keep them cool, and sections of shallow, pooled water. Frogs and tadpoles also need sloped sides on the pond to allow them in and out, and these must not be too steep (they only have tiny legs after all!) or too slippery!
There are a number of pre-made fibreglass ponds that can be simply dug into place, and you can place rocks and logs in one end to create a shallow section. Edges and base can be hidden and the pond softened with the inclusion of rocks and pebbles, and, when the plants go in and around the pond, it will look as though it has always been there!
Another simple method of construction is to excavate a suitable sized hole, with varying depths, and lay a good quality pond liner in it (check with your local garden centre for the best product). The edges and base are also hidden with rocks, pebbles, logs and vegetation. The design below shows the ideal layout of a frog-friendly pond.
Fill 'er up - Putting Water in the Pond
Might sound simple, but filling up frog ponds can be a bit tricky, especially if your tap water is chlorinated - as it is in many parts of Australia. If this is the case, the water must be allowed to stand, for about 5 days, in a clean container or bucket before it is introduced to the frog pond, to minimise any risk to resident tadpoles and frogs. Water from metal tanks should be treated in the same way, as frogs can be quite sensitive to chemicals that are present in some metal water tanks. Oh, and if you need to top up an inhabited frog pond, don't just blast the water in. Tadpoles can become over-buoyant if the water contains too much oxygen, so a steady trickle is ideal!

Plants for the Pond, and the Patch
Frogs and tadpoles need a variety of plants at their place, both in and out of the water. Ideally, plants should be indigenous to your local area, and include shrubs, grasses, ground covers and water plants. This combination of plants provides not only shelter and food for tadpoles and frogs, but will attract insects and bugs…..top notch frog tucker! Where you are located in Australia will determine which plants are the most appropriate for your bog, but below is a rough guide to some common Aussie plants that are perfect for frog ponds.
Plants for the Shallow End - include Tussock Sedges (Carex sp.), Sedges (Cyprus sp.), Jointed and Common Rush (Juncus sp.) and Nardoo (Marsilea sp.)
Plants for the Intermediate and Deep Zones - include Marsh Flower (Villarsia exaltata), Purple Loosestrife (Lythrum salicaria), Tassel Sedge (Carex fascicularis), Jointed Twig-rush (Baumea articulata) and Water Ribbons (Triglochin procerum).
Native Plants for the Pond Edge - include Lilly Pilly (Acmena smithii), Dwarf Baeckia (Baeckia sp.), Dianella sp., Purple Coral Pea (Hardenbergia violacea), Mat Rush (Lomandra longifolia), Native Violet (Viola hederacea), Kangaroo Grass (Themeda triandra), Weeping Grass (Microleana stipoides), Wallaby Grass (Austrodanthonia spp.) and assorted Grevilleas and Bottlebrush (Callistemon sp.) to attract insects. Don't forget to mulch these plants with a nice layer of chunky leaf and wood based mulch (not pine bark or redgum).
Be aware that there are many exotic water plants that are terrible environmental weeds, so be very discerning when you buy, and do a bit of research. Also, avoid plants that form a mat on the top of the water (like Duckweed and Azolla). This stuff makes it difficult for tadpoles to get enough oxygen.
Ponds Can Cop a Caning
As a native Queenslander, I know only to well the horrors of the Cane Toad, and their uncanny ability to seek out frog ponds, pools, dog bowls, and, on one occasion, the hallway in my childhood home! These guys are nasty, and love nothing more than moving into your frog pond. So, there are a couple of things you can do to prevent the Bufus marinus displacing your Kermits.
Firstly, if you live in an area inhabited by cane toads, consider building a raised frog bog with overhanging vegetation. Frogs will be able to access it, but it will certainly prove difficult for the Cane Toad. Secondly, keep an eye out for their eggs in the pond... they are a distinctive blackish "necklace" and will be found clinging to vegetation in the pond. Remove these from the pond, and stick them out in the sun to dry, as this kills off the awful toad spawn. If you are concerned you may be removing frogs eggs, fear not... only cane toads will lay the distinctive necklace of eggs.
Oh, and if you are roving about at night on the hunt for toads, forget the golf club and consider freezing them instead. This is the most humane way to dispose of these hideous creatures, just avoid their poison gland on their backs (best to wear gloves).

Now, what about the frogs?
Okay, there is one rule to remember here... if you build it, they will come! There is no need to head down to the local waterway and collect tadpoles, and, in most places, this is illegal and can draw a hefty fine, so please don't do it! Frogs will seek out a well designed and well positioned bog, and, although it won't happen overnight, it will happen!
Once they have moved in, you can pretty much sit back and enjoy. Try and keep pets away from the pond (they do tend to munch frogs), and, don't clean the pond out too often... this upsets the little ecosystem, and can do more harm than good. Tadpoles can be fed to supplement their algae and insect diet, and the best thing to give them is a bit of washed and boiled lettuce! Sounds revolting, but these guys love it. Don't go overboard, just a bit now and then.
Oh, most fish and tadpoles don't really get along that well, so it is best to avoid putting fish in your frog pond altogether. There are a few native species that can co-exist happily with frogs and tadpoles, so ask your local aquarium, or get in touch with your local frog society (check the links below).
Now all that is required is to sit back on a delightful spring evening, and listen to the sound of our amazing native frogs calling well into the night!
Frog Links
www.frogs.org.au
www.mybackyard.info/backyardblog/
Photographs
Tadpole photo courtesy of www.mybackyard.info
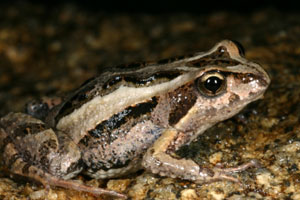
A cute Peron's Treefrog Tadpole (Litoria peroni)
Native Violet (Viola hederacea), an excellent plant for around your pond
Eastern Common Froglet (Crinia signifera), a regular pond visitor to much of Eastern Australia. Lydia Fucsko/frogs.org.au
Frogs in the Pond!!
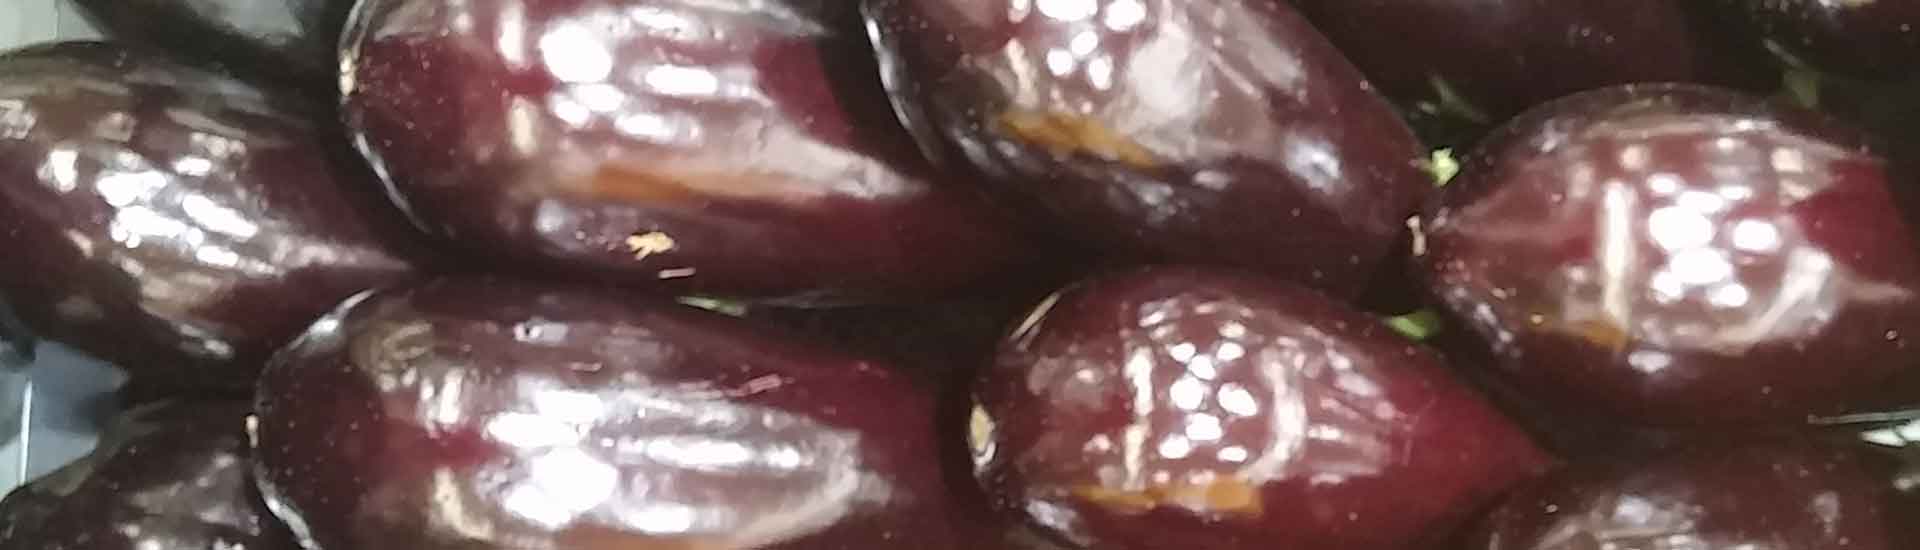
Eggplant

The exquisite flavour and versatility of home grown eggplants makes them a summer garden essential. Some people think they look ugly, but that does not deter most of us from growing these fairly hardy vegetables.
Planting Schedule
Warm Areas: Sow seed: September, Seedlings: October- December
Temperate Areas: Seedlings: Late September - December (after frost risk has passed)
Cool to Cold Areas: Seedlings: October - December
Position, Position, Position!
Now, here's a bit of info you can use at your next trivia night... eggplants and tomatoes are related (just like cousins)! Position-wise though, eggplants vary from tomatoes in that they like it warmer... a fair bit warmer. Eggplants can't handle frosts at all, and, like me, they hate long periods of cool weather. Stick a few in a sunny spot in the garden and leave about 50cm between them, as they can get pretty big. They'll thank you for it!
Talking Dirty
Due to the family ties between eggplants and tomatoes (and potatoes and chillis), we need to remember the following two things: they love what tomatoes love, and they can't be planted where tomatoes (or their other rellies) have been for at least three years. Check out the Companion Planting chart here for other good and bad neighbours.
So, just like tomatoes, top eggplants thrive in a fertile soil, rich with compost, pelletized poo and topped with a layer of straw. Eggplants will do even better if the bed is prepared for them a month before planting out, so whack it all in and count the days. The tip here is to ensure the soil drains freely, and isn't too heavy (meaning really dense or clay). As with most Yummy Yards plants, ensure that the mulch is not pushed right up to the stem, as this can lead to collar rot and all sorts of nasties!
Feed Me!
Feeding your eggplants with poultry poo based granules just as the flower buds appear will do "eggsalent" things for the yield of your plants. If you feel the need to feed, and you missed the bud stage, make a chook poo tea by soaking poo pellets in water, and giving it to your eggplants to drink. Other than that, the beaut rich soil in the bed you have prepared should provide a far whack of nutrients to these tasty tackers!

What about the Water?
Eggplants, like most summer veggies, do not like to dry out, so keep a close eye on the soil moisture. Left to dry out, eggplants can produce hideous, misshapen fruit, making ugly even uglier... so, for the sake of a good looking garden, just don't do it! Once again, a nice mulch layer will assist.
Are We There Yet?
Generally speaking, my eggplants take about 13 weeks to mature, bearing in mind that I live in the second coldest place on earth (second only to my lawyer's office... that's a joke). Eggplants can take varying lengths of time to mature (can't we all), but, depending on variety, between 10 - 14 weeks is the norm. These guys are ready to roll when they are big enough to use, are firm, and the skin is glossy. Don't leave them on the plants too long, as they can over ripen and go wrinkly, which makes them even uglier, and not so tasty!
Stake ya' Claim!
Like their cousin tomatoes, eggplants need to stake their claim, and must be well supported in order to be productive and upstanding. Staking eggplants, especially the bigger fruiting varieties, prevents the vegetable equivalent of the "Dolly Parton", where the plant becomes so top heavy with eggplants it is unable to support itself. Nice solid tomato stakes, driven into the ground about 10 centimeters away from the stem of the plant should do it. Join the stake and the stem together with an old stocking (don't tie it too tight) and you'll find this is the beginning of a fruitful and supportive relationship.
Pests and the Rest
Eggplants don't seem to suffer from an enormous amount of pest and disease issues, but, being related to tomatoes and friends, they are susceptible to the same suite of pests and problems. That said, diverse Yummy Yards, full of tasty treats and pretty plants, will attract a range of good bugs to your patch. These guys will make short work of loads of pest outbreaks. The other hot tips are a consistent watering regime, and crop rotation. Don't plant these guys in a patch where tomatoes, chillis, eggplants or potatoes have been in the last two years... this lessens the possibility of disease. Also, Companion Planting and eggplants go hand in hand.

Now, if all this fails and you do have an issue, never fear, Sustainable Gardening Australia is here! Below is a list of common issues, their causes, and a couple of solutions for eggstra-odinary eggplants!
- Flowers fall off before the fruit forms - Could be caused by loads of things, including too much or not enough water, not enough light, over fertilising (I tried to warn you), possums or thrips. Check flowers for thrips, and, if you find them, click here for what to do next!
- Leaves wilting - Ummmm... did you water your plants? This generally happens when humans are overcome by laziness, or holidayitis! Especially common during summer school holidays! Also, check to see that the eggplants are not mulched right up to the stem... this can cause awful things to happen!
- White powdery patches on upper surfaces of leaves - Ahhh, me old mate powdery mildew! Often caused by water hanging around on the leaves of plants. Try to water the soil, rather than the foliage. Remove affected leaves and put them in the bin, not the compost. Click here for tips!
- Holes in your leaves - Pretty sure it's caterpillars.
- Really ugly wet looking patches on the eggplant - It's probably Blossom End Rot (if it's at the bottom end) of the eggplant.
- Plants falling over - did you read the 'stake ya' claim' segment? And have you planted your eggplants in a wind tunnel? They don't stand up to wind real well!
Now, one other issue that effects eggplants is fruit fly... these little devils love an eggplant grown in some of our warmer climes. I say warmer climates because the fruit fly maggots like to pupate (that means change from maggots to flies) in warm soil, and, like most southern gardeners, are not big fans of cold soil. This is great news for us in the cooler climes, but not so flash for those in warmer spots. So, my top tips for sustainable fruit fly control can be found here, but, before you head off, remember a great place to start is with garden hygiene. Remove any fallen or infested fruits; bag them up and ditch them in the bin... that's an excellent discouragement for fruit fly larvae.
Hot Tip
Now, don't get me wrong, it's not all about looks (goodness knows I am well aware of that), but when it comes to eggplants, there are some really "out there" looking varieties and cultivars available. We all know about the big old "Deep Purple" varieties, but this is just "Smoke on the Water" (end of corny 1970s music reference)! Eggplants come in pink, white, stripped, green, lavender and intriguing combinations of the above. So, head to your local SGA garden centre to see what's available. Go on, put some crazy colour in your garden, your mates will be impressed!
Why not try some other varieties as well, like Lebanese eggplants (you know, the long, skinny ones). These are dead easy to grow, and go really well in pots or containers. Because they have fruit of a smaller size, they are quicker to harvest so are good for climate with shorter summers. Oh, and while you're at the garden centre, why not have a look at the grafted eggplants now available. These are said to be more disease resistance, more vigorous, and have a higher fruit production... why not try one and see!
But wait... there's more! I was always told that eggplants needed to be soaked in salty water, then "de-gorged" under weight and left to stand before being ready to use. What a massive pain in the neck that ends up being, as anyone who has done it can testify. Well, here's the big scoop: it's not true!! Only the bigger, purple coloured eggplants need this, particularly if you have let them go a bit wrinkly and past it! The cute little Lebanese and Thai eggplants, along with many more of the smaller varieties don't need it, so here's my hot tip: Grow the wee ones, and save yourself the effort!
Eat Me
Eggplants and Mushrooms Chinese Style
10 dried shitake mushrooms
1 ½ cups water
3 eggplants
½ Cup vegetable oil
4 cloves garlic
2 cm knob ginger
1/3 Cup soy sauce or tamari
2 tbsp rice wine, saki or other cooking wine or sherry
2 tbsp sugar
1 tsp sesame oil
Place shitake mushrooms in a heatproof bowl and cover with 1 ½ cups boiling water. Allow to soak while you prepare the rest of the meal.
Prepare rice and place it on to cook. (The absorption method is best)
Crush garlic and grate ginger.
Cut eggplant into thick wedges. Toss eggplant in 2 Tb of the oil.
Heat a large saucepan or wok over high heat.
Add eggplant wedges and cook over high heat until golden and soft. Try not to stir the eggplant too much but turn it methodically with tongs so it browns on all sides.
Turn heat to low. Add garlic and ginger and stir for 1 minute.
Add remaining oil, soy sauce, wine, sugar and sesame oil.
Strain the mushrooms, but reserve all of the cooking water.
Add 1 cup of the mushroom soaking liquid to the saucepan.
Cut stems of shitake mushrooms and save to compost. Add mushroom caps to the saucepan.
Bring mixture to the boil, then reduce heat to a simmer. Simmer for 30 minutes.
This is best served with homegrown Asian greens such as bok choi or choi sum. Simply stirfry with garlic and any left over mushroom stock.
Garden Predators
There are plenty of garden critters that are useful predators of plant pests, and SGA encourages home gardeners to reduce their chemical use, in order to encourage predator activity.
Many companies supply a range of garden predators for sale to commercial, home and community gardeners. We just can't resist introducing the 'characters', known as Backyard Buddies ™, introduced by Organic Crop Protectants, since we think the company has done a splendid job of developing their respective stories (plus it's a great initiative)! You will need to contact the company for further information and costs, www.ecoorganicgarden.com.au

Gracey - the Green Lacewing
Hello my name is Gracey. You would better know me as an iridescent green glassy-winged insect that lays her eggs on long slender white stalks all over the garden. That's what I look like as an adult! You very rarely see me in this form because I like to carry my snack wrappers on my back as fashion accessories. My favourite home is amongst veggies, roses, or any other part of the garden where I can find my favourite snacks which are aphids, mites, juvenile whitefly, small caterpillars and moth eggs. I will also eat mealy bug if they are the only food you have in your garden. Like my Buddies, I am delivered to you in a small plastic container. I come as an egg with 99 of my sisters, packed in Lucerne chaff. Sprinkle the chaff equally into small shallow cardboard containers or my very own release boxes and hang them close to my favourite food so that when I hatch I can start eating straight away.

Pete - the Predatory Mite
G'day my name is Pete. I am very busy and always hungry because I have eight legs to feed. You probably never ever see me because I am very small but I do a big job in your backyard. My favourite food is Two Spotted Mite (TSM, also called Red Spotted Mite). TSMs are those pesky blighters that suck all the nutrients out of foliage and cause russetting and yellowing of your precious rose leaves, tomato leaves and many other plants. I am delivered to you in a small plastic container with 999 of my mates on 20 to 30 bean leaves. Place one bean leaf into each plant where TSM like to live. If TSM are a big problem (webbing under the leaves), place 2-3 bean leaves into each plant.

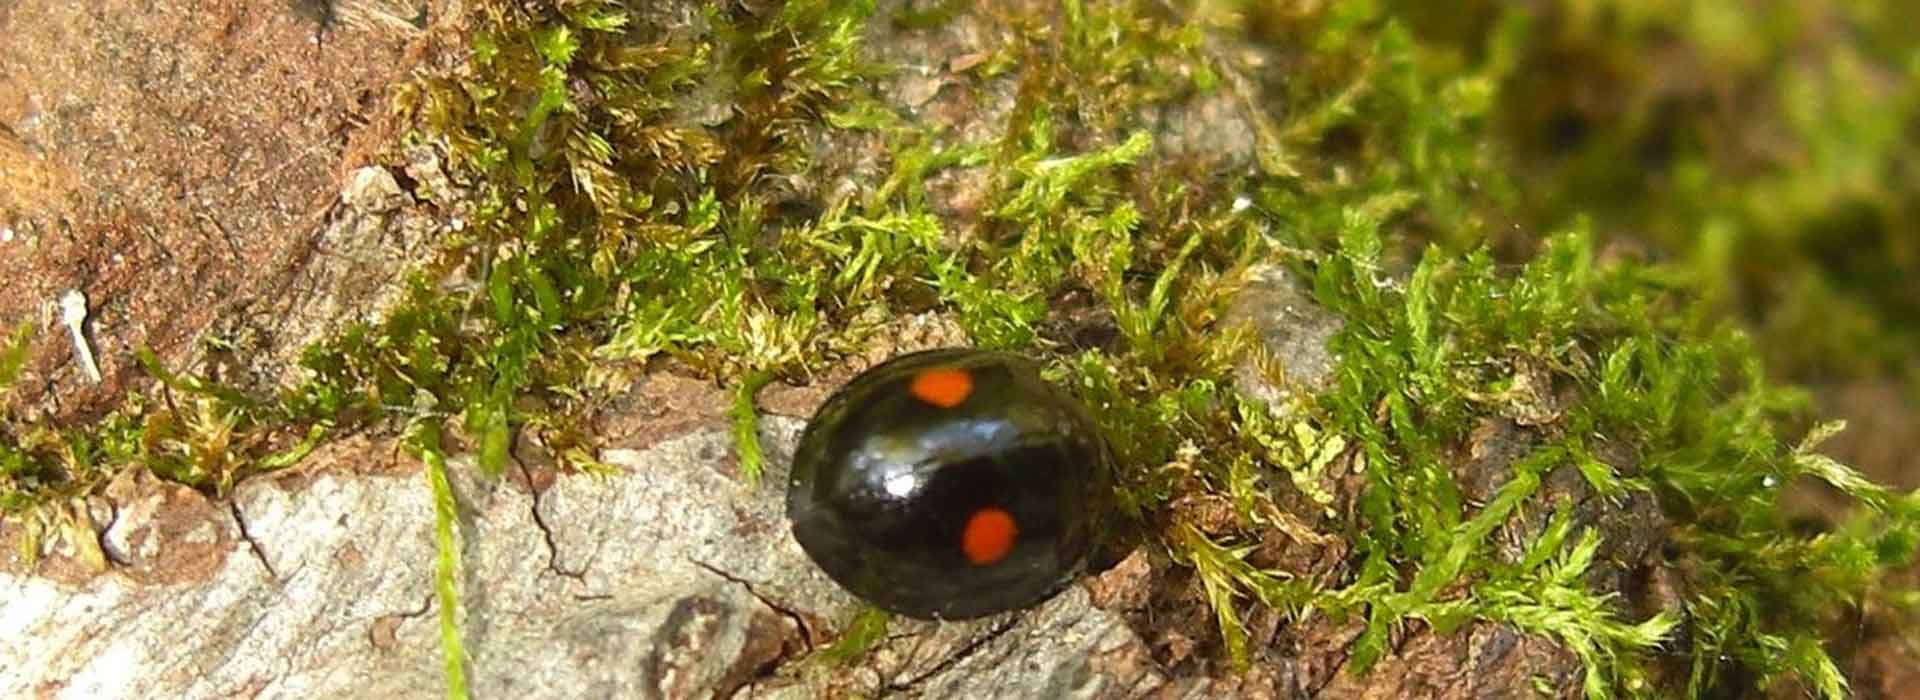
Linda - Cryptolaemus Ladybeetle
Hi, my name is Linda and I'm your best friend if you have plants that suffer from mealybug attack. My little baby sisters and I love to eat mealybugs, they are like little balls of white fairy floss. I also like to eat Pulvinaria scales such as cottony scale in citrus and other soft scales. Since my brother Luke also likes scale I leave them for him to eat if there are enough mealybugs around. I am delivered to you in a small plastic container with 39 of my sisters. We rapidly go to work finding mealybugs to eat and lay our eggs into mealybug egg masses. Our babies hatch 2-3 weeks later and are sometimes confused with mealybugs because they look similar, like little white balls of fluff; but they move much faster on plants. Tap 1-2 of my sisters out of the plastic container close to a mealybug infestation. My sisters and I will feed on up to 40m2 of garden infested with mealybugs.

Luke - Chilocorus Ladybeetle
G'day my name is Luke, and I love to eat scale. Scale are like little mini pizzas to me and I enjoy an assortment of flavours including Red Scale, Oriental Scale, Oleander Scale and White Louse Scale (Citrus Snow Scale). Just like my sister Linda, I have baby brothers who also feed on scale and look very different to me. In fact they look like little brown porcupines. You will see them about 1 week after you release me into the garden. I am delivered to you in a small plastic container with 29 of my brothers and we rapidly go to work finding scale to eat. Tap one or two of us out of the plastic container close to a scale infestation. My brothers and I will feed on 20-40m2 of garden infested with scale.

Walter - Parasitic Wasp
Greetings, my name is Walter and my job is a little different from the other Backyard Buddies. In a lot of ways, my job is the most important because I help protect the rest of my Buddies from deadly fly spray, which can kill us all. I have the very specialised task of controlling house flies, stable/horse flies and buffalo flies by zeroing in on fly larvae. It's a dirty job but I am well-trained in this area. Once I find fly larvae, I deposit some eggs, which soon hatch out and use the fly larvae as baby food to grow and develop. In doing so, we control flies before they become adults. To achieve this goal, we need to be released in areas where flies breed, starting in spring or early summer. Follow-up releases are required every fortnight during the fly season. I come in a special cocoon of fly pupae mixed in vermiculite with about 2500 of my brothers and sisters. If you have horses or cows, you should release a minimum of 100 and a maximum of 500 of us per animal per fortnight. For smaller animals like chooks, cats and dogs you need between 5 and 50 of us to be released every fortnight.
Banner image: Jason Hollinger - Lady BugUploaded by Amada44, CC BY 2.0, https://commons.wikimedia.org/w/index.php?curid=24213810
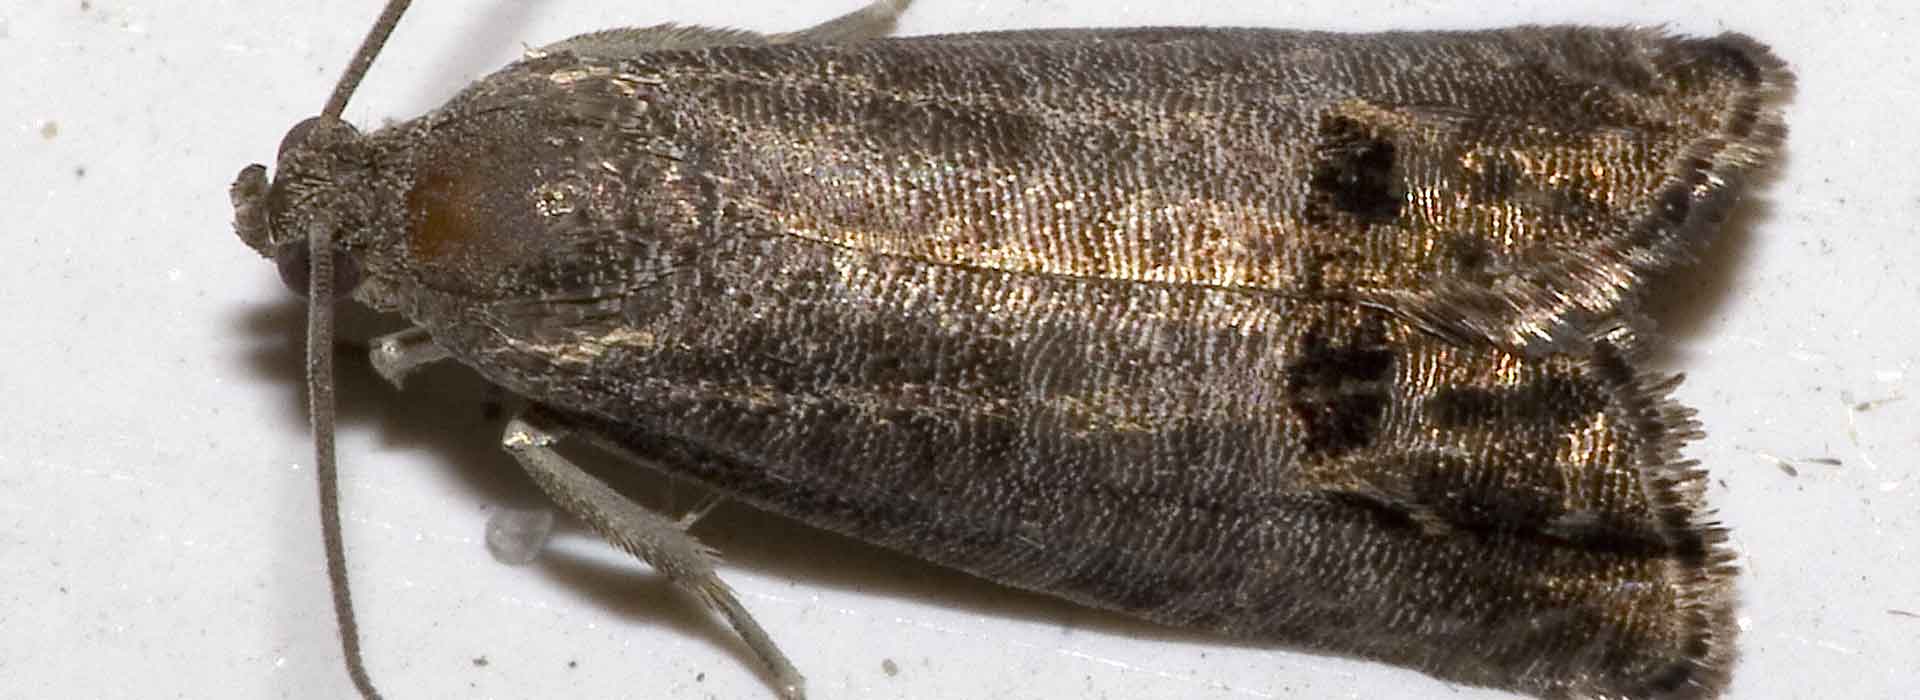
Codling Moth
If you want to protect your apple or pear trees prepare for this pest! He introduces himself here:
Hi, my name is: Codling Moth
Describe yourself: Man... I have the best sense of humour! Ready... "What's worse than finding a worm in your apple?" "Finding half a worm in your apple!!!" That joke's about me, well, me, when I was a little tacker! Now that I am all grown up I am a pretty handsome fella, grey coloured, with light grey and copper colour on my wings... which are a pretty impressive 20mm across! My scientific name is Cydia pomonella.
Hobbies: Laying pin head sized eggs after dark. Then my young hatch as larvae and start chewing through the apple skin and munching right into the middle of fruit. You can see little holes plugged by brownish excrement where they burrow in and as the fruit develops there may also be something sticky. When they are full-grown they are about 1.5 cm long, a bit pink and have a brown head. They leave the fruit and go into their next life stage i.e. forming cocoons in loose bark or in leaves and mulch on the ground. If the weather is right, they may hatch out as moths again and start over! But if it is cooler, they may decide to stay put during winter and hatch in spring - about when their host tree starts to flower.
Likes: Well, as a young kid I love apples, pears, quinces and crabapples. My dad loves cheap sherry and port, and mum loves laying eggs when the temperature gets over 15 degrees at night time. Mum really loves it when the trees have just finished flowering, it makes her want to have babies!
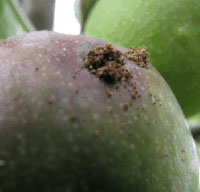
Dislikes: Clean trees and gardens, chooks, when people remove fruit with holes in them. I hate soaps - like home made chilli soap, or store bought stuff (like Beat-a-Bug) or socks or bags put over the fruit so I can't lay eggs. I can't stand Dipel... this stuff makes me sick! There are also codling moth traps (Desire) which I am a real sucker for. Dad can't really handle his port and sherry!
You'll know you've met me when: Your fruit (especially apples) will be riddled with holes, brown and squishy on the inside, and will fall of the tree really early!
Breaking up ain't hard to do... if you:
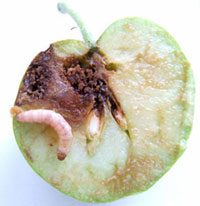
- Remove loose bark and leaf debris from the tree, to reduce hiding places for cocoons. You pay attention to the timing.
- Catch boys in a sherry trap (a jar filled with sherry and hung in a tree) the girls are about to lay eggs
- Use Dipel (Bacillus thuringiensis) at the right time (ie: when the eggs are laid but the fruit not infested)
- Have a wide range of flowering plants in your garden to attract beneficial insects and insectivorous birds.
- Paint a band of horticultural glue around the trunk and/or main branches - this will trap female moths as they try to climb up to the fruit to lay their eggs
- Inspect the trees every few days, collect any fruit you find with small holes and destroy it by placing it in a sealed, black plastic bag in the sun. Or feed it to the chooks!
- Attach bands of corrugated cardboard around tree trunks - the larvae like to pupate in the shelter the corrugations provide. Remove them every 3 weeks and place them in a black plastic bag in the sun to destroy the pupae
- Hang a commercially available pheromone lure and trap in the tree - this attracts the moths and they get stuck on the sticky inner surface.
- Make your own traps out of old plastic bottles with 2 holes cut in the sides about 2 cm above the base and add a 50:50 mix of molasses and water. Check them every few weeks.
- Put bags around the fruit on your trees.
Photographs:
Banner image: Picture taken by Olaf Leillinger [CC BY-SA 2.5 (https://creativecommons.org/licenses/by-sa/2.5) or GFDL (http://www.gnu.org/copyleft/fdl.html)], from Wikimedia Commons
Pic1: Courtesy of Western Australian Dept. of Agriculture
Pic2: Courtesy of Meredith Nursery
Pic 3: www.biology_blog.com
Pic 4: www.greenharvest.com.au Description: Desire Coddling Moth Trap
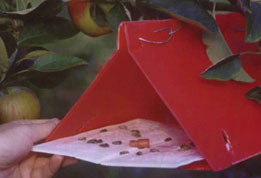
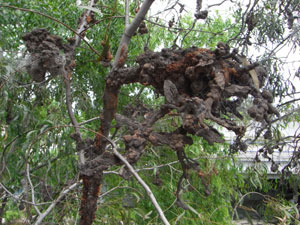
Gall (of Australian Native Trees)
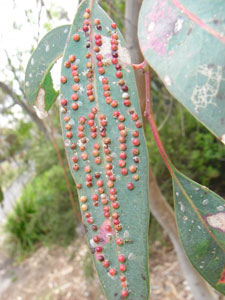
Hi, my name is: Gall (of Australian Native Trees)
Describe yourself: I guess some people would describe me as an abnormal growth on plant parts, but I reckon I'm just a regular lump, hanging around on stems, leaves, buds, and, when the mood strikes….roots! I may look pretty boring (and a little ugly) on the outside, but I'm actually really interesting under the surface! Size wise, I can go from minute to big and hideous, and my colours can vary from red to yellow and even brown!
Hobbies: I am the result of plant cells' reaction to invasion by my friends e.g. wasps, beetles, moths, coccids, psyllids or bacteria. I don't move around at all (I just hang out growing bigger and bigger) and, once I've settled in, I stay for a long while!
Likes: Loads of Australian native plants, but I really love Eucalypts, Acacias, Lilypillies and Hakeas. I like making your prized native trees look really ugly... but I don't always kill them!
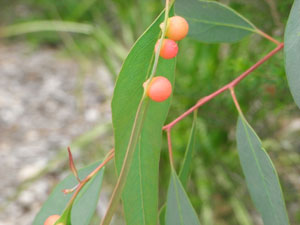
Dislikes: Well... not much, but the little pests who cause me are not huge fans of birds and other insect eaters. You see, I am often formed when little wasps, beetles and insects lay their eggs in plant parts, so a really diverse habitat with loads of bird activity will certainly upset me!
You'll Know You've Met Me When: Certain parts of your trees have lumps on them. In wattle trees and hakeas, I grow on the branches and look like a big seed pod. But on eucalypts I can appear a bit like a little pimple on the leaves. When I hang out on lilly pillies, I look like bubbles and pimples on their beautiful foliage!

Breaking up ain't hard to do... if:
- Accept that tiny lumps and bumps are all part of nature….I mean, we can't all look like supermodels!
- Encourage backyard biodiversity….having birds, lizard and insects in the garden will help keep the critters that cause galls under control.
- When buying Lillypillies, look for varieties that are less susceptible to psyllid….there's heaps of them out there!
- Cut off areas if they are really offensive to you….as I said, I probably won't kill your tree, so this is a last resort!
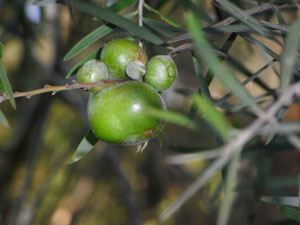
Photographs:
Pics 1&2: Coccid Gall on Eucalypt
Pic 3: Fungus Gall on Acacia sp.
Pic 4: Wasp Gall on Acacia sp.
Pumpkin
 Pumpkins, the source of many a young girl's daydreams. Turns into a carriage, takes you to the ball, something about glass slippers and a happy ending! As a young girl, and even as a not so young girl, I was never one for the whole Cinderella thing, but I too had dreams of pumpkins! Well, more specifically, my Mum's pumpkin soup! The secret ingredient to this oft imitated, never duplicated soup, was home grown pumpkinney goodness (or ginger, I can't quite remember). So now you too can grow your own giant orange balls of tastiness!
Planting Schedule
Warm Areas: All Year Round!
Temperate Areas: After last frost in winter
Cool to Cold Areas: After last frost in winter
Position, Position, Position!
The biggest thing to remember about pumpkins is that they LOVE space, and I reckon that each vine needs about 1m². So, here's a hot tip: find a sunny spot out of the way a bit (like the forgotten side of the house or shed), pile up some compost, whack in two vines and walk away. Pumpkins like their privacy, and can suffer a bit if they are trod on, cut or damaged.

Talking Dirty
Growing pumpkins is so easy, even my evil stepsisters can manage it (that's a joke by the way!). Pumpkins love compost, I mean they really love compost. That's why you'll often find a pumpkin vine growing out of old compost piles. So, the more compost the better! Pumpkins vines will root where they come into contact with the ground, and this should be encouraged as it produces more pumpkins and stronger plants.
Feed Me!
If you have planted your pumpkins in a nice, rich, compost filled Yummy Yard, there is absolutely no need to feed!
What about the Water?
The other thing that pumpkins love, in addition to compost and space, is a moist, well-drained soil. Soil with a high compost content will retain moisture, as will a nice mulch layer. Now, before you go nuts on the end of the hose, use your moisture sensor! What do you mean you don't have one? Your pointer finger is the greatest moisture sensor in the world... and most of us have two of those. Stick your chosen finger in the soil, and remove. Is it damp, and is there dirt stuck to your finger? If yes, it doesn't need a drink. If no, read on! Water in the morning, to avoid water on the foliage as the temperature cools down, and never, ever, ever water pumpkin with greywater!
Are We There Yet?
Pumpkins, depending on the variety, take between 70 - 120 days to mature, which is a bloody, long time, but totally worth the wait! You can tell when a pumpkin is ripe when you give it a knock on the side, and it sounds hollow. The skin should feel hard and the tendril closest to the fruit should be dead. When removing the pumpkin from the vine, be sure to keep about 5cm of stalk on top.
If you don't plan on chowing down or carving up your pumpkin straight away, I recommend "curing" it by sitting it in the sun for a while (about a week), and then storing it in a cool, dark (but not damp) place. Well-cured pumpkins can last for up to ten months.
Pests and the Rest
A common problem with pumpkins isn't so much a pest issue, but a pollination problem. For years I grew pumpkins with magic vines, but no real fruit. The problem was that small fruits would form, go yellow, and fall off. I overcame this with hand-pollination! The trick is to pick the boy flowers (the ones without the tell-tale bump at the base), take the petals off, and lightly rub the pollen on the sticky bits of the female flowers.
As for real pests - well, there's not much, but keep an eye on fuzzy mildews (like Powdery Mildew or Downy Mildew). Have a read of those two factsheets should these little fungal nasties appear!

Hot Tip
Don't grow pumpkins in the same patch as tomatoes or potatoes, 'cos they just don't get along! Also, crop rotation is a big deal, so wait two years after planting other members of the pumpkin family (including cucumbers, melons, squashes and zucchinis) before you whack in your pumpkins. This just helps cut down the risk of disease and bad stuff happening to your pumpkin patch.
Eat me!
Pumpkin Curry
This is the ultimate in kinship. This sauce and pumpkin go together so well that you’ll pass this recipe on through the generations.
Preheat oven and bake the pumpkin while the sauce cooks. Wash and cook some jasmine rice too. Cut up and stir fry a few greens to complement it if you so desire.
Pumpkin Curry Sauce
1 onion
1 tbsp vegetable or peanut oil
1 clove garlic
2 cm knob ginger
½ butternut pumpkin or about 500g other pumpkin
1 can coconut cream or milk
1 tsp garam masala
2 chopped chilies
juice of half lemon or lime
1 star anise
1 tsp brown or palm sugar
1 tsp soy or fish sauce
Preheat oven to 200°C
Prepare rice and place it on to cook. (The absorption method is best)
Peel pumpkin. Cut into small chunks. Place pumpkin on greased baking trays and bake until tender. (Will take approximately as long as the rice and the sauce or 25-30 minutes).
Finely dice onion and chilies.
Crush garlic and grate ginger.
Heat oil in small saucepan over medium heat. Cook onion until soft.
Add garlic, ginger, chilies and garam masala. Stir for 1 minute until fragrant.
Add remaining ingredients and bring to boil. Turn heat to low and simmer gently until rice is cooked and pumpkin tender. However, the sauce will thicken quite a lot, so keep an eye on it.
When sauce is the thickness you desire, or the rest of the meal is ready, turn the sauce off. Allow to sit for a few minutes.
In this time, you could stirfry some greens. A green salad with Asian inspired dressing also goes well with this dish.
Remove star anise from sauce. Taste sauce and season if necessary.
Place pumpkin on top of rice and ladle the curry sauce on top. Serve by itself or alongside your greens.
